How To Increase Track Volume In GarageBand
Oct 24, 2022
I am going to teach you how to increase track volume in GarageBand. There are a variety of ways that you can increase and decrease the track volume in GarageBand.
If you're producing and creating music it's important for you to understand the difference why you might want to increase the track fader vs doing a track volume automation. I'll unpack all the methods of volume in GarageBand so there is no confusion.

Beside the very specific ways to increase volume in GarageBand, I also want to teach you about the topic of Gain.
This is something similar to volume and is commonly confused for beginner producers in GarageBand. We'll talk about how you might want to increase the gain vs increasing the volume. On the other hand, I will mention the perception of volume as well which is something you should consider when you're producing a song.
The three most important ways to increase track volume in GarageBand that we will discuss are:
-
Using the track fader
-
Doing a volume automation
-
Using the master volume fader
Increasing Volume With Track Fader
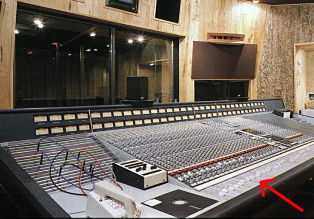
This is my go to and preferred method for quickly increasing the track volume in GarageBand. Every track will have something called a "fader". This is reminiscent of the actual physical faders that you would see in an analog style studio. Specifically, on an old SSL desk. Take note of an old SSL mixing desk below. I point of the volume faders with an arrow.
In GarageBand, we have similar track faders. However, they are sorted in vertical order. This is what volume faders look like on a song production in GarageBand with many tracks:
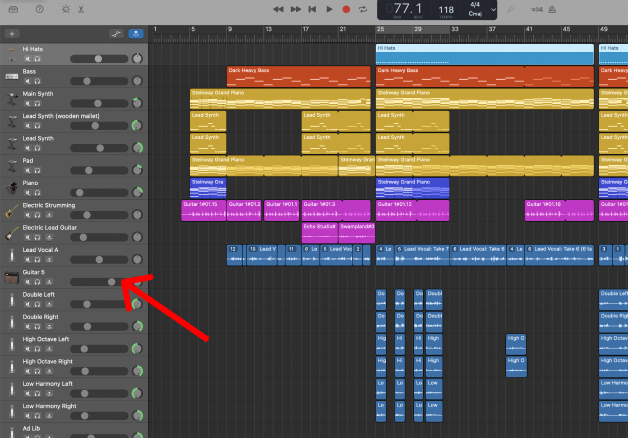
Notice in the image above that we have multiple volume faders.
The arrow is pointing to the volume fader for the Guitar track. Also take notice that all the faders have different positions. Some faders have moved more to the right. This means the mixer have increased the volume. Some faders are more to the left. This means the mixer has decreased their volume.
For example, the track at the bottom Low Harmony Right is very low in volume and it's easy to see because the volume fader is very close to the left. On the other hand, the guitar track (which the arrow is pointing towards) is loud in volume since the fader is more to the right.

If you're wondering how to increase the volume of a specific track. The easiest way to do so is by moving the volume fader to the right. If you want to decrease the volume, move it to the left.
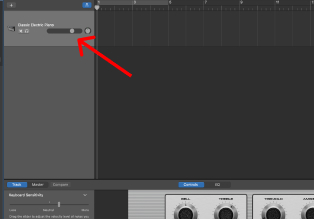
When you first start an empty project in GarageBand, you won't see many volume faders and that's normal because you haven't added any tracks yet. Take note of the image below, we see a Classic Electric Piano track with its respective volume fader. This is the default track you get when you open a software instrument in GarageBand.
Once you start adding more tracks, you'll have more volume faders.
Moving the volume faders left and right (or up and down) is the most powerful tool you have to making your song sound more professional.
This is the biggest tool you leverage when you are mixing a song. Typically, you would choose a priority instrument in your song, let's say it's the lead vocal. You would "mix" the volume of all other tracks around the lead vocal so that they are balanced well together.
Increasing Volume With A Volume Automation
The second way to increase volume in GarageBand is by doing a volume automation. This is a more intermediate or advance technique but it's necessary to get comfortable with if you're considering making great music that has excitement and dynamics. One of the biggest ways to achieve dynamics in your songs is by using automation.
What Is Volume Automation?
When you think of the word "automation", what do you think of? I think of something being automated. Like you automate a robot to make you a sandwich. Once you code that into the robot, they'll make you a sandwich. Nothing else. Or like an automatic car. There is no gear shifting. It's done "automatically" for you.
The same goes for automating tasks in GarageBand. We can automate the volume of a track to increase over time. Let's dive into an example.
Let's go through an example of increasing the volume of a guitar track during the chorus section.
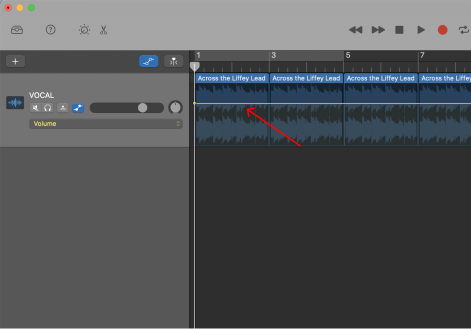
Step 1
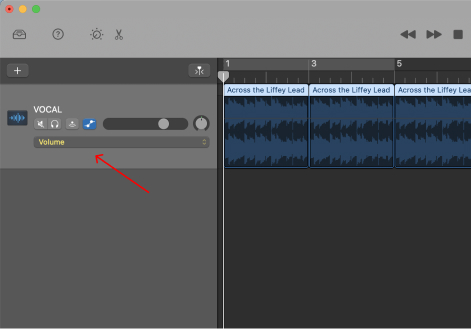
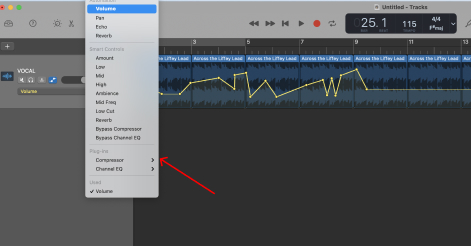
Press "A" on your computer keyboard to get this view in GarageBand. Notice that "volume" drop down box.

Step 2
Click on your audio track to generate a yellow line. This line represents your volume. If you increase the line, the volume will increase, if you decrease the line, the volume will decrease.
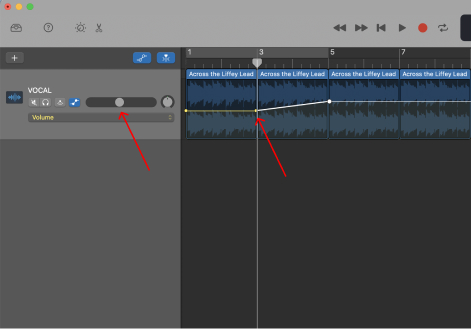
Step 3
Click on the yellow line to generate dots. This dots allow you to create shapes to increase or decrease the volume. Take note of the image below. Notice there are 3 dots on the yellow line. One at the beginning, one in the middle, and one near the end. On the last dot, I am clicking and dragging up on the yellow line to create a slope. This slope represents an increase in volume while the track is being played.

Let's dig into a little further to cement your understanding. Take note of the image below. Notice the yellow dot on bar 3. Now take a look at the volume fader on the track. It's representative of the volume with respect to the yellow line. Now, take a look at the next image.
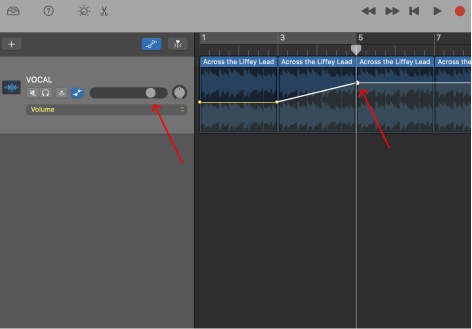
Look at the volume fader now. Notice how it has increased from the previous image. That means that when your guitar track is being played the volume will automatically increase from bar 3 to bar 5. You just created an automation!

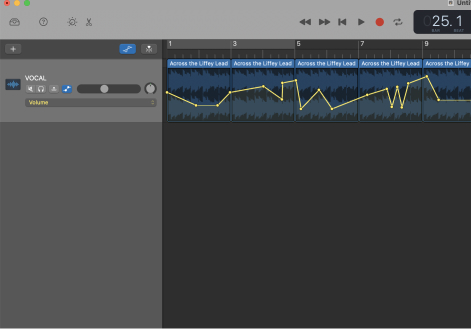
You can get really creative with your volume automations in GarageBand to increase or decrease volume. You can do anything you want. You don't have to limit yourself †o simple slopes like we did in this example. You can have the volume increase in certain sections, decrease, or slowly increase or decrease over time. Whatever you want! Look at how crazy the volume automation in the image below.
Taking automation in GarageBand even further. You can automate anything you want. Not just volume. You can automate EQ, Reverb, Delay, anything! Just click the drop down box and choose what you would like to automate. If I'm making a beat in GarageBand I often like to automate the EQ to give it that "underwater" effect.
Apply the same process as you did with volume automation. That's it. If you want to learn more about automation here is great video tutorial on how to use automation in Logic Pro. It's still very applicable to GarageBand users.

Increasing Volume With The Master Fader
You can increase the volume of your entire GarageBand session by using the master fader. The master fader is located in the top control bar. Take note of the image below.
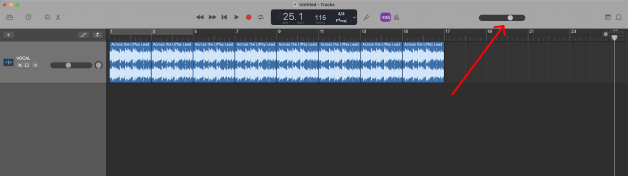
Just like a track volume fader, the master fader works exactly the same. Moving it to the right will increase the volume. Moving it to the left will decrease the volume. However, keep in mind, you are increasing or decreasing the volume of all tracks in your GarageBand session.
I never move the master fader to increase volume. Instead, I increase the volume on my speakers. This means physically going to your audio interface and turning up the volume knob. I recommend you do the same. I wouldn't get into the habit of moving the master fader because this could create future problems when you are ready to master your song. If you're curious to learn about mastering, watch this video tutorial on how to master a song.
Of course, if you need a little boost temporarily, it's fine to turn the master volume fader up or down. However, get into the habit of using your audio interface to turn up and down the volume.
Is Gain Different Than Volume
Gain is a tool that we can also use to increase volume in GarageBand. Technically speaking, gain does the same thing as volume. It increase the decibel output. However, it's nice to use gain and volume together to create interesting production effects.
If you've ever played guitar you may have noticed a "gain" knob on the amp. This is a great example to discuss how gain and volume can work together. Essentially, you can increase the gain on a track to apply more amplification and this sometimes adds more distortion to the track. Once you like the sound of the distorted track, you can lower that in volume. In a nutshell, you have a distorted track but it's still soft in volume. That's how gain and volume work together.
Throughout your journey as a music producer in GarageBand you're going to see gain a lot in all the plugins you use. There are multiple ways we can add and reduce gain. I won't get into all the ways in this post. The key thing to remember is, you can use gain and volume together. You don't have to use just one.

Perception Of Volume Increase
Did you know to make something louder you don't actually have to increase the volume? Weird, right? Yes, it is, but it's true. If you want something to be louder in volume you can also turn something down around it so the desired track you want louder is perceived to be louder.
For example, let's say you have bass track and a drum track. You want the bas to be louder so that obvious thing to do is increase the volume of the bass, right? Well, yes, you can do that. However, you can also decrease the volume of the drum track. Now the bass is louder.
This is a practice you should get good at if you'd like to become a mixing engineer. Volume is not always about pushing the faders and getting the loudest of each track. It's about finding the right balance between all track and this means you should be decreasing volume as well, not just increasing.
Final Thoughts On Increasing Volume
Getting loud mixes is all the rage in today's modern world and I get that. I also like to produce my music to be loud so it can compete with all other songs on the internet. However, I always try to create my music with dynamic and excitement by using the lessons taught in this post. I'd love to help you on your music journey in GarageBand too. I suggest getting my 5 free steps on learning GarageBand faster.


