How To Change Pitch In GarageBand
Oct 27, 2022
In this post, I'm going to teach you how to change pitch in GarageBand. By far, GarageBand is my favourite of all the free digital audio workstations there are out there. It gives you everything you need to get started creating and producing professional music without overloading you with a software that might make it difficult to learn.
However, even though GarageBand is simple and easy to use, it still packs a lot of useful features under the hood. A lot of great features you might not even know about.
I show you these features in my 5 free steps to learning GarageBand faster. One of these powerful features is learning how to change pitch.

Learning how to change pitch will open up new creative doors while you're producing in GarageBand. It gives you the flexibility to change keys so you can record a vocal more comfortably. On the other hand, you can freely drag and drop audio samples in and change their pitch to work with your song. Changing pitch is one of the tools producers use on a daily basis.
In this post, I'm going to show you two different ways that you can change pitch in GarageBand. Both get the same result. They are:
-
Changing Pitch Shortcut Method
-
Changing Pitch Flex Method
By the way, I will let you know in each section, my suggested method for audio and midi.
Getting Started
Let's get started by opening up a new project in GarageBand and adding an audio track.
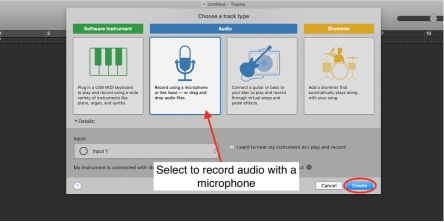
The audio track can be a vocal, guitar, saxophone, whatever you like. When we're changing pitch in GarageBand, it doesn't matter what the audio is. Therefore, go ahead and record your own bit of audio to get started.

If you'd prefer to use an audio sample. For instance, let's say you want to drag and drop a sample using the Splice library or even if you want to drag in an audio sample form the GarageBand loop library. That's fine. Whatever it is, we need to get a piece of audio first so we can pitch it.


If you're not familiar with Splice. This is what it looks like below. You can get hundreds of Samples to use in your GarageBand projects. Here is a video I made on making a full song with Splice sounds. Another great sound library that I use on a regular basis is Arcade.

Changing Pitch Shortcut Method
This is the method I usually use in GarageBand. It's the same method you would use to change pitch in Logic Pro as well. That's the great thing about upgrading to Logic Pro eventually from GarageBand. The shortcuts and most of the workflows remain the same.
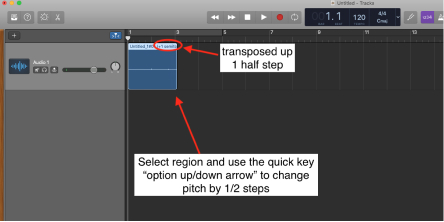
Step 1
Select the audio file and use the quick key ⌥ ↓ or ↑ to change pitch (option up or down). Take note of the image below. Notice the positive (+) or negative (-) numbers that show up in the audio region. This is letting you know how much you've pitched or transposed the audio up or dow.
That's it. You now know how to change pitch in GarageBand. Yes, it's that easy. It also gets easier, you can pitch the audio up or down quickly by octaves as well. Keep reading below.

Pitching The Audio By Octaves
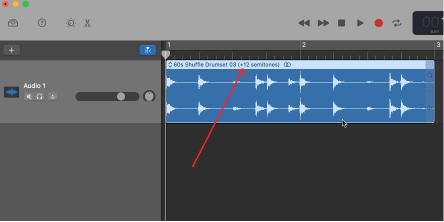
By using the same method above, holding the ⌥ ↓ or ↑ keys to pitch the audio. We can add the shift key to pitch the audio up or down 12 semi-tones. In other words, pitching an octave up or down. The shortcut is ⇧⌥↓ or ↑. Which in plain english means shift+option up or down.
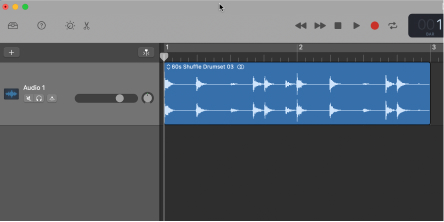
Let's say we want to pitch this 60s Shuffle Drum set below by an octave up.
By holding ⇧⌥ ↑ we will get this:
What About With MIDI?
The same exact method words with MIDI. Simply follow the same steps as above either by pitching one semi-tone at a time or complete octaves.
Changing Pitch Flex Method
Step 1
Once you have your audio recorded, open up the audio editor using the quick key “E” or clicking on the scissors icon in the top left. Take note of the image below.


Step 2
Make sure flex is enabled. The icon looks like a ribbon. Take note of the image below where I point it out with an arrow. Click the checkmark on the box that says “Follow Tempo and Pitch” in the bottom left corner. Then use the “transpose” slider to transpose the pitch of the audio region by a number of half steps.
Think of using the slider as the same method of pitching the audio in the section above.

If you'd like to use autotune as well to change the pitch of a vocal track. Then change from “region” to “track” in the editor window. Take note of the image below.

If you'd like to have the pitch correction work more aggressively, you'll need to move the slide more to the right side. This is going to make your voice sound like it will have auto-tune on it. It should be easily noticeable. For less autotune, slide the pitch correction to the left.

By the way, when you're using autotune in GarageBand, you should feel free not only to use it on vocals but on any type of audio track. Try it on your acoustic or electric guitars too. It might not always sound good but then again, maybe you're onto something cool. That's my favourite part about creating music, there are no wrong ways to do something. Heck, even try it if you're making a beat in GarageBand. Often crazy ideas get to crazy results!

What About Using This Method With MIDI?
You can use this with MIDI. However, there is no pitch correction or autotune with MIDI in GarageBand. Take note of the image below. In GarageBand, we're still giving the Transpose Slider. Very similar to how it looked in the audio file editor.

However, you'll notice from the image above that we don't have the pitch correction or autotune option.
Final Thoughts On Changing Pitch In GarageBand
Learning how to change pitch in GarageBand is going to level you up as a music producer. It's another tool that you'll have on your production tool belt. I'd also like to help you increase your productivity and tools in GarageBand. If you liked this post and you're interested in learning more about GarageBand I suggest getting my 5 free pillars on learning GarageBand Faster.


