How To Master In Logic Pro
Mar 22, 2022
Mastering is the final phase of the music production process that aims to make a song absolutely complete and ready for distribution. Although it requires creativity to some degree, it is highly technical and demands a specialist with extremely precise hearing capabilities. Even the best producers in the industry will invariably not master their own productions.
However, most producers who are near complete the mixing phase in Logic will want to do some rough mastering themselves in order to demonstrate their mix as a near-finished product. Therefore, it is important for producers of any level to understand the mastering process. In this article we will discuss some of the processes involved in mastering and how to use them.

If you would rather learn how to master in logic by watching a video instead, then you can do so here:
Headroom
It is good practice to make sure you have sufficient headroom in your mix down file before you start mastering. Many mastering engineers will recommend having no peaks above around -6 dBFS. This will give you plenty of room to start applying compression, EQ and other processors, without too much risk of clipping.
If you find your mix is too loud, you can turn all your faders down to achieve the correct headroom (if you are applying mastering within the same production project). If you do this, be aware of any tracks with automation as these will not behave the same as the other faders.
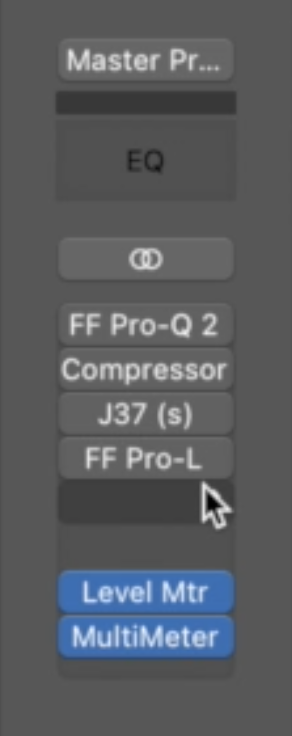
Mastering Chain Overview
Here is an example of a chain that you could use for your mastering process. We will talk about each plugin seen in the picture, which include the following:
-
FabFilter Pro-Q
-
Logic Pro Compressor
-
Waves J37
-
FabFilter Pro-L
-
Logic Pro Level Meter
-
Logic Pro MultiMeter
Here's an example of what it could look like in Logic Pro:
EQ
The changes that we make using EQ on the master bus will be every subtle. The aim is to create an overall EQ profile that will be pleasant to listen to rather than focussing too much on specific frequencies. Below is an image of an EQ shape that could be useful for some mastering purposes.
I wouldn't recommend placing this EQ on every master and assume it will be fine, this is just an example of an EQ that could add flavour. Here is a great video on how to use EQ in Logic Pro.
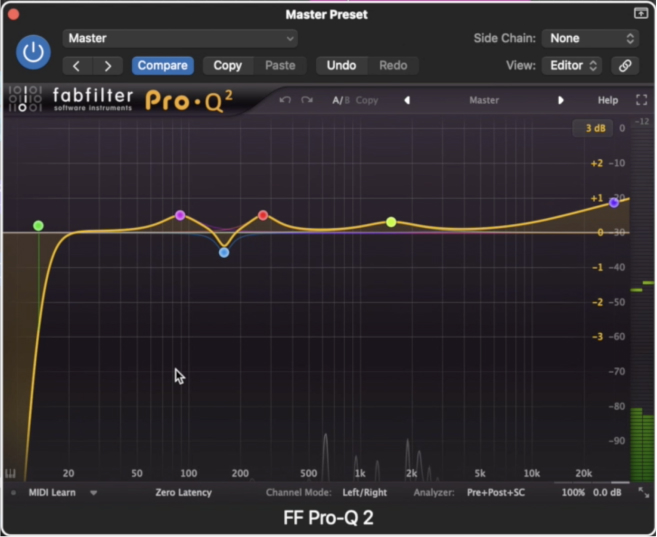
Low Cut ~ 20 Hz - A low cut is necessary to remove any frequencies that are not audible but can create muddiness / other problems in your song.
Low End Boost ~ 100 Hz - In some situations, a boost of this kind may bring out some of the bass in your song. You can experiment with this yourself and try out using a shelf as opposed to a bell for different results.
Low Mid Cut ~ 160 Hz - You may find some mud in this region, especially if you have applied a low and boost.
Low Mid Boost ~ 300 Hz - Boosting this region in the song used in the video gave the vocal more warmth in a pleasant way.
Upper Midrange Boost ~ 1.5 kHz - This area is where the intelligibility of the vocal is usually present and boosting it can sometimes bring out the emotion of a vocal (but too much becomes tinny). For the song in used in the video however, you will see that it did not make much difference so it was ultimately disabled.
High Shelf ~ 20 kHz - Sometimes boosting this region is a great way to bring out some brightness and air in a production. As you will see from the video however, it did not make a huge difference but also wasn't hurting the song.

Compressor
Compression is a good way to add some glue to your master and control some of the dynamics.
Generally, it is advisable to use a low ratio; anywhere between 1.5:1 and 4:1. You can then experiment adjust the threshold, aiming for between -0.5 dB and -3 dB gain reduction. It is also worth adjusting your attack and release times, as different settings will make for different compression characteristics. Below is an image of the compression settings used in the video:
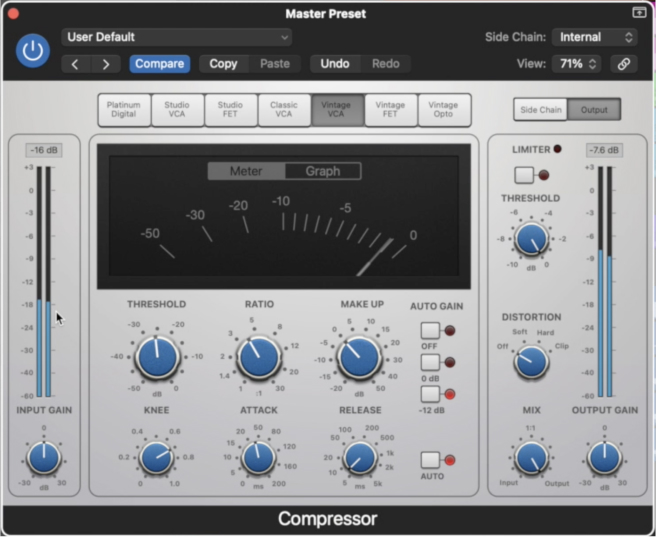
As you can see from the image, the ratio is not too high (around 4:1), the attack time is fast without being over the top, and the release time is considerably fast. Gain reduction is somewhere between -1 and -3 dB. This gave the mix a lively, crunchy sound. It is also worth noting that the auto release button is turned on, which will give the release a more natural / transparent feel.
Note: As you can see from the image, the EQ is set to display increments of 1 dB so while the adjustments may look big, they are only boosting / cutting by a tiny amount.
Tape Emulation
Tape emulation plugins can be a great way to add some additional crunch to your master. The Waves J37 is a popular choice among many producers. Below is a picture of the settings tried in the video:

As you will see in my how to master a song in Logic Pro video, I disabled the tape emulation plugin because I didn't think it provided any value.
Limiter
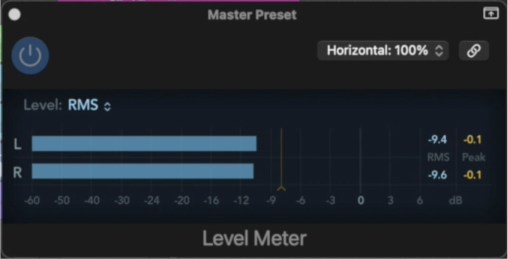
A limiter is the final processor used in a mastering chain. It is at this point that you bring your song up to the desired loudness, using a limiter in conjunction with a loudness meter (such as Logic’s Level Meter).
A good ballpark loudness target to aim for is -8 dB RMS. To achieve this, you can adjust the gain parameter in your chosen limiter while keeping an eye on the Level Meter until you see the meter registering at -8 dB. Below is an image of the FabFilter Pro-L. This is a very popular limiter plugin and I use it on almost all my mixes that I produce in Logic Pro.

Tip: It is sometimes recommended to set your output level to -0.1 dB just to be sure that no clipping will occur after the limiter.
Furthermore, you can also make adjustments to the other plugins in your chain such as the compressor, EQ, or tape plugin in order to effect the loudness. Below is and image of Logic’s Level Meter set to RMS mode, showing a loudness close to the correct value of -8 RMS:

Final Thoughts On Mastering
With streaming services making use loudness matching algorithms, the benefit of having overly loud masters is becoming diminished. Not only does it kill the dynamics of your music, but it may cause your song to be turned down by the algorithm.
If you are ever in doubt as to if your song is the correct loudness for streaming, you can upload it to a free platform called Loudness Penalty. This will give you an indication of how much your song could be turned down based on its loudness.
Overall, you should be listening to your master in different environments too. For example, your phone, laptop speakers, car speakers, a cheap bluetooth speaks. This should be in reference to your mix and master that you are creating on your speakers and headphones.
If you're looking to become a professional mastering engineer then buckle up. It will takes years of practice to finely tune your ears. I believe in you though and I think you can do it. If you'd like to learn more about Logic Pro, songwriting, production, mixing, and mastering then I recommend checking out my free 6 pillars on learning Logic Pro Faster.


