How To Mix In Logic Pro
Jul 26, 2022
There’s so much to cover when it comes to learning how to mix in Logic Pro and it may seem daunting.
In order to learn mixing in bite sized chunks. I'd like to break down this post into 6 essential sections. If you'd prefer to get more specific on vocals then here is a detailed post on how to mix vocals in Logic Pro. I also created a video on mixing vocals too if you'd prefer.

Here are the six mixing areas I'd like to cover:
- Mixing Set Up
- Levelling (Volume)
- EQ
- Compression
- Stereo Imaging
- Other Mixing Effects
Set Up
Before diving into the mixing process, you’ll want to consider how to set up your session for the best workflow. Creating a template with all the buses and plugins you like ready-to-go is a great way to save time.
Here are some tips to help create a template for mixing:
- Make sure your session is organized by using summing folders for instruments/vocals that go together. Use the quick key “Command Shift D” to create a track stack.

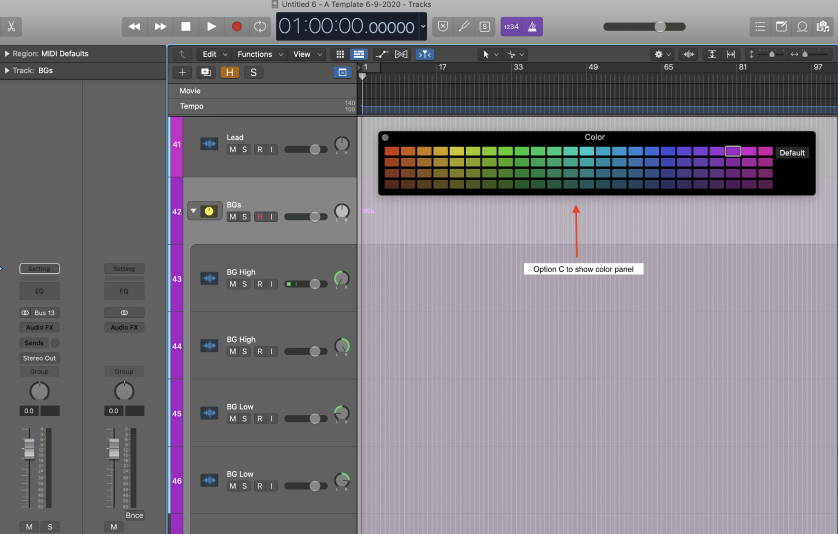
Show the colour panel using the quick key “option c” to colour code your tracks by selecting a colour while a track is highlighted.
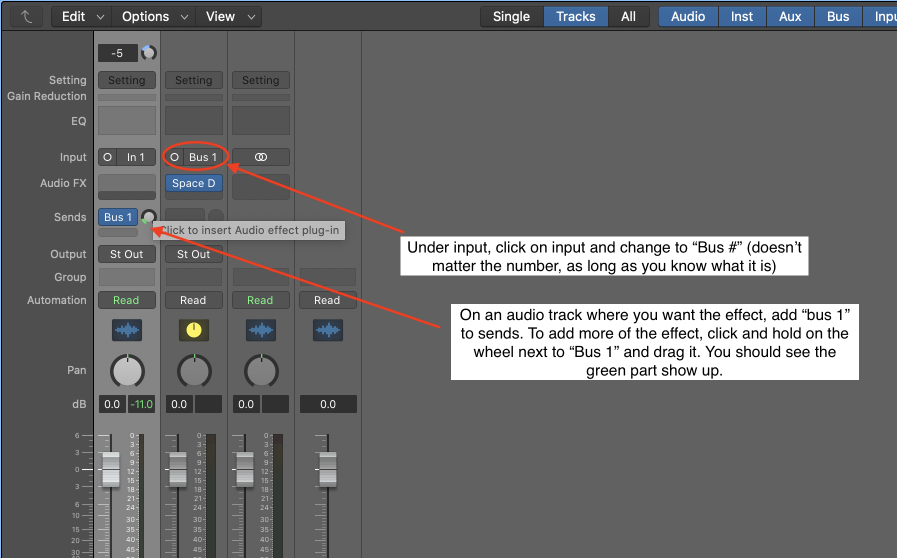
You should also consider creating buses for your reverbs and delays by opening the mixer (using key command “x”), going to:
Options > Create New Auxiliary Channel Strip

Now we can add a reverb. For example, let's add the stock reverb plugin in Logic called Space Designer Reverb.

Now we can properly set up the routing in our mixer and apply the appropriate amount of "send" to our aux track. Remember, if this sounds gibberish to you then you might find it easier to learn with a real example. Here is a video tutorial on bussing in Logic Pro.
Creating busses for your mix session will make you work more productively. Using bus tracks properly can also help your song glue together. If you're just a beginner to Logic Pro then wrapping your head around bus tracks can be difficult. I've posted a video tutorial above but here is another another great beginner tutorial on bussing in Logic Pro.

Levels (Volume)
To make sure all your sounds are the right loudness, use a reference track of an existing song that you want your mix to sound similar to.
When you import your reference, sound match the reference to your track so that they’re at the same dB level. For instance, if you get a song from Youtube or an MP3 track, it's most likely mastered which means when you play it in Logic, it's going to sound much louder. Therefore, gain match means make sure your mix and the reference track are the same level of loudness.
Then you can compare how your mix sounds with the reference. If you notice the bass in your song is way louder than the reference, that’s a good way to tell you need to turn down the bass.
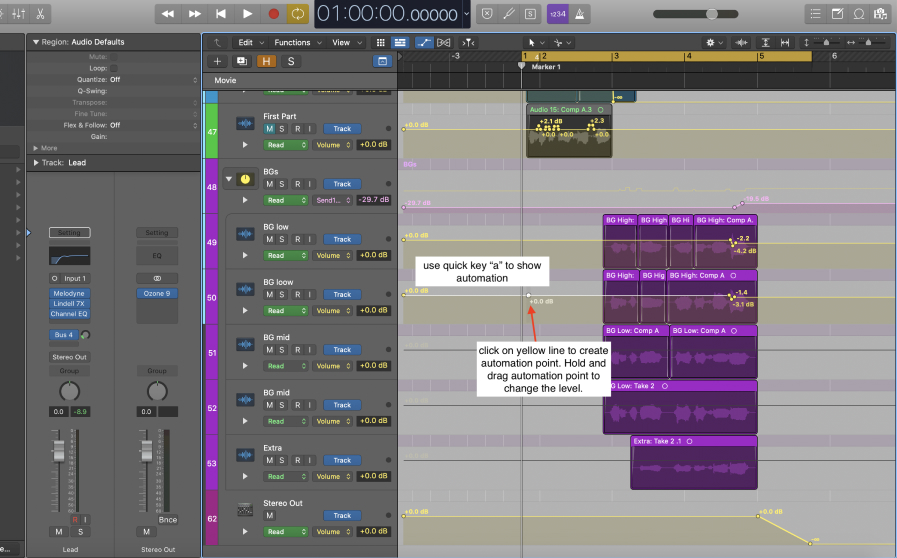
You can automate the volume of a track by using the quick key “a”.
Click on the faint yellow line to create and automation point and drag it to where you want it.
For example, if you want the drums to be quieter during the verses and louder during the chorus, this is an effective way to achieve those levels.
EQ
After you have everything at the right levels, the next step is EQ'ing.
EQ'ing cuts away and boosts frequencies to make sure everything is heard clearly in the mix. For example, if you have a bass and a kick drum, they likely will both have a lot of low frequencies. A common way to make the low end even punchier is to take away frequencies from the bass where you want your kick to take over and vice versa.
Here is an image of what the EQ in Logic Pro looks like:
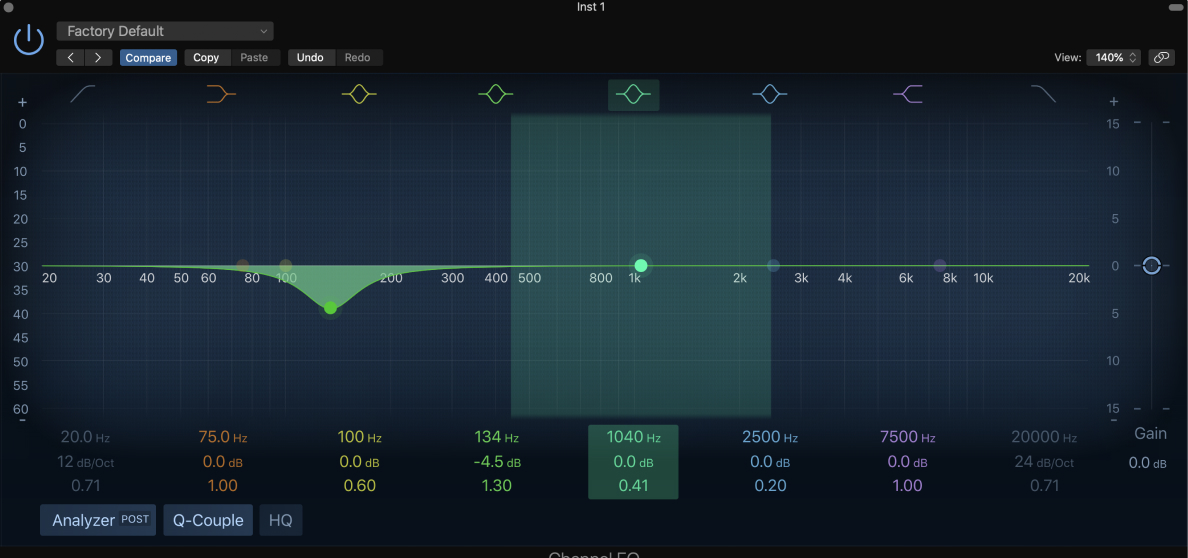
Learning how to EQ properly is by far the most difficult part to grasp while you're mixing.
This is because it involves listening and having "tuned ears". When you start making music, your ears are not necessarily tuned. This means that they are not aware of listening to individual frequencies. Overtime, as you being to EQ more instruments, your ears will begin to learn and be able to reference specific frequencies.
Don't be too hard on yourself at the beginning. EQ takes time to learn. That's all it is. Just time. Here is a great post on how to mix vocals in Logic Pro where I also talk about EQ'ing. Vocal frequencies are very broad so I can guarantee you will be EQ'ing your vocals. If you'd prefer a video tutorial where you can hear the frequencies then I recommend this video on how to mix vocals.
Compression
Compression helps smooth out levels of dynamic sounds by compressing peaks of a waveform that fall above a certain threshold.
The two most important knobs are the threshold and ratio.
The ratio knob controls the ratio it will be compressed. A higher ratio = more compression. The “threshold” knob defines the level at which the compressor will start compressing.
Every peak that falls above the threshold will get compressed and everything below the threshold won’t. So a lower threshold means more will get compressed.
This is what the default compressor looks like in Logic:
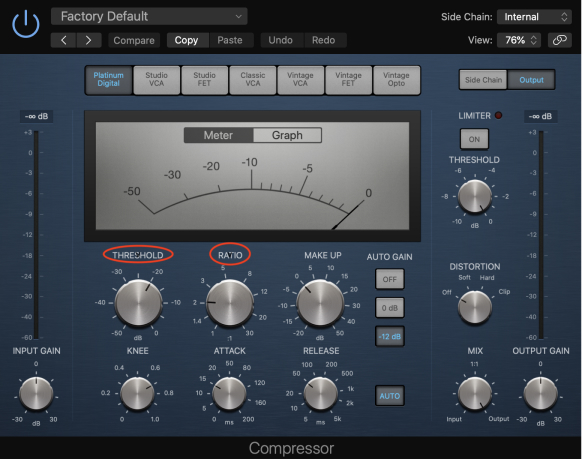
I feel like a bit of a broken record here but using compression will also take time to tune your ears to actually hear what you are doing. But what did you expect? We are making music after all!

Stereo Imaging
You can think of stereo imaging has the space between and space around your set of speakers.
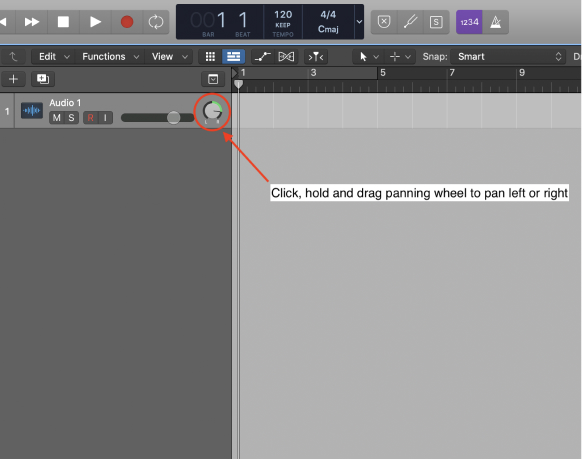
Take a look at your speakers. You have a left speaker and you have a right speaker. Therefore, we can move the sound to specially be only on the left side or only on the right side. This action is called panning.
Have you ever wanted to make your tracks sound wide Panning is one of the best ways to accomplish a wide mix.
Panning tracks left and right will create an ear-catching stereo image that feels spatial. You’ll want the left side to sound unique from the right side. Avoid panning instruments with a lot of low end, such as the kick or bass. You’ll also want to keep your lead vocal panned centre.
To pan, hold down the panning knob on a track and drag left or right.
Other Effects
There are plenty of other effects that can make your mix really stand out. Here is a list of some great plugins that I use on almost every mix that I work on. These plugins are all available for free in Logic Pro but there are also some great paid options as well. If plugin is a new word in your vocabulary then I think it's best to start with this post on how to add plugins in Logic Pro.
- Reverb
- Delay
- Distortion
- Chorus
Reverb
This is one of the stock reverb plugins in Logic Pro called the Space Designer reverb. There are a lot of great reverb presets that you can choose from if you're unsure on what reverb to add in in your song.
Reverb helps put your instrument or vocal in a space which allows the listener to properly digest the sound. As humans, we love reverb, and we need to understand where a sound is coming from. It gives us context and information. Without it, sound would be boring, and quite frankly useless.

Delay
Delay can be used to add width. Just like panning can. However, delay also has a spatial effect too. It's a great plugin to help "fill space" in your mix. Delays can be short or long too. If you have a short delay, you might not even notice it but if you have a long delay, you'll be sure to hear it.
We use delays in our mixes to give the listener context of space but also as production tool as well.
This is stock stereo delay in Logic. Remember when I was discussing stereo imaging? This delay has a separate left delay and right delay. It adds a super cool effect to any instrument you add it too.
Try it on any of your tracks to see if it helps glue into your mix more.

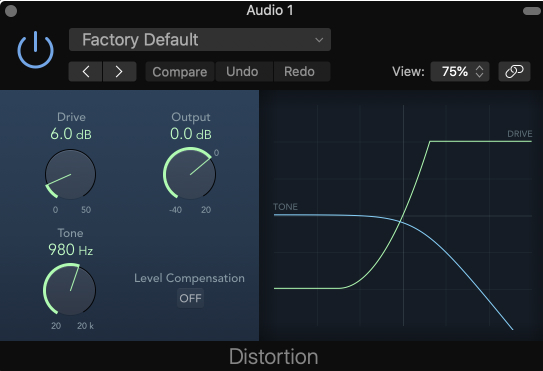
Distortion
Distortion is one of my favourite plugins to add in a mix. A distortion plugin allows for more harmonics in a specific track. Let's say we're recording a guitar track. If our guitar is not properly sitting in a mix then I would do a couple things to try first. I would compress the guitar to help level out the dynamics to help it be more consistent and noticeable.
Then I would add distortion to the guitar to give it more harmonics which will make it sound more interesting, which will make it pop out of the mix more.
This plugin below is the stock distortion plugin in Logic Pro. I like a lot of the stock plugins in Logic, however, when it comes to distortion I'm not a big fan of the stock plugins. I'd prefer to use something like the SoundToys Decapitator plugins which is paid. However, it's awesome and I use it on almost all my tracks. Drums, vocals, guitars, almost everything.
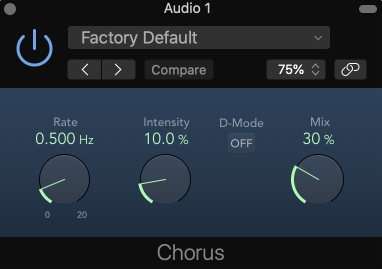
Chorus
A chorus plugin can some really cool dynamics to any track. I like to add it on a lead vocal sometimes or an acoustic guitar to help fill it out a bit. It's adding more width and depth which is a great mixing tool if something is clogging up the middle of your mix. Let's say you have a mono acoustic guitar track and it's fighting with the frequencies of your lead vocal and your mix is sound muddy.

Try adding a chorus plugin and this will help add width to your acoustic guitar. It's going to take away some of the frequencies in the middle and move them to the sides. Less clogging up the middle and fighting with your lead vocal.
This is the stock chorus plugin in Logic Pro which is quite good and I do use it regularly.
Conclusion
To be honest, this only scratches the surface of everything that goes into mixing in Logic Pro. I wanted this post to be high level, just to wet your feet a bit and hopefully it was able to provide some useful information to help you get started.
I would suggest watching this video which is a free mixing tutorial for beginners.
If you are a serious student and ready to take on a mixing course then I would highly suggest my mixing course where I go everything to the fine detail. I think the course is awesome but I'm likely a little bit biased.
Have fun mixing!


