How To Record Guitar In Logic Pro
Jun 08, 2022
If you’re an acoustic guitar master or know how to shred on the electric guitar but you're wondering how to learn recording the guitar in Logic Pro, then you’re in the right place! I'm going how you how to record guitar in Logic by teaching you the two fundamental ways. Each option below will both work if you'd like to record acoustic guitar or electric guitar.
1. Recording with a microphone
2. Recording directly into an audio interface
Let’s go through both from start to finish! But first we'll need to do a couple things to get set up.
Let's go!
By the way, if you prefer to learn how to record guitar in video format then be sure to check out my youtube video on how to record guitars in Logic Pro.

Step 1 - Setting Up
Create a new Logic Pro session and add two audio tracks.
If you're not familiar with recording audio in Logic Pro, don't worry, check out this video where I go through setting up audio tracks. Ok, so let's say you've added two new audio tracks now. The next thing we'll want to do is set a tempo for your recording.
You can set the tempo on the top control bar in Logic Pro. Once you've set the tempo, be sure to have your metronome on. If the metronome is purple then it is on. See the image below where I have two audio tracks, tempo set, and metronome is on. My tempo is set to 140 bpm which is a fast tempo, you can set your tempo at any bpm you'd like. If this is the first time you're hearing about BPM then be sure to check out this wiki article so you learn what bpm is.

You can totally record without a tempo. However, if you’re adding more instruments to your song down the road, then it will be much easier to record with a tempo. I personally recommend recording your guitar with a tempo. Whether it's acoustic or electric, it's really important that the recordings are "in time".
Tip: For an industry-standard recording, make sure your sample rate is at 48 kHz (unless you are collaborating with someone who works in 44.1). You can find the sample rate of your project by going to:
File > Project Settings > Audio > Sample Rate

Once we have our audio tracks added, our metronome on, we've chosen a tempo and a sample rate then we are ready to starting recording guitar. Acoustic guitar or electric guitar, the choice is yours! I'll leave that to you. If you'd like to record an acoustic guitar with a microphone then you can skip to Option 2. If you'd' like to record an electric guitar with your audio interface then keep reading Option 1.
Option 1 - Recording Guitar Using An Audio Interface
If you have an electric guitar or an acoustic guitar that has a DI, you can record directly into Logic Pro.
What is a DI you ask?
Good question, I won't get into right now but here is a great article that explains what a DI is.
Moving on, with an audio interface and 1/4 cable. Think of 1/4 cable as a regular guitar patch cord. This is an example. You should be able to plug and play right away. However, your interface may only have an XLR input. It really will depend on your audio interface. However, most modern audio interface will allow you to plug-in a 1/4 inch cable. For instance any of the Focusrite audio interfaced or Apollo interfaces allow both XLR inputs and 1/4 inputs.
If you’re choosing direct input with your acoustic guitar or electric guitar then it’s recommended you have a DI box. It's important because this converts the unbalanced, high impedance signal to a low impedance signal that your system is designed to handle.
Depending on what audio interface you have, check to see if a DI box is required.
You can of course record without a DI box and often times I do if I want to record something quickly. But if I'm in a recording session where I'm truly trying to get the best quality and the right take, then I will use a DI to make sure everything runs smoothly.
Tip: You also have the option to use the built in amp designer and pedalboards in Logic Pro that emulate vintage and modern guitar amps. Some of them sound really nice and I use them on a lot of my productions. You can the amp designer or the pedalboard as a plugin on the channel strip in the inspector window, here's a post where I talk about adding plugins in Logic Pro.
When you have your acoustic or electric guitar plugged into your audio interface then you are one step closer to recording. Meet us in the below section. Connect Your Audio Interface ↓

Option 2 - Recording Guitar With A Microphone
If you’re mic'ing up an acoustic guitar then I recommend using a condenser or ribbon microphone. The reason being is both these types of microphones will capture the intricate sound of an acoustic guitar. Think of the finger picking, the plucking, strum muting, and all the specific and wonderful sounds that are created from an acoustic guitar. We want to make sure that we capture these wonderful sounds when we are recording. A great example of a condenser microphone is the AKG C214:

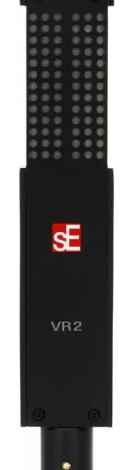
A good example of a ribbon microphone would be the Voodoo VR2. When it comes to ribbon microphones, they tend to be more expensive because the quality is very good.
If you’re mic'ing up an electric guitar then I recommend that you use a dynamic microphone. An example would be something like an SM57 which is an industry standard for mic'ing up electric guitars. Check out the image below. I'd be boggled if you told me that you've never seen this type of microphone before. If not, make sure to keep a close eye on the electric guitar amp when you see your next live show. I can almost guarantee the lead guitarist will be using an SM57 to mic up their guitar.

If your microphone is a condenser mic then it will likely require phantom power 48V. Make sure to red the mic's manual before since phantom power is very important. If you have an audio interface then you it should be able to supply phantom power to the microphone. Most standard mixing boards have this capability too. However, be careful if the microphone does not need phantom power. You could potentially damage a microphone, especially a ribbon microphone if you apply phantom power. When it doubt, read the manual. I know it's not fun, but it could save you a few bucks!
Tip: In general, only turn on and off phantom power when your microphone is plugged in, or you may bust your microphone!
Once you have plugged your audio interface into your computer and you've plugged your microphone into your interface, using an XLR cable. Then turn on phantom power (if needed). Make sure to do these steps in order. Once that is done, we are ready to record. If you're having trouble setting up your audio interface then here is a great video for you. I cover everything you need to know about working with you audio interface in Logic Pro.
Connect Your Audio Interface
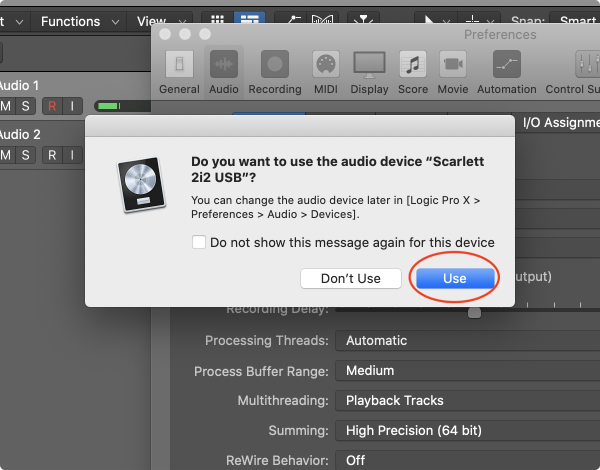
When you plug in your audio interface to Logic Pro, you should see a message pop up that asks you if you want to use this audio device. Select “use”, and your input and output will automatically change to your interface. This is an important step but it's okay if you accidentally press "don't use". Or if for some reason you don't see this notification below then keep reading. I'll teach you another way.
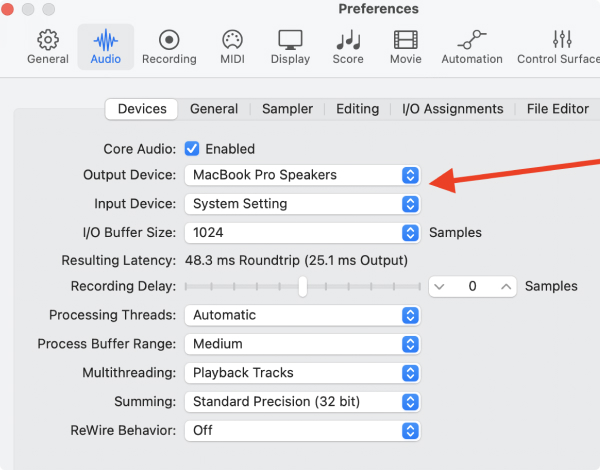
When you plug in your audio interface to your computer and you do not see this notification in Logic Pro then go here:
Logic Pro X > Preferences > Audio > Devices
This is where you can set you audio input and audio output devices manually.

Headphones For Recording Guitar
It's important that you record your guitar with headphones. However, you do not necessarily have to use headphones if you're recording directly with an audio interface. But, with a microphone it's essential that we record with headphones on. That is because we will be in the same room as the microphone and we do not want our metronome track being played through the speakers. If so, the microphone would record the metronome track. In our case, while recording with headphones on, the metronome will only be played in our ears.
Plug in your favourite pair of studio headphones into the headphone input on your audio interface. If you'd like to know some of my favourite headphones, here's a great post about headphones for mixing and mastering. Furthermore, make sure the volume knob is not completely set at 0. We want to be able to able to monitor our guitar on our audio tracks. If everything is set up correctly then at this point you should be able to hear your guitar being played through your headphones. If you're using an audio interface, you should be able to hear your guitar through your speakers or headphones. The choice is yours.
If you don't hear anything in your headphones then this could be because software monitoring is not on in your Logic Pro preferences. You can get there by going to:
Logic Pro > Preferences > Audio > General
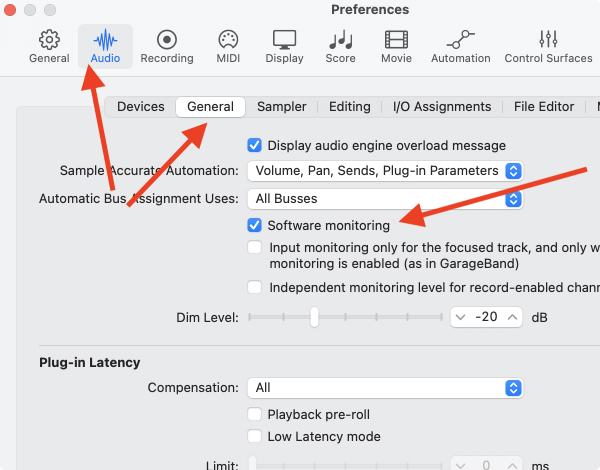
Once you check software monitoring on then you will be able to monitor (which essentially means 'hear') your guitar tracks through your headphones or speakers.
Still having problems not hearing anything?
If it's still not working then let's double check our channel input settings. This is different than your audio input and audio output device preferences. It's very important that the channel input on your audio track matches up with the channel input on your audio interface.
So, let's look an example.
On a typical home studio audio interface there would two channels. You can think of channels as being plugs. For instance, the number of plugs (inputs) the audio interface has on the front side of the device. Notice on the image below that the Focusrite Scarlett 4i4 interface has 2 channels. In other words, it has 2 plugs for microphones or instruments.
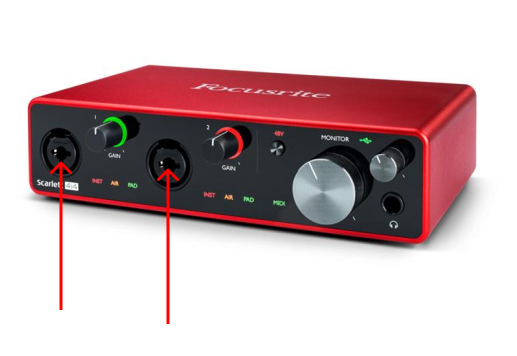
It's possible that your interface only has 1 channel. It's also very possible that your interface has 8 or 16 channels. The key to note here is the channels are numbered from left to right. Therefore the first arrow on the left of the above image is channel 1 and the arrow to the right is channel 2.
Now that you know what the channels are on your audio interface, let's take a look at them in Logic Pro.
The channel settings in Logic Pro are located in the inspector window on the selected audio track.
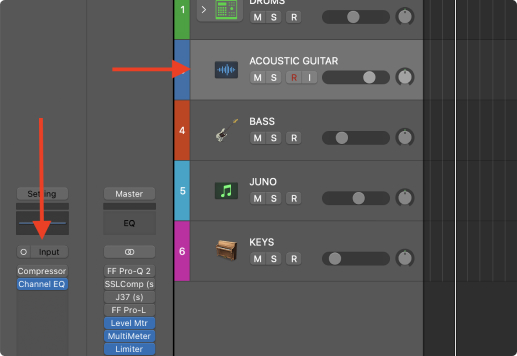
Now is the time we need to tell Logic where we plugged in your microphone or your guitar. Click "input" in the above image and choose the appropriate input.
You guessed it. If you plugged in your microphone on the furthest plug to the left on your audio interface then you would select input 1. If you plugged in your guitar to the second channel on your audio interface then you would choose input 2.

I've seen it a thousand times where my students are not sure why their recordings aren't working. They have everything setup correctly but they've forgot to double check their input settings. Often times you might not be thinking and plug in directly to channel 2 on your audio interface. However, if your audio track in Logic says input 1 then they will not match up. Logic Pro is a super sophisticated and smart software but it's not that smart. You still need to tell it what plug you are using.

You're Ready To Record Guitar
Once everything above is set up correctly you are finally ready to record.
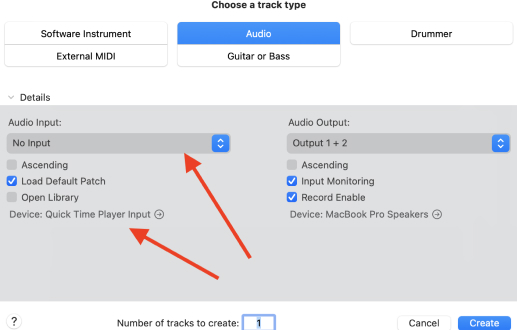
Trust my, I know it might seem like a lot of steps to finally get ready to record audio in Logic but the more times you do it, the faster it will become. Also, overtime, you'll start to notice different options to do setup tasks more quickly. Ah ha! Yes, there are more ways to do things than just one. I won't get into all of them here but I'll mention a small one that could speed things up for you. It happens when you first add an audio track. I'm talking about this window below:

Notice that you have options to change the audio channel settings and the audio output device settings. This theoretically will save you time by having to open up your Logic Pro preferences to change your audio input and output devices but it also saves you time from having to choose the right channel input in the audio track inspector window.
You'r going to find your own ways to make your sessions more productive too. All it takes is making more music Logic Pro. There's so many ways to do things and if you want to learn more about recording, Logic Pro, and music production, you should subscribe to my Youtube channel, you might like it! For example, here is a video on how to record the acoustic guitar.
Let's get back to recording audio now.
We're finally ready to record!
All we need to do now is make sure to click R on the audio track. This is a record enabled button. Now press R on our computer keyboard and boom, you will be recording your acoustic or electric guitar. Here's a good final checklist image of how things should be looking like on your end before you start recording your guitar:

Guitar Production Tips
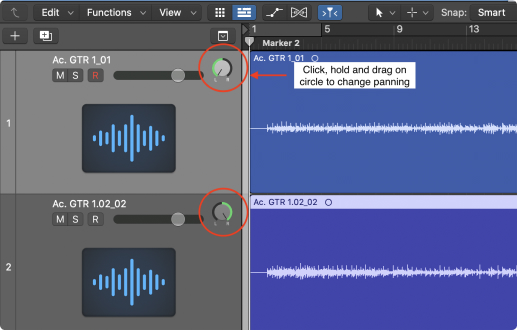
You might try some of these helpful guitar production tips. Whether it's for an acoustic or electric guitar. For example, if you'd like to record a more "full sounding" guitar than you could try double tracking your guitars and panning them far left and far right. After you finished recording, it should look something like this:

Make sure to not to make a copy of your initial recording. It's very important that if you are going to overlay two tracks on top of each other that they are different recordings. It's okay that they are playing the same parts, that's totally fine because they're still different. However, if you make a copy of a track and overlay the copies on each other, that will create volume and phasing issues. In a nutshell, it won't sound good and it will not give you the affect of a full sounding guitar that you'd originally want in the first place.
I also suggest adding two types of reverb to your acoustic guitar or electric guitar. I personally like using a small room reverb to put it in a room that the listener can digest but then I also like to add a large chamber reverb. Just a little bit. This will make the guitar sound really lush. This also really depends on the style, genre, and track you're producing.
Once you get the flow of recording guitar in Logic Pro, you’ll be able to focus on the most important part of the recording process which is capturing a killer guitar performance! After all, that’s the fun part! If you're looking to learn more about recording best practices and music production within Logic Pro then I suggest you get my free 6 pillars on learning Logic Pro faster.


