How To Make A Beat In Logic Pro
Aug 05, 2022
In this post, let's learn how to make a beat in Logic Pro. One of the biggest reasons I like Logic is that there are several ways to create beats.
By the way, when I am referring to beats, I'm specifically referring to drums. If you'd like to know how to make a beat from scratch from the perspective of an instrumental song that you could sell on, for instance, beat stars then you might prefer this video on how to create an indie songwriter song. Also, make sure to browse my youtube channel too, I have many other videos on how to make beats.

Let's dive into making beats in Logic Pro with the variety of tools that we have at our disposal. I want to teach you the three tools that I use regularly in my productions to make a beat:
- Drummer Tracks
- Programming with MIDI
- Step Sequencer
Some times, I will use all three as well, since, for instance, it's possible to start with drummer tracks and then convert them to midi tracks. Or vice versa with the step sequencer. The step sequencer was added to Logic Pro with their big 10.6 update. Here is a great video tutorial on how to make a beat with the step sequencer.
1. Drummer Tracks
Logic Pro has built-in features designed for quick access to great sounding drums. These tracks are yellow in colour and also a feature that is available in GarageBand. With these yellow drummer tracks, you can get up and running with a groovy beat in a matter of seconds. Let's talk about how you would do that below.
Step 1
In a blank Logic session, start by adding a new track. Navigate to the top menu:
Track > New Track
Choose a Drummer Track, as shown below, and then click Create.

Step 2
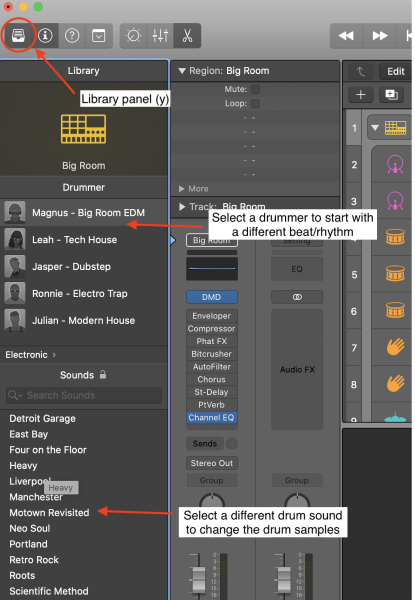
Open the instrument library. You can also click on the shortcut "Y" on your computer keyboard. In the Logic library instrument window, you can select which drummer and drum sounds you’d like. Each drummer has a slightly different style and vibe. Each drum set will also sound a bit different.
Start by choosing your dummer first.
What genre is the song you're producing? Electro? Indie? Trap? Rock?
You have many different options to choose from. Each "drummer" has their own name and style. Notice below, the Electro Trap drummer is Ronnie. If you make a mistake, you can always switch drummers later on.
After you choose your drummer, you'll want to choose your drum set. This is the sounds section in the left hand music library. Each drum set will sound a little different. However, the genre or drummer won't change. For example, if you choose Ronnie as your drummer, then you need to set Ronnie up with a drum set.
Some drum set examples are Detroit Garage, East Bay, Four on the Floor, and Heavy. Decide which drum set you'd like Ronnie to play. If you make a mistake here too, you can always change the drum set.
Step 3
Now that we've chosen our drummer and the drum set. We can now choose and edit our drum pattern. Start by opening up the editor window. You can press the shortcut "E" on your computer keyboard.
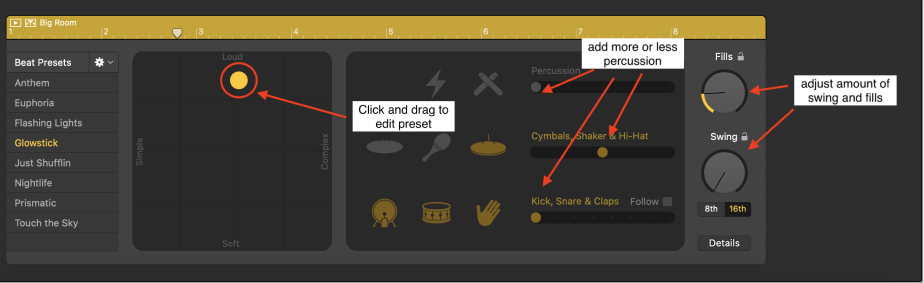
Inside the drummer editor is where we really make our drummer track come to life. We can either start with a beat preset. For instance, notice on the left hand side of the image below that there are many different presents to choose from. These are beat patterns that Logic has created for us.
We can also start a beat from scratch. I prefer starting a beat from scratch because I often have an idea of how I'd like to produce the song. Start by dragging the yellow dot within the grey shaded square.
You'll notice there are four drum aspects you can change:
- Loudness
- Complexity
- Softness
- Simplicity
If you leave the yellow dot in the middle then you'll get a nice balance of all four aspects. However, if you move the yellow dot in the very top left corner then your beat will be very simple and very loud. Play around with the yellow dot to experiment how you'd like your beat to sound.
After experimenting with the yellow dot, you can choose the pattern and the drum elements you'd like to be present in your beat. You have the opportunity to add:
- Percussion
- Cymbals, Shakers, Hi Hats
- Kick, Snare and Claps
You'll notice there are sliders below each of these elements as well. The sliders represent different beat patterns. For instance, what should the kick and snare pattern beat in your beat? Will you have hi hats doing a 1/8 note pattern? Or will they doing a 1/16 note pattern? You use the sliders to choose this information.
On the right side of the editor window, you can choose to add fills and swing to your groove. Try it out and see if it fits with the song you're producing. After that, you'll notice there is a Details button on the bottom right hand corner of the editor window. Inside this window, you have further flexibility on what you'd like your beat to sound like. For example, I often go to the details section and change the sound of my hi-hats.

Step 4
Now is the time where we can add effects to our beat to really make it come to life!
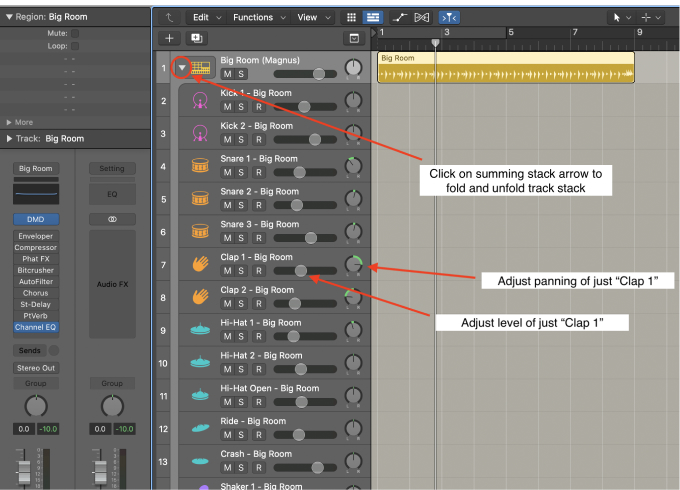
My preferred way to do this is by having my beat in a summing stack in Logic. This gives you the flexibility to adjust the entire volume of your drums and also apply effects that would change the sound of everything inside your drums.
I'm not going to get too deep on adding drum compression or effects but if you'd like to learn more about that then here is a great video tutorial on mixing drums in Logic Pro.
2. Programming Drums With MIDI
In this section, we're going to be looking at making a beat in Logic Pro with MIDI. The first thing we'll need to create is a software instrument track.
Step 1
Navigate to:
Track > New Track
Chose software instrument and then click create.

Step 2
Just like in the first section, open up the Logic instrument Library by pressing "Y" on your computer keyboard.

Step 3
Notice that you didn't have to choose a drummer. For instance, like Ronnie in our last example. Well, that is because, you are the dummer!
Once you click a drum set in the left hand library, you're now ready to record your own drum pattern idea. You can do so either by drawing the midi notes in or playing them directly on your midi keyboard. If you don't have a midi keyboard, you can also use musical typing which turns your computer keyboard into a midi controller. To get there, press "command K".
Once you're ready with your idea, press "R" to record your beat.

A good point to remember is, the kick drum is always assigned to C1 on your keyboard and snare is always assigned to C2. This never changes, unless you overwrite those keys. If you're struggling on what type of beat pattern you should record, you could take a look at this video tutorial on how to make a beat in Logic Pro.
Otherwise, I often resort to choosing my favourite songs and looking at the beat patterns they are using. It's totally okay to take a beat idea from another song.
Last thing to keep in mind when you're recording your own beat is quantization. Using drummer tracks, the beat is already perfectly quantized for you. However, when recording midi, you should quantize your beat after you record. The beat and groove are essential to be quantized. It's not necessary that it is so rigid and quantized 100% on the grid. Although, the beat is the backbone to your song it's helpful if your beat sounds tight.

3. Using Step Sequencer
Lately, I've been using the step sequencer a bit more because I've found myself producing and working with samples. Sometimes, I'll even chop a sample by looking at kick drum or snare I really like in a breakbeat or audio track and I'll chop only the kick drum or only the snare drum.
The step sequencer gives you a lot of freedom if you're working with samples. My go to sample Library would either be Splice or Arcade. Actually, here is a great video on how to make a song a song with Splice.
Step 1
We'll first need to add a software instrument track. The same thing we did in section two with recording drums with midi. After you add your software instrument track, you'll need to choose a drum set as well. Keep in mind, if you don't want a traditional sound "drum set". You can navigate to the Electronic Drum Sets. If you'd prefer to use your own drum samples. That's completely fine as well.
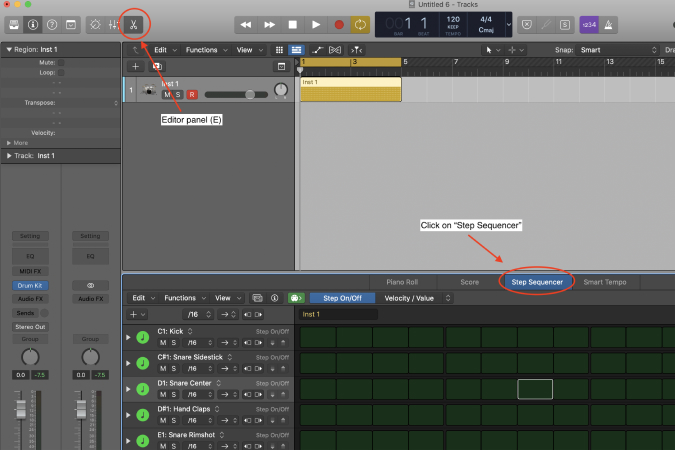
Once you've chosen your drum set, open up the step sequencer from the editor window. To do so, click "E" on your computer keyboard. An important step here is to navigate to the menu bar in the editor window and change the panel from “Piano Roll” to “Step Sequencer”.
Step 2
Now is the time to create our beat. All you need to do is click on the green blocks. Each block represents one note or "hit" of the drum. For example, here is a simple drum pattern below using the kick drum and snare drum.

Step 3
If you're struggling to find a pattern you can groove with then you might want to check out the beat pattern library that is available in Logic Pro. Click on the Pattern Browser Icon. You can also click "option shift B" to find different beat patterns and beat presets to help you get started. This can often be a great way to overcome beat block or to overcome writers block. Switch it up with something different!
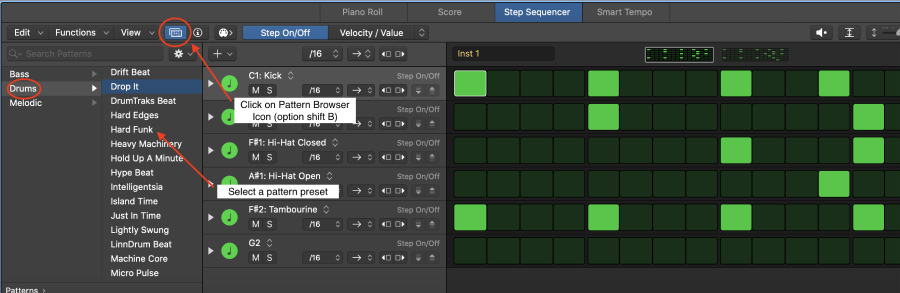
If you'd like to customize your drum pattern even further then Logic also gives you more opportunity to dial in on the groove. Notice the note patterns that are available on each drum element. For example, by default they are all set at 1/16 note patterns. However, sometime you might want your hi-hat to be an 1/8 note pattern. Well, in order to test this out, all you need to do is change 1/16 to an 1/8 note on the hi hat track. This will now only effect the hi hat track while keeping all of your other drum elements unaffected.

Want To Use Your Own Drum Samples Instead?
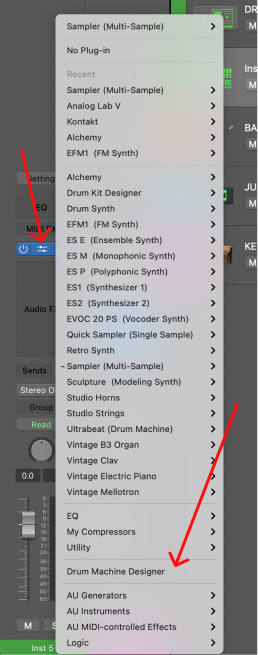
If you'd prefer to use your own drum samples with the Logic step sequencer then I would recommend using the Drum Machine Designer.
In order to get going with the drum machine designer in Logic Pro, you'll need to start with a software instrument track. The software instrument is specifically called Drum Machine Designer and you can navigate to this instrument by clicking on the instrument plugin in your inspector window. See the image below.
As soon as you add a Drum Machine Designer instrument a new window will pop up. Think of this window as your sample window. Be default, it will be empty.
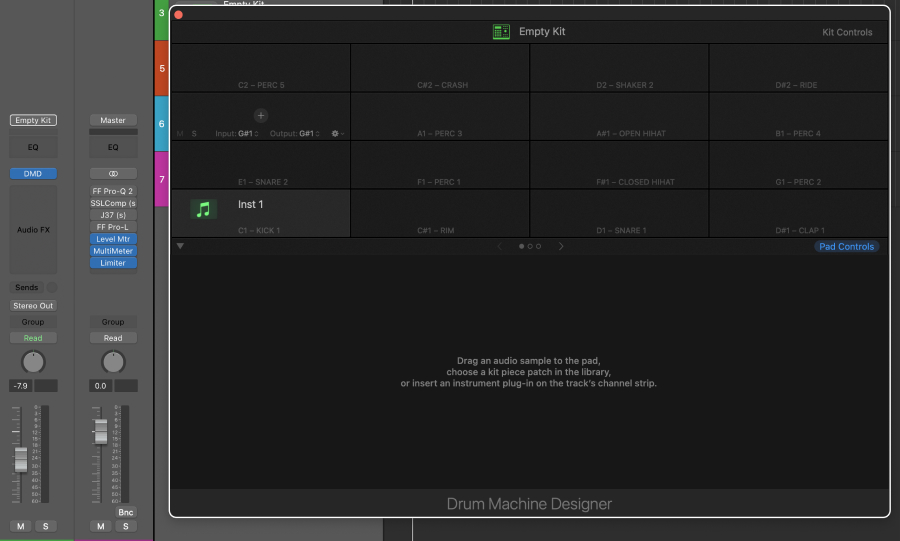
Now, simply, drag and drop you samples onto the empty pads of your sample window. For example, let's say you use Splice. Navigate to wherever your Splice samples are located on your computer or via their application. Drag and drop in and boom you're good to go. Your samples will have immediately been connected to your midi controller.
If your controller is plugging in then press "R" and you can start recording your beat idea right way. On the other hand, if you'd prefer not to record them you can open up the step sequencer and start there instead. You have options!
You can also use the drum machine designer with the default Logic Pro drum sets and electronic drum sets. If you'd prefer to do this, then open up the instrument library and double click on a drum set or electronic drum set. They will automatically populate in the sample window and then you can begin creating your beat.

Where To Go From Here
Making beats can be one of the most fun and creative processes in Logic. This only gets easier once you find a workflow that works best for you.
For example, for me, I enjoy using the step sequencer and my own samples. However, when I need a quick groove idea then I use drummer tracks. Keep creating beats and you'll find a workflow that works for you.
If you'd like to learn Logic Pro faster and become a better music producer then I recommend checking out my free 6 Pillars on Learning Logic Pro faster.


