How To Mute Tracks in Logic Pro
Oct 12, 2022
In this post, I will teach you how to mute tracks in Logic Pro. Although, this is an elementary task in Logic, there are some shortcuts, unknowns, and tools that can also be used to mute tracks or regions to increase your productivity while you’re producing in Logic or mixing in Logic. I’ll cover everything in this post, after all, I’m a huge Logic Pro fan!

On every track in Logic Pro you’ll notice there are are a handful of controls to perform elementary functions. These are also known as the track header components. For example, we have volume, panning, solo, and mute. In my opinion, these are the main functions on the track header. However, there are many more that are visible when you first open Logic, and you can also add more components that might not be visible to you yet.
Other example components would be, track icons, freeze, record enable, input monitoring, on/off, track protect, or track alternatives. You can customize your track header components to whatever your heart desires.
This is what my track header component looks like:

The mute function on the track header will be there by default since it’s so important. The mute never gets the light of day and its not usually considered a powerful tool when it comes to developing a streamlined workflow. However, I’m going to show you a new side to the mute tool and teach you how powerful it can be. Plus, I’ll show you other ways of muting that are less obvious, but potentially a lot more flexible.
In particular, all of these these methods that I will teach you will increase your productivity in tasks such as vocal comping when you’re mixing vocals.
Region Muting With Control-M & Inspector
As I was saying in the earlier section, the most common way to mute tracks in Logic Pro is simply using the track’s mute button. This will affect the entire track. The shortcut do muting the entire track in Logic is by pressing “M” on your computer keyboard. This is what I assume you already know but that’s not what this post is really about. Let’s continue…
Firstly, you can be more specific by muting regions rather than whole tracks. You might have 10 or 15 regions on a track. Regions are completely separate identities in Logic, which basically means that they can be edited differently regardless if they are on the same track with other regions. The shortcut to mute a region is ‘Control-M’. The keys look like this on your computer keyboard. ⌃M.
There are two main tasks that muting regions would be useful for:
1. Comping
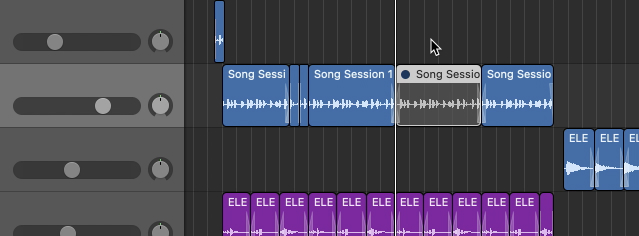
If you have a comp (composite) of a few different vocal takes, you can use the mute function to make different regions inaudible (muted). As I mentioned, muting regions works independently on each region and is not effected by the track’s mute button. Below is an image of a vocal comp with one of the regions muted:

Take note of the image above, the region is greyed out with a small dark circle in the top left corner, indicating the region is muted. You can also highlight multiple regions and press ‘control-M’ to effect all the regions selected.
If you want to apply region muting without using the shortcut, you can press the checkbox in the inspector window under the region settings. Take note of this in the image below.
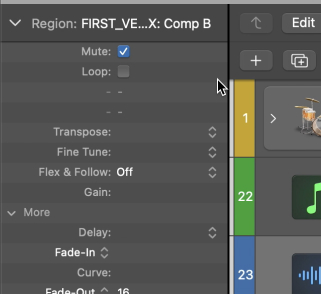
In the image above we have the region settings. These are all the parameters that you can edit in regards to the specific region you have highlighted. You can also edit groups of regions together at the same time.
In our example above, the ‘Mute’ checkbox is ticked meaning the currently selected region is muted. Additionally, you can also see there are a number of other functions listed alongside this mute button. These are all other individual controls that can be applied to a specific region. The ‘Loop’ function for example, which loops a region for a given length of time, can be accessed in this view.
Most of the functions visible in the region settings editor also have shortcuts; region mute being ‘control-M’ and region loop being simply ‘L’. Taking this further, there are also shortcuts to reverse regions or to duplicate regions.

2. Muting Rough Ideas
Another reason to use region muting is to remove a part of the production you potentially don't like, without permanently deleting it from the project. I do this all the time when I’m producing a song in Logic.
For example, let’s say you recorded a guitar part, and you really liked how it fit in the song at first. However, after an hour or so building on the track you’re now unsure about the guitar part you added. If you delete the track, it could be quickly forgotten about a few minutes later. Here’s the trick, simply mute the region of your guitar part. Easy.
Now, you won’t hear it but at least you can still unmute it at a later time to see if it works in the song. You may at some point have an epiphany that the part starts to work really well after you’ve had a chance to reset your objective opinion. If you had deleted it, which I usually did before, it would be difficult or even impossible to retrieve since, well, it’s deleted, but also it’s not visible anymore. Just by muting the region though, you can still access it at an instant.
Mute Tool Muting
The mute tool is one of the tools seen in the ‘tool menu’ in the Logic Pro main window. This provides an even faster shortcut to mute regions than the key command. It does exactly the same thing as ‘control-M’ or pressing the ‘Mute’ checkbox in the region inspector settings.
Take not of the image below, the mute tool is selected as the secondary tool in the tool menu:
You’ll notice that I have three tools available in the image. Pretty cool, right? That’s a setting I’ve turned on. The third tool changes your right click mouse button into a tool you can use quickly. For instance I always have my scissors tool as a right click and I can immediately cut things by right clicking on regions. If you’d like a third click tool as well, navigate to:
Logic Pro > Preferences > Editing > Right Mouse Button > Is assignable to a tool.
It’s not necessary that you do this, just an extra tip, not everyone likes it because it overrides your normal right click, but I’ve got used to it and built it into my workflow.
Let’s get back to the mute tool.
Whenever you have this tool selected, you can mute regions by simply clicking on them. This can be hugely useful if you want to mute many regions quickly one after another, or switch between muting a variety of regions.
An example of when this can be useful is in vocal comping. The mute tool can be used to switch between different comps or experiment having particular layers audible at given times. For example, take not of the image below.

This can be very useful when figuring out a vocal arrangement. Say you have recorded many different vocal parts, you might want to experiment with different textures by only having certain notes audible in the mix. With the mute tool, it is easy to audition different vocal textures by muting the ones you don’t want to hear, or going back and unmuting to try even more textures.
Final Thoughts Of Muting Tracks In Logic Pro
Learning how to quickly mute tracks and mute regions is a technique that saves a lot of time and tools such as the mute tool are there to make you more productive.
Logic Pro is a powerful digital audio workstation with thousands of shortcuts to reduce the time it takes from idea to finished production. If you’re doing anything in Logic and it become laborious or frustrating. Stop. There is likely an alternative shortcut to it more productively.
Go to google and type in what you’re doing or search my YouTube channel to find a faster and more productive way. In general, I’d love to help you learn Logic Pro and become a more proficient writer, musician, and producer. I suggest starting with my free 6 pillars on learning Logic Pro faster.


