How to Mix Vocals In Logic Pro
Apr 05, 2022
The first thing to consider when mixing vocals is how you want the end result to sound. Different genres approach vocal mixing in a variety of ways, meaning there are an infinite number of vocal styles at your disposal. Every decision you make throughout the mixing process will have a small impact on the resulting style and feel.
If you have an idea of how the vocal should sound before you even begin mixing, this will help to influence your decision making throughout the process. However, if you don't that's okay too but if that's the case then I recommend choosing a reference song that you like.

In this post we will discuss the techniques that go into mixing a great vocal in Logic Pro so you can get the the sound you want. As always, here is a video tutorial if you'd prefer to learn by watching on how to mix vocals.
Are you looking to learn more about mixing or Logic Pro? I recommend also checking out my 6 free pillars on learning Logic Pro.
3 Vocal Production Pre Mixing Processes
There are a number of things that can affect how your vocal will sound before you even start mixing. I like to consider these things as "Pre-Mixing Factors". These factors happen before you technically start "mixing". However, if you do these things right then your mixing job will be a piece of cake.
Pre-Mixing Factors
-
Lyrics
If your vocal has weak lyrics, then his could influence the vocal quality. For instance, a word might sound to "cheesy" or "overused". This doesn't necessarily affect the quality of the audio but it will effect how the listener perceives the vocal. On the other hand, your lyric might have too many syllables or have to many "s's" or harsh sounds. Speaking from experience, harsh sounds can directly affect your vocal mix. Try and use less words with "s's".
-
Melody
A great melody will sound unforgettable and pleasant to the ear. Therefore, having a good vocal melody will be easy to mix within your instrumentation because it's nice to listen too. A harsh, annoying, or distracting vocal melody would be a mixing nightmare.
-
Performance
Although you can accentuate the emotion of a great performance in the mixing process, no amount of mixing will be able to fix a terrible performance. This is the number one thing I'm looking out for when I'm producing an artist. I'd much rather have a good performance than the best microphone in the world. Someone once told me that Adele couldn't nail the performance in Abbey Road Studios for her hit single "Rolling in the Deep". They used Adele's demo vocal instead because she nailed the performance! This happens a lot of the time because most singers choke up with the nerve of being in a studio.
-
Timing
It is important to make sure the timing of your vocal is in the pocket with the rest of your track. This means it has to gel with the instrumentation and the rhythms need to compliment one another. You can do this by chopping the audio and nudging it forward and backward, or you can use Logic’s Flex-Time function for flexible timing adjustment. This is much easier to see in my video tutorial on how to mix vocals in Logic Pro.
-
Editing
When you have your final vocal comp, there often will be extraneous mouth noise present such as lip smacks, breaths, and pops. It is essential to go through your vocal and remove all this unwanted noise if you want a professional vocal sound. I'm a huge advocate of vocal editing. Sometimes this can be quite tedious and annoying to do in the vocal mixing process but it is 100% necessary. It adds a lot of professional polish that most beginner mixers forget to do. A great suite of plugins that can help clean up your vocal track is the Izoptope RX9 plugins. They can help with lip smacks, breaths, de-noising, de-humming, and much more. I think they're great and you'll notice in my videos that I use them a lot.
2 Vocal Production Mixing Processes
There are two vocal mixing processes that I would like to teach you in order to get the professional vocal you're looking to achieve. The first process is mixing your vocal in solo and the second is mixing your vocal in the context of the rest of your song. Both are very important mixing processes.
Mixing In Solo
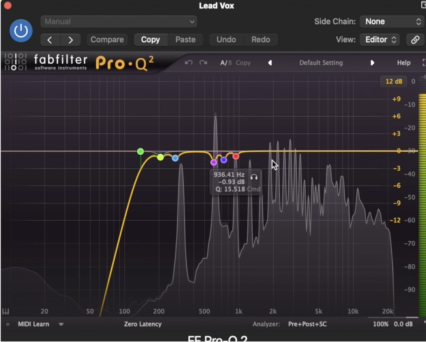
1. EQ
One type of EQ you might use when mixing in solo is a corrective surgical style of EQ. This could be useful to help remove harsh frequencies from your vocal. Below is an image of my vocal. I'm applying some surgical corrective EQ to specific frequency ranges that I think are harsh. In order to same time here, make sure you are setting yourself up for a great vocal recording. This means spending the time setting the right gain and any other adjustments you might want. For instance, compression and EQ.
2. Autotune
Applying a subtle autotune to your vocal can help to smooth out any pitch issues that may be present in the vocal. I regularly use autotune on my vocal but it's hardly noticeable. This is just a subjective taste for my personal vocal. However, you might want to have a lot of autotune on yours. There is not right or wrong answer. Do whatever sounds good to you.
3. Compression
Compression is an important part of vocal production as it helps smooth out the vocal recording and keep it at a consistent level. I personally like to record with a little bit of compression on. I do this by using the UAD Apollo Twin audio interface which gives you the flexibility to record with vintage compressors, preamps, and EQ's with zero latency.
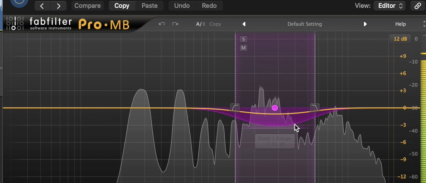
4. Multiband Compression
Sometimes it can be worthwhile to use some multi-band compression. It's a good idea to add a multi-band compressor plugin if your vocal has harshness in a specific frequency range. In the picture below, multi-band compression was used to tame the 1.5 to 5 kHz frequency range, an area in which harshness can often be present. Especially, in my vocal.
5. De-Essing
De-essing is really important in getting a great vocal mix. A de-esser plugin aims to remove harshness in the high-end caused by “S” and “T” sounds. Since you often want a vocal that has a strong high end presence, removing harsh sibilance will allow you to add colour and presence to the high end without accentuating the harsh “S” sound. This stock Logic Desser plugin is a good option but if you're looking for a paid plugin then I recommend the Izotope de-esser plugin.
6. Colour
When you have achieved a controlled vocal sound free of harshness, this is often the most appropriate time to start adding more "colour" to the vocal. Some plugins such as Fresh Air by Slate Digital are designed not as a corrective tool, but a creative stylistic tool that can add some colour to your vocal sound. Fresh Air can add a pleasant brightness to your vocal sound, but be aware not to go overboard with this plugin as it can result in nasty hissing / buzzing sounds.
Mixing In The Track
1. Reverb
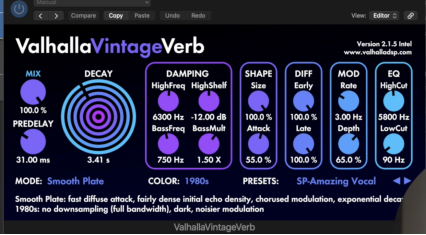
Adding a reverb plugin in Logic Pro is my favourite part in the vocal mixing process because it sounds great! However, it can be easy to go overboard with reverb and this could result in killing your mix. My favourite reverb plugin is the Valhalla Vintage Verb, pictured below:
You should also consider bussing your reverb instead of adding a reverb plugin directly on the track itself. Here is a great video tutorial on how to do bussing in Logic Pro. When you bus reverb, this gives you the opportunity to apply specific effects on the reverb signal that will not effect your try single. For example, you could add sidechain compression to your reverb reacting to a muted duplicate of the dry signal, to attenuate the reverb when the dry vocal is present. This means you can have a huge wet reverb sound, without it interfering with the dry signal.

Below is an image of what the channel strip should look like (note: it is also important to EQ your reverb to remove unwanted muddy frequencies from the reverb itself)

2. Delay
Using delay on a bus send is another way to add some "spatial interest" to your vocal sound. The Soundtoys EchoBoy plugin is a popular choice for creative analogue style delays. The benefit of having delays on a bus channel is that you can design a tighter and cleaner sound by adding reverb, phasers, distortion, and more sidechain compression! Below is an image example of what your delay bus channel could look like:

3. Automation
Automation is a key aspect of vocal production to add some development and dynamics to your mix.
In general, automation is where you mix comes to life! One common use of vocal automation is to have the overall volume lower in the verses than you have it in the chorus. This will create a subtle lifting effect when the chorus kicks in. Below is an example of automation being used to lift the chorus by 0.5 dB or so:

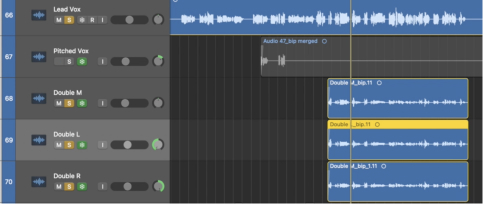
4. Doubling
Doubling your vocals is a great way to thicken up the sound.
It simply involves having multiple takes of the same vocal part present in your mix. You can then pan the different takes to the left and right channel to add stereo width to your vocal. Below is an image of a vocal part that has 3 doubles, one being central and two more hard panned left and right:
5. Harmonies
Harmonies are another important way to thicken up your vocal sound as well as reinforcing the chord progression and melodies. It's my favourite part about music production. If you follow my Youtube channel then you'll know I'm a big fan of adding harmonies to create dynamics and suspense in your vocal production and overall mix.
You can have any number of harmony layers depending on how thick you want the sound. Below is an image of some harmony tracks used to thicken up the lead vocal:
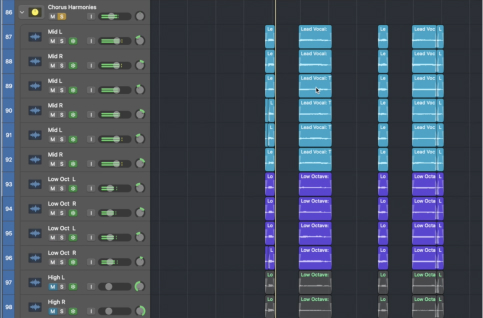
As you can see, there are many different layers used and each one is panned to the left or right to a different degree. It is also important to ensure that you are doing all of the other required processes (such as compression, EQ, de-essing, etc) on each additional vocal layer you use.

Final Thoughts On Vocal Mixing
In order to be a versatile vocal producer, you need to have the flexibility to make retrospective adjustments. Since people do not listen to music in solo, you need to take a step back and listen to how your vocal relates to the rest of the mix.
Something that sounded great when the vocal was solo’ed may not work in the context of the song. Or something that sounds terrible in solo might actually work perfectly in the mix. Therefore, you have to be able to adjust processes that were applied many stages back and still make the vocal work overall.
The vocal mix is usually the most important part of the song as well so it's important that you get it right. I'd be happy to help you get a perfect vocal mix by teaching you at a more in depth level with any of my music production courses OR better yet, start here by checking out my 6 free pillars on learning Logic Pro faster.


