How To Time Stretch In Logic Pro
Aug 02, 2022
It's essential that you know how to time stretch audio if you're looking to produce music.
I often find myself with an audio sample that might be 1-2 BPM above or below my track or perhaps I didn't record a guitar section perfectly and I need to stretch it to be faster or slower. There's plenty of examples of why you might want to stretch audio, either way, it's a tool you're going to want to have in your Logic toolbox.

Let's dive in.
There are several ways to time stretch audio in Logic Pro. I'm going to go over these 2 ways
- Stretching A Region
- Using Flex Time
By the way, if you'd prefer, here is a video tutorial on how to time stretch audio in Logic Pro.
1. Stretching A Region
The quickest and easiest way to time stretch audio in Logic is by simply holding down “option” on your computer keyboard. Try it out. Hold "option" (⌥) and hover over the end of a region. You'll notice a new icon appears. This icon is a bracket with 2 audio signals on the left and right side. This is also known as the time stretch icon.
Click and drag your audio region while you see the time stretch icon. My advice would be to drag to the nearest 1/1 note (whole note). This will time stretch your audio. Voila. It's now in time with your project.
This method is useful for slowing down an entire region, rather than information inside the region.
2. Flex Time
If you’re trying to stretch information inside a region, you’ll need to use flex time.
For example, if you’re editing background vocals and one of the takes has an “S” that isn’t in time, that’s something you could use flex time for. Be cautious using flex time and only use it when you really need to because it will create artifacts in your audio and actually distort the file itself.
Not sure what artifacts are? Don't worry. You'll hear them. If you use flex time and it starts sounding bad. Then you've likely "overstretched" the audio. That's what artifacts are. I often will not use flex-time for essential instruments in my productions.

For example, if I have recorded an acoustic guitar part that is carrying the main chord progression, I won't use flex-time to stretch the audio. Instead, I'll focus my time on recording the acoustic guitar to get a perfect take. If that's not possible, then you could try recording one section of the guitar at a time and then crossfade your audio regions together. This is a bit of a hack. In a perfect world, you get the perfect take.
On the other hand, I will use flex-time for almost everything else in a song. It's a fast and easy way to put something in time. Also, a tiny bit of audio artifacts is okay. Especially, if it's on something like an electric lead or background vocal that might not be so noticeable in the song because it' slow in volume.
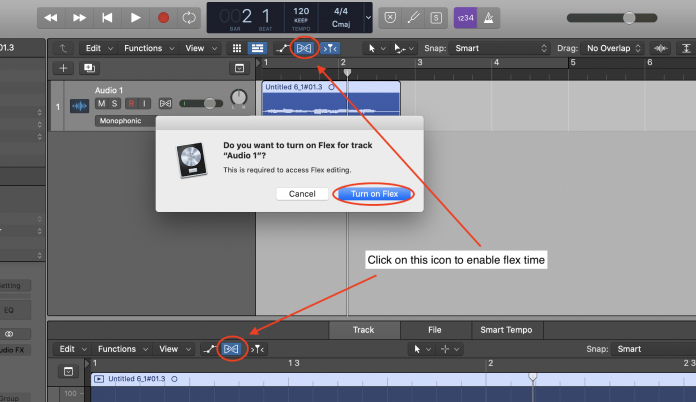
Step 1:
To enable flex time, click on the ribbon-like icon in either the main window or the editing window.
To open the editing window, use the quick key “E”. If it pops up with the message “do you want to turn on flex for *region name*?”, select “turn on flex”.

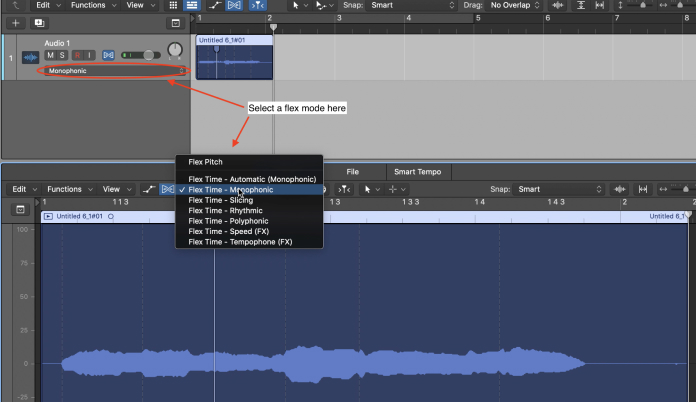
Step 2:
Select which flex mode you want where it says “flex time - monophonic”. Here's an explanation of what some of the different flex time modes mean:
Monophonic: This is the default meant for melodic instruments. Think of a lead synth for example or even a bass guitar.
Polyphonic: This mode is for harmonic instruments playing chords like guitar and piano.
Slicing: This mode will slice in between your flex edits and add a little break or silence. This could be great if you do want breaks or silence in between your parts.
When in doubt, use “automatic” mode, which will detect the audio and choose the best mode for you. As you start to stretch more audio with flex time then you'll become more familiar with the flex time modes. Here is another video tutorial on how to do flex time in Logic if you'd like to dive deeper.
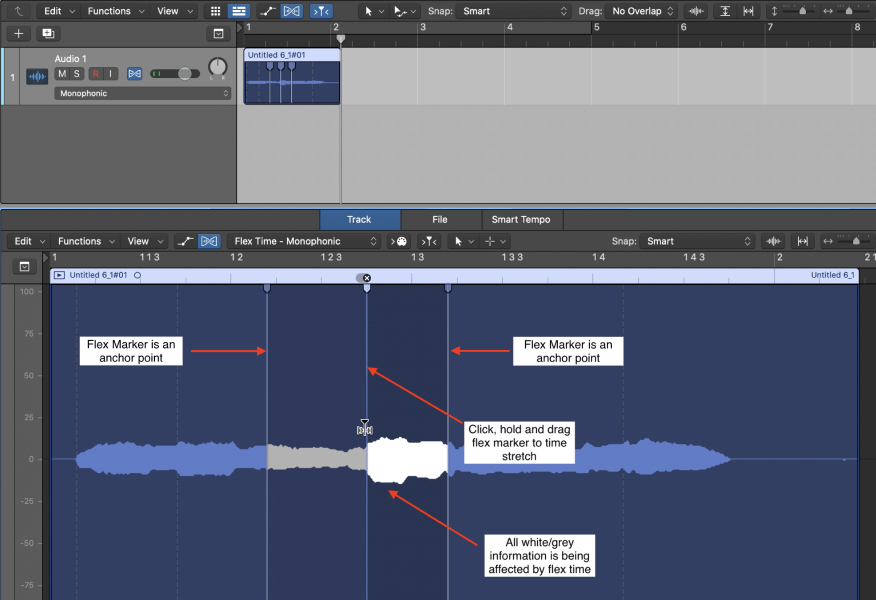
Step 3:
Add transient markers by clicking on the point in the middle of a region where you want to add a marker.

Remove a marker by double clicking on a marker. See the image below for more detail:
![]()
Step 4:
To time stretch an individual section, make sure there are transient markers on either side of the section you want to affect. Those two points will be anchors.
Then click, hold and drag the transient marker you want to shift.
Conclusion
Whether you’re trying to get creative with slow-down effects or need to make a technical edit, time-stretching is an important tool to have under your belt as a music producer. I am always time stretching audio in every project I work on.
I also find it to be a great creative tool to use when you're looking to spice something up. For example, sometimes when I am producing a song I might come across a piece of audio that is not adding any value in the production. I'll try adding some distortion or reverb to see if that helps. If not, I'll stretch the audio. Either by speeding it up or slowing this down. It doesn't always work but some times it can have a really cool effect. Try it out in your tracks.
If you'd like to learn more about songwriting, music production, and mixing in Logic Pro then I suggest you take a look at my 6 Pillars On Learning Logic Pro Faster. You can always reach out or ask a question in a youtube comment too.


