How to Make MIDI Instruments Sound Natural in Logic Pro
Jul 05, 2023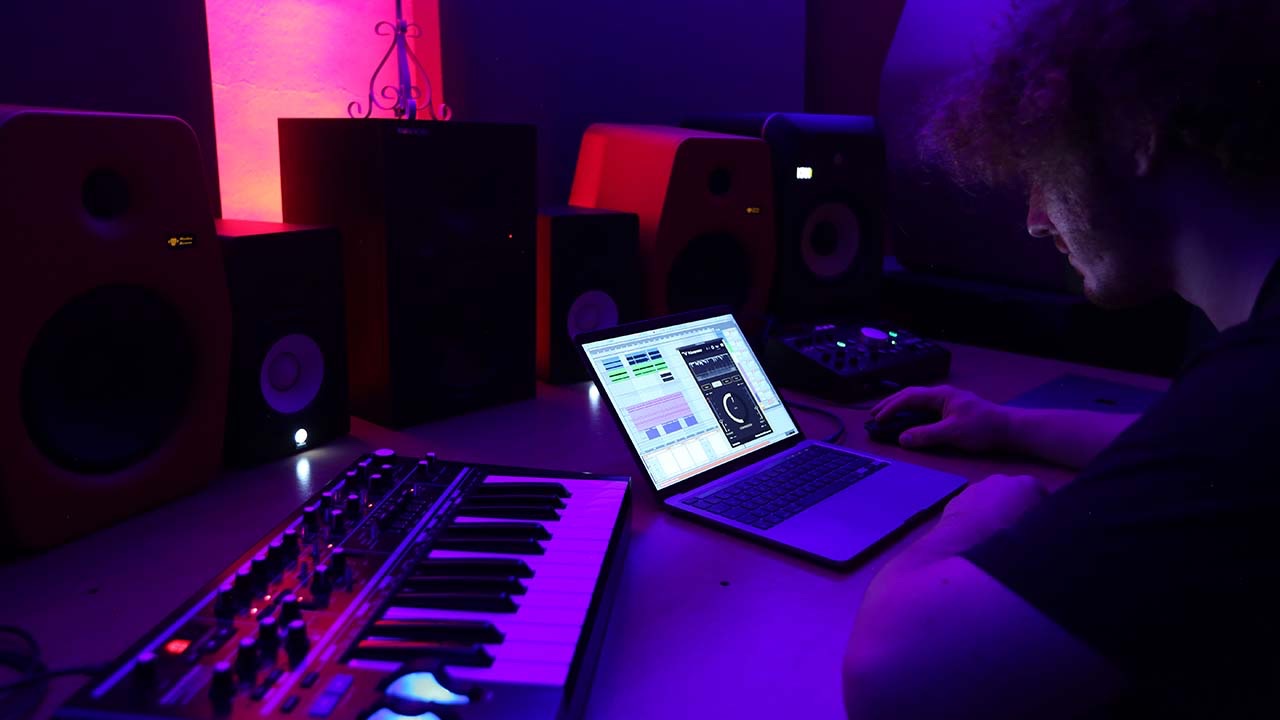
MIDI instruments are among the most vital parts of almost any music production project.
Whether you’re an indie musician trying to record a demo or want to make a beat in Logic Pro, MIDI instruments can come in very handy to create the instrumentation and the atmosphere you’re looking for.
Therefore, MIDI keyboards are among the most essential gear you should have in your studio.
So, it makes sense to invest in a decent keyboard for music production, depending on your needs and budget. I personally use the Arturia KeyLab 49 as my main midi controller.

The question now remains, how can you make midi sound more human? Especially if we are quantizing everything to be 100% in time and all our note velocities are the same. This can sound very machine like or robotic.
No matter how good of a musician you are, it’s impossible to create absolute perfection with a real instrument. What’s more, most of what we call the feel in a piece of music comes from subtle and unique imperfections that come from a particular musician.
Thankfully, Logic offers various tools and methods you can use to avoid making dull and monotonic MIDI regions.
In this post, I will show you some of the best strategies for livening up your MIDI tracks; whether it is drums, piano, bass, or a synth.
Let’s take a quick look at what we’ll go through in this post:
-
Changing Note Velocity
-
Changing Note Length
-
Adding Swing
-
Using Logic’s ‘Humanize’ Tool
-
Using Dynamics From Another Region
1. Changing Note Velocity
Let’s kick things off with note velocity.
Velocity indicates how hard the key was struck when the note was played. Whether it’s the piano, drums, or strings, having all notes at the same velocity can easily make your track sound too dull and lack dynamics.
To make it more understandable, look at the screenshot below. I have created a simple piano track using my Arturia KeyLab 49 MIDI keyboard and I’ve struck all keys as sturdily as possible.

By pressing E on the keyboard and opening the Editor menu, you’ll see that all notes are coloured bright red, indicating their velocity levels.
Moreover, by selecting any of these notes and looking at the bottom left side of the Editor menu, you’ll see that the velocity is set at its maximum level, which is 127.
There are different methods you could use to change the velocity for each note. One way is to select each note and drag the velocity slider. Although precise, that is an extremely time-consuming way of going at it.

Thankfully, Logic offers a tool that you can randomize velocity with one click.

From the Editor menu:
-
Click on the “Functions” button and hover your pointer on “MIDI Transform.”
-
From the MIDI Transform menu, open “Random Velocity.”
A new window pops open on your screen that gives you different parameters to control for randomizing velocity for your MIDI track.
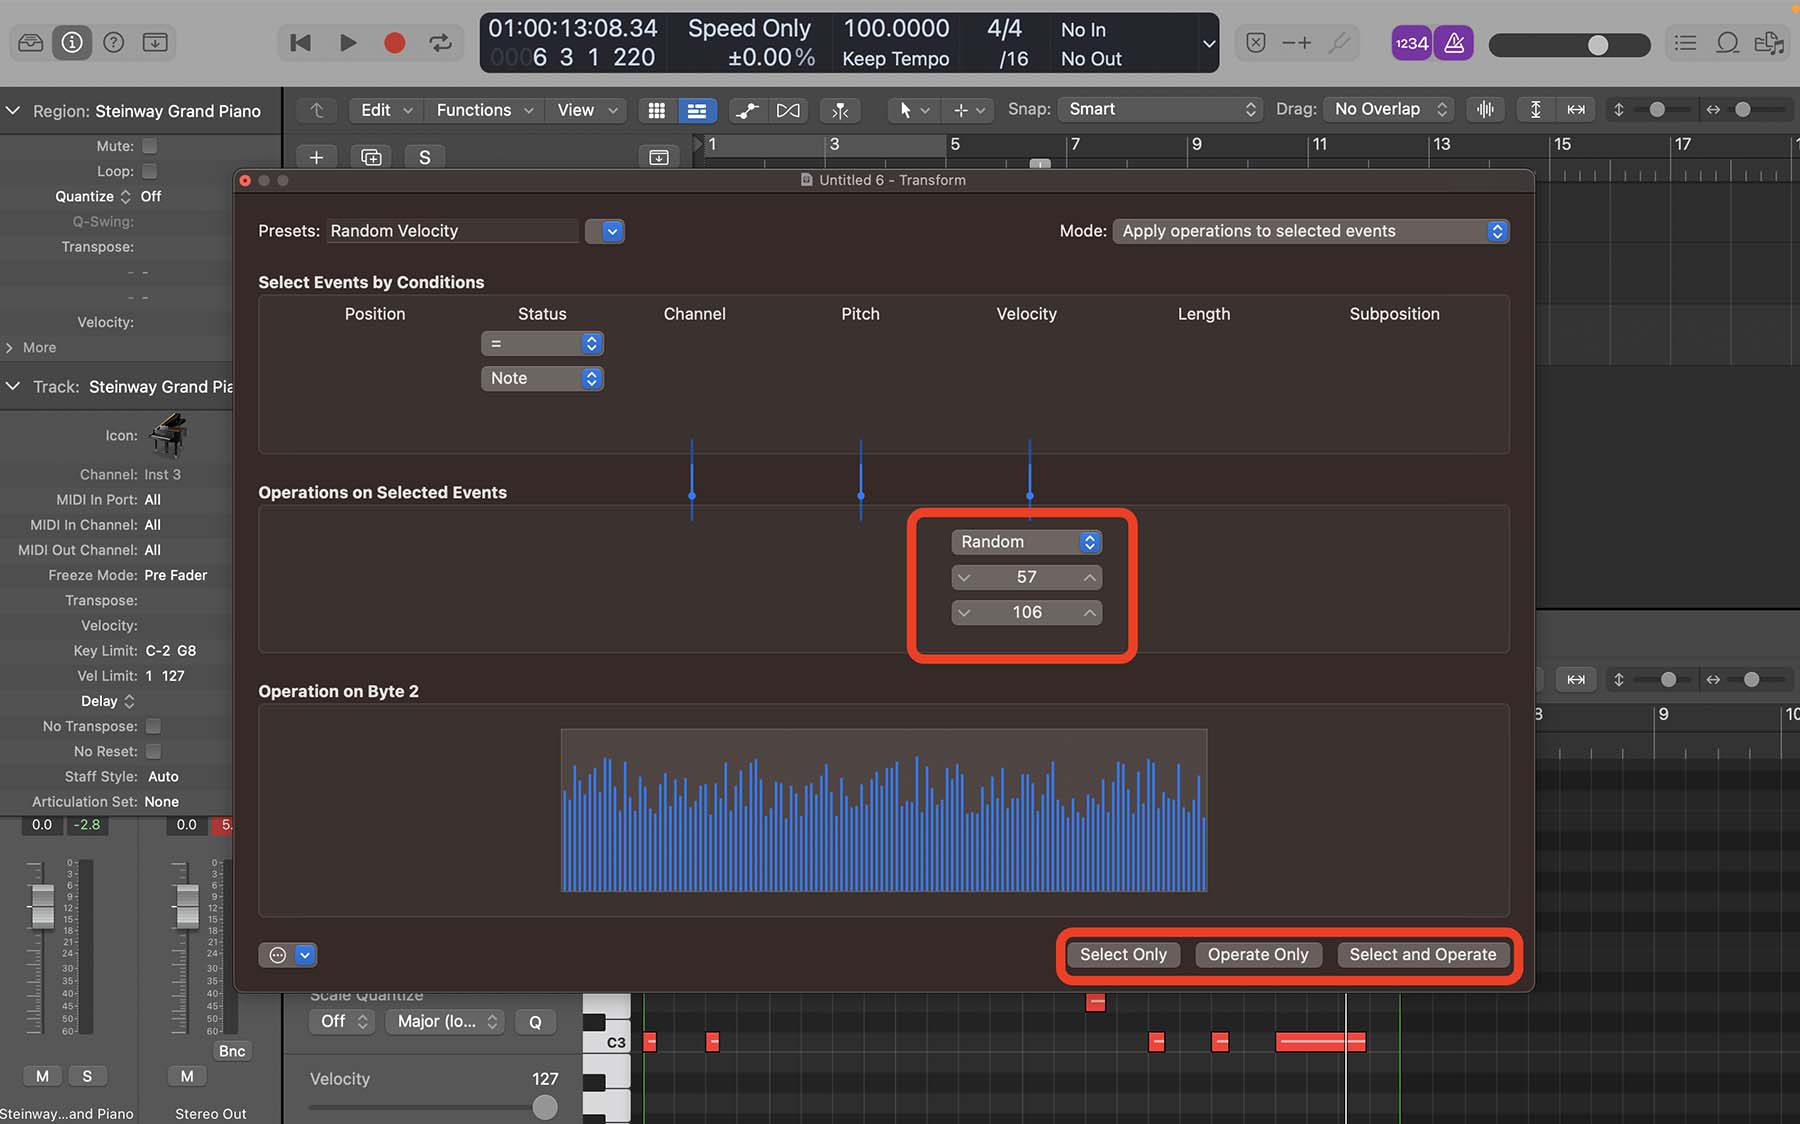
Roughly in the centre of this new window, you’ll see two changeable quantities under the Operations on Selected Events segment.
These determine the thresholds at which Logic creates randomized velocities for selected notes. In simpler words, the first number indicates the possible minimum level of velocity, and the number below it shows the maximum level.
For instance, I’ve selected 57 as my minimum velocity and 106 as my maximum velocity. Once I operate this command, velocity levels on all selected notes will be set to a random number between 57 and 106.

I’d suggest not going too dramatic with minimum and maximum velocity levels, as it makes your track sound jarring and unrealistic.
Once you’ve selected your desired thresholds, click on “Select and Operate” from the bottom right corner of the Transform window.
Now your notes should have different colours, indicating they have different velocity levels with a random pattern. But yet again, no musician plays everything completely random. In order to change that, try to create a pattern by changing some of the velocities by hand. For instance, raise the velocity level for the first note of each bar to make it stand out. In this way, you’ll have some interesting dynamics and make your track sound livelier without sounding too random and unrhythmical.
2. Changing Note Length
Similar to velocity, fixed length across all notes make your track sound too machine-like.
Here I have a strings track with all the notes for each chord align perfectly on the grid. While I can change each note length by hand, I can use a tool similar to the velocity randomizer to adjust the note length.

From the Editor menu:
- Click on the “Functions” button and hover your pointer on “MIDI Transform.”
- From the MIDI Transform menu, open “Random Pitch, Velocity, Length.”
First, let's try to get rid of pitch and velocity randomizers so that we can focus entirely on Length.
Under the Operations on Selected Events segment, you’ll see three parameters; from left to right, pitch, velocity, and length randomizer. Go ahead and click on “Random” for the first two and change it to “Thru.”
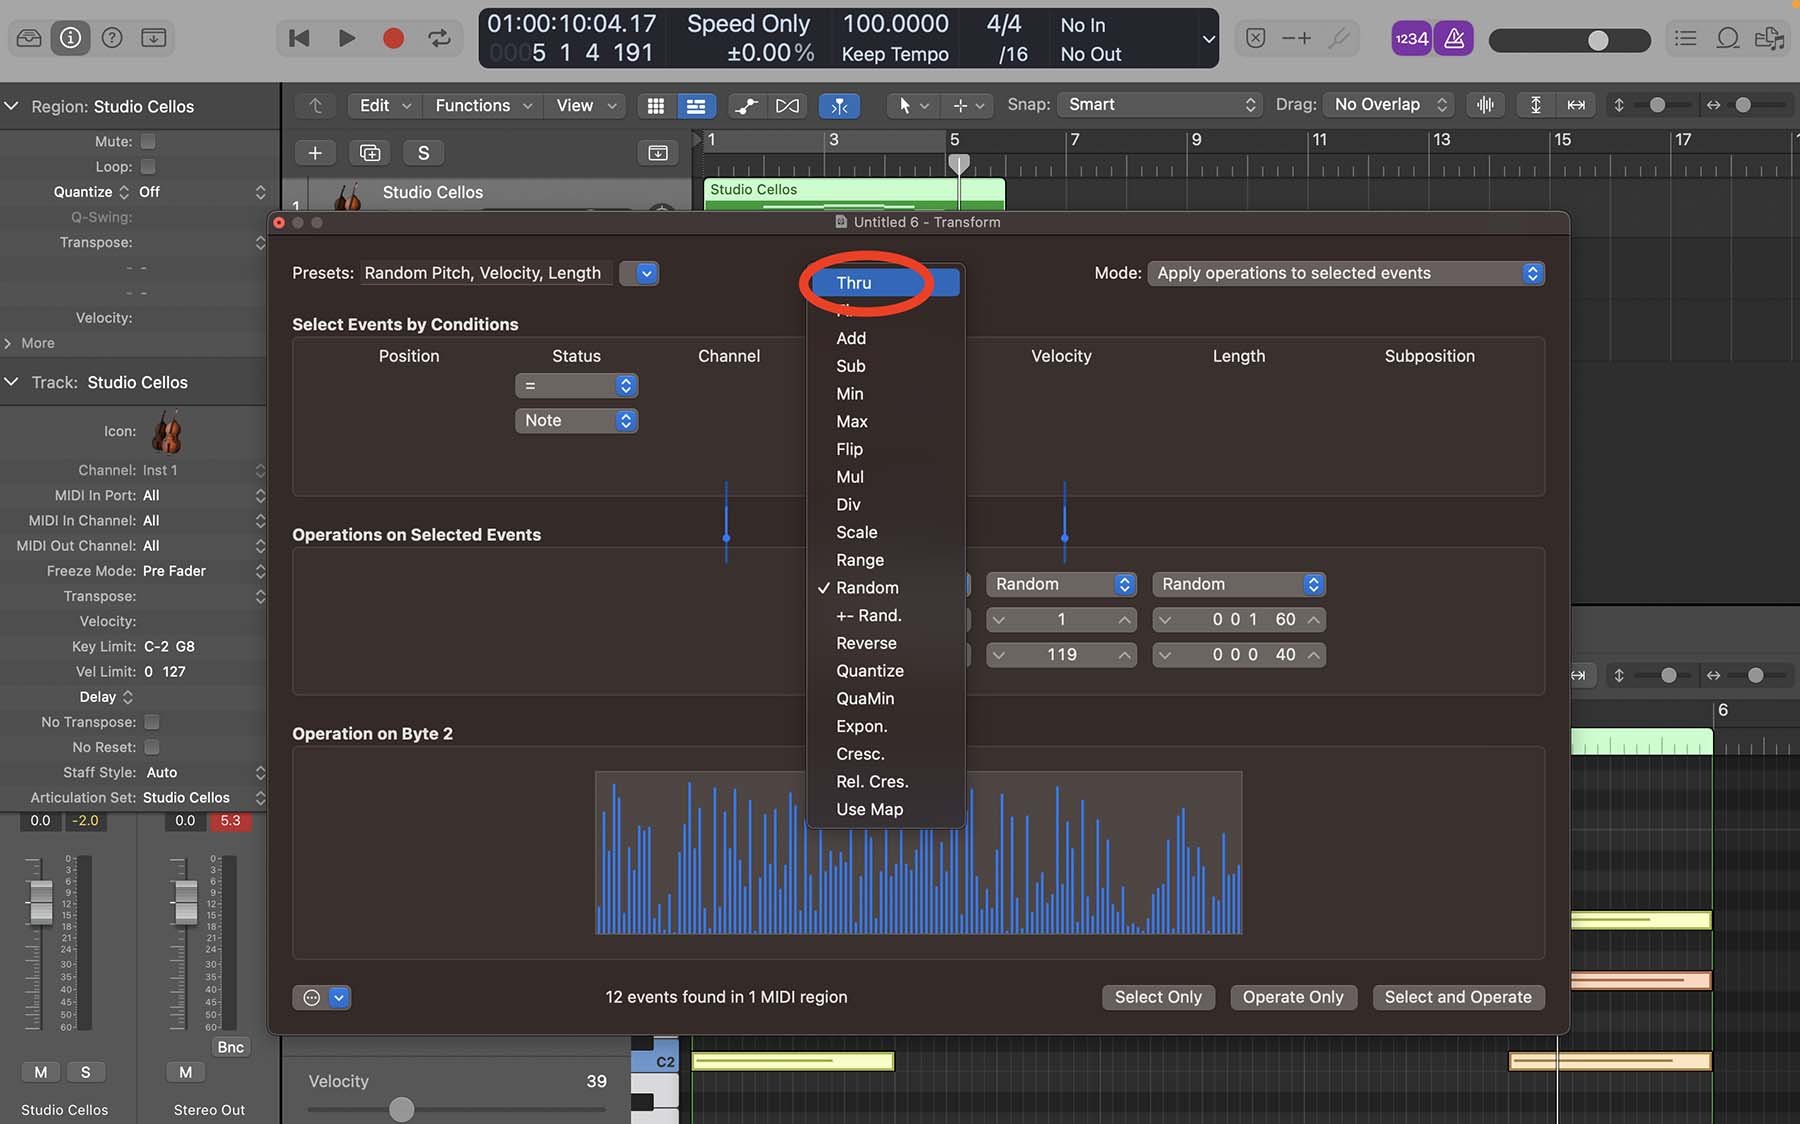
Now, only the Length randomizer should be available under the Operations on Selected Events segment. If you take a closer look at my strings MIDI region, you’ll notice that all chords are played for four beats, except the chords in bar 4, which are two beats each.

What I want to achieve is to make each of these notes unique by slightly changing the length. First, I’ll select all the chords that are four beats long by selecting all of the notes (Command + A) and then deselecting the notes in bar 4 by holding Shift and dragging my mouse pointer across those notes (as shown in the screenshot above).

Then, from the transform window, I’ll select the maximum level of length one bar (1.0.0.0) and for the minimum, I’ll go with a slightly lower level (0.3.3.0). Now if I click “Operate Only,” Logic will randomize all the selected notes based on the provided data.
I’ll do the same for the notes in bar 4, but put the minimum and maximum quantities at (0.1.3.0) and (0.2.0.0), respectively.
Now, all notes in chords have subtle differences in length, making the whole track sound more human.
3. Adding Swing
Swing helps you move notes that are on even divisions of a bar slightly off-beat. Adding swing to your tracks creates a jazzy/funky feel. When used appropriately, swing can easily uplift your song and make it sound a lot more groovy.
To use Logic’s Swing tool:
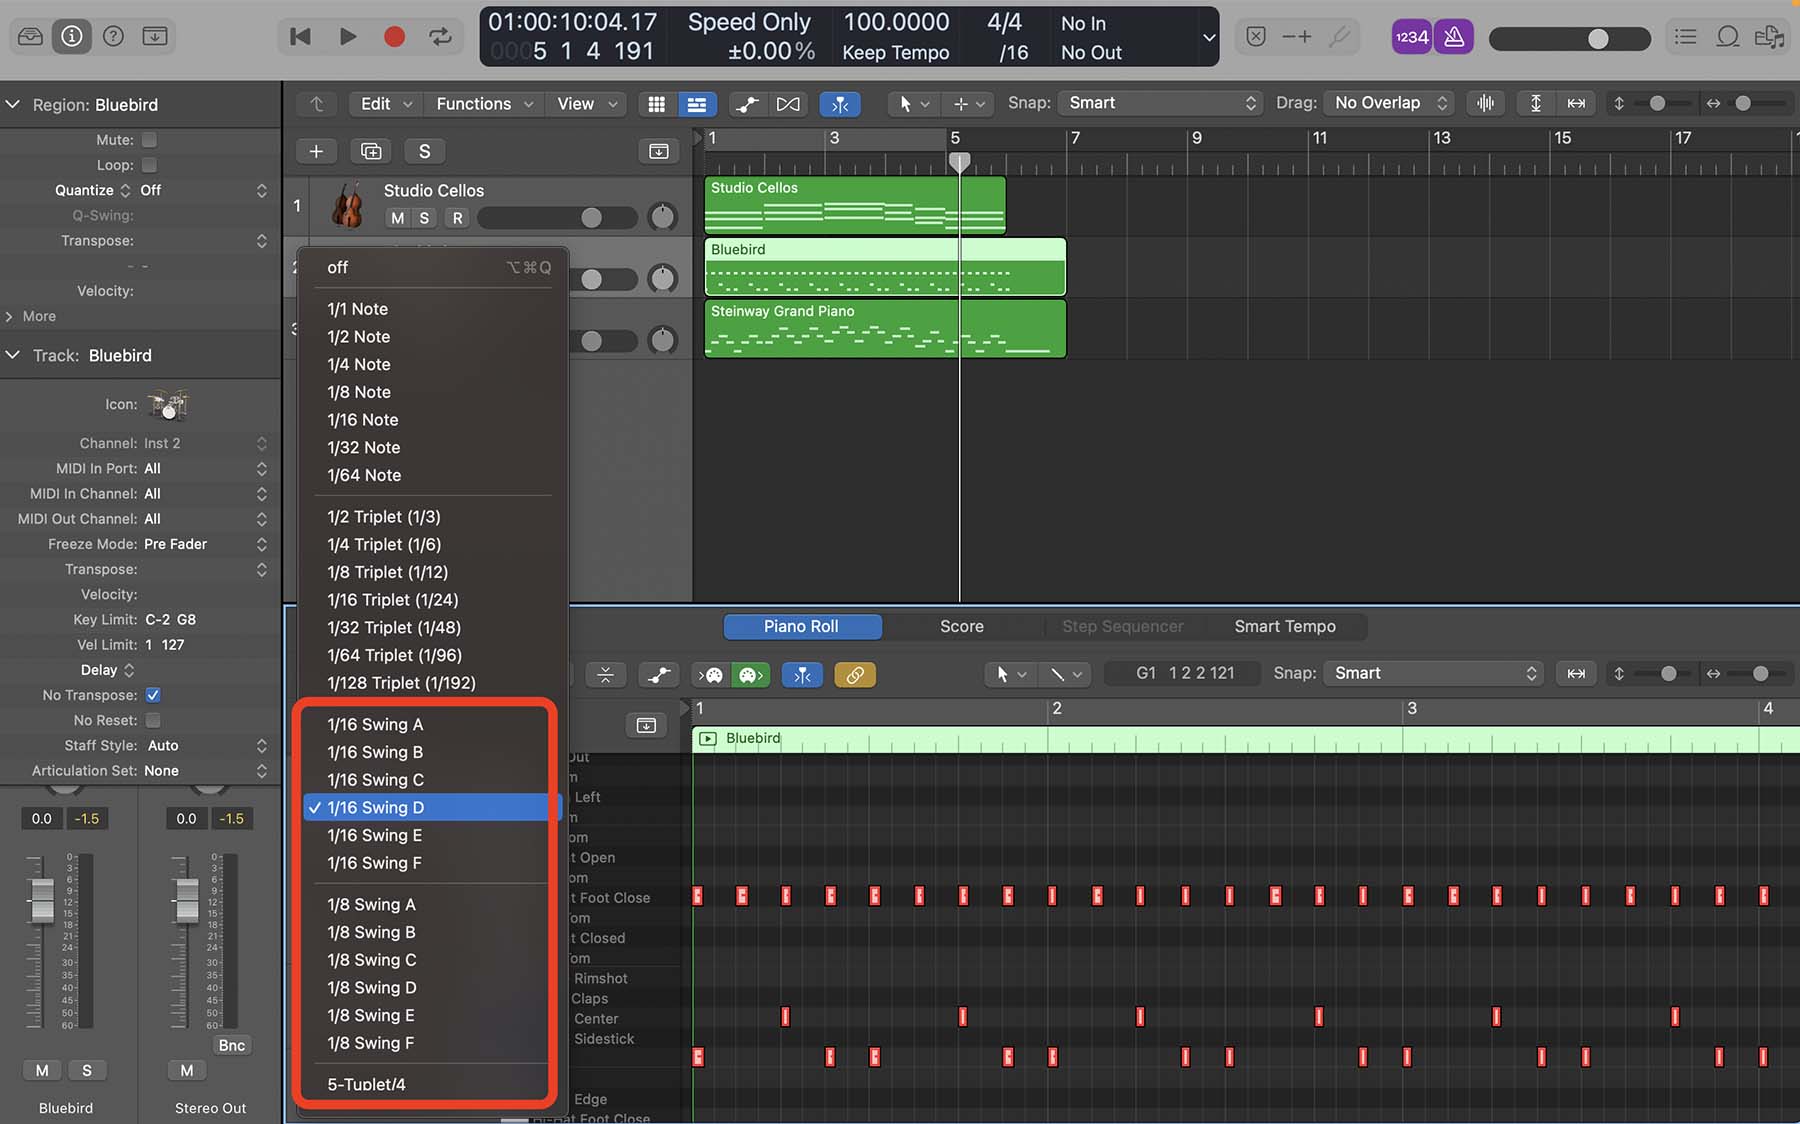
- Quantize MIDI notes based on one of the ‘Swing’ options from the Editor menu.
- Adjust the Swing slider to play adjust according to what you’re looking for.
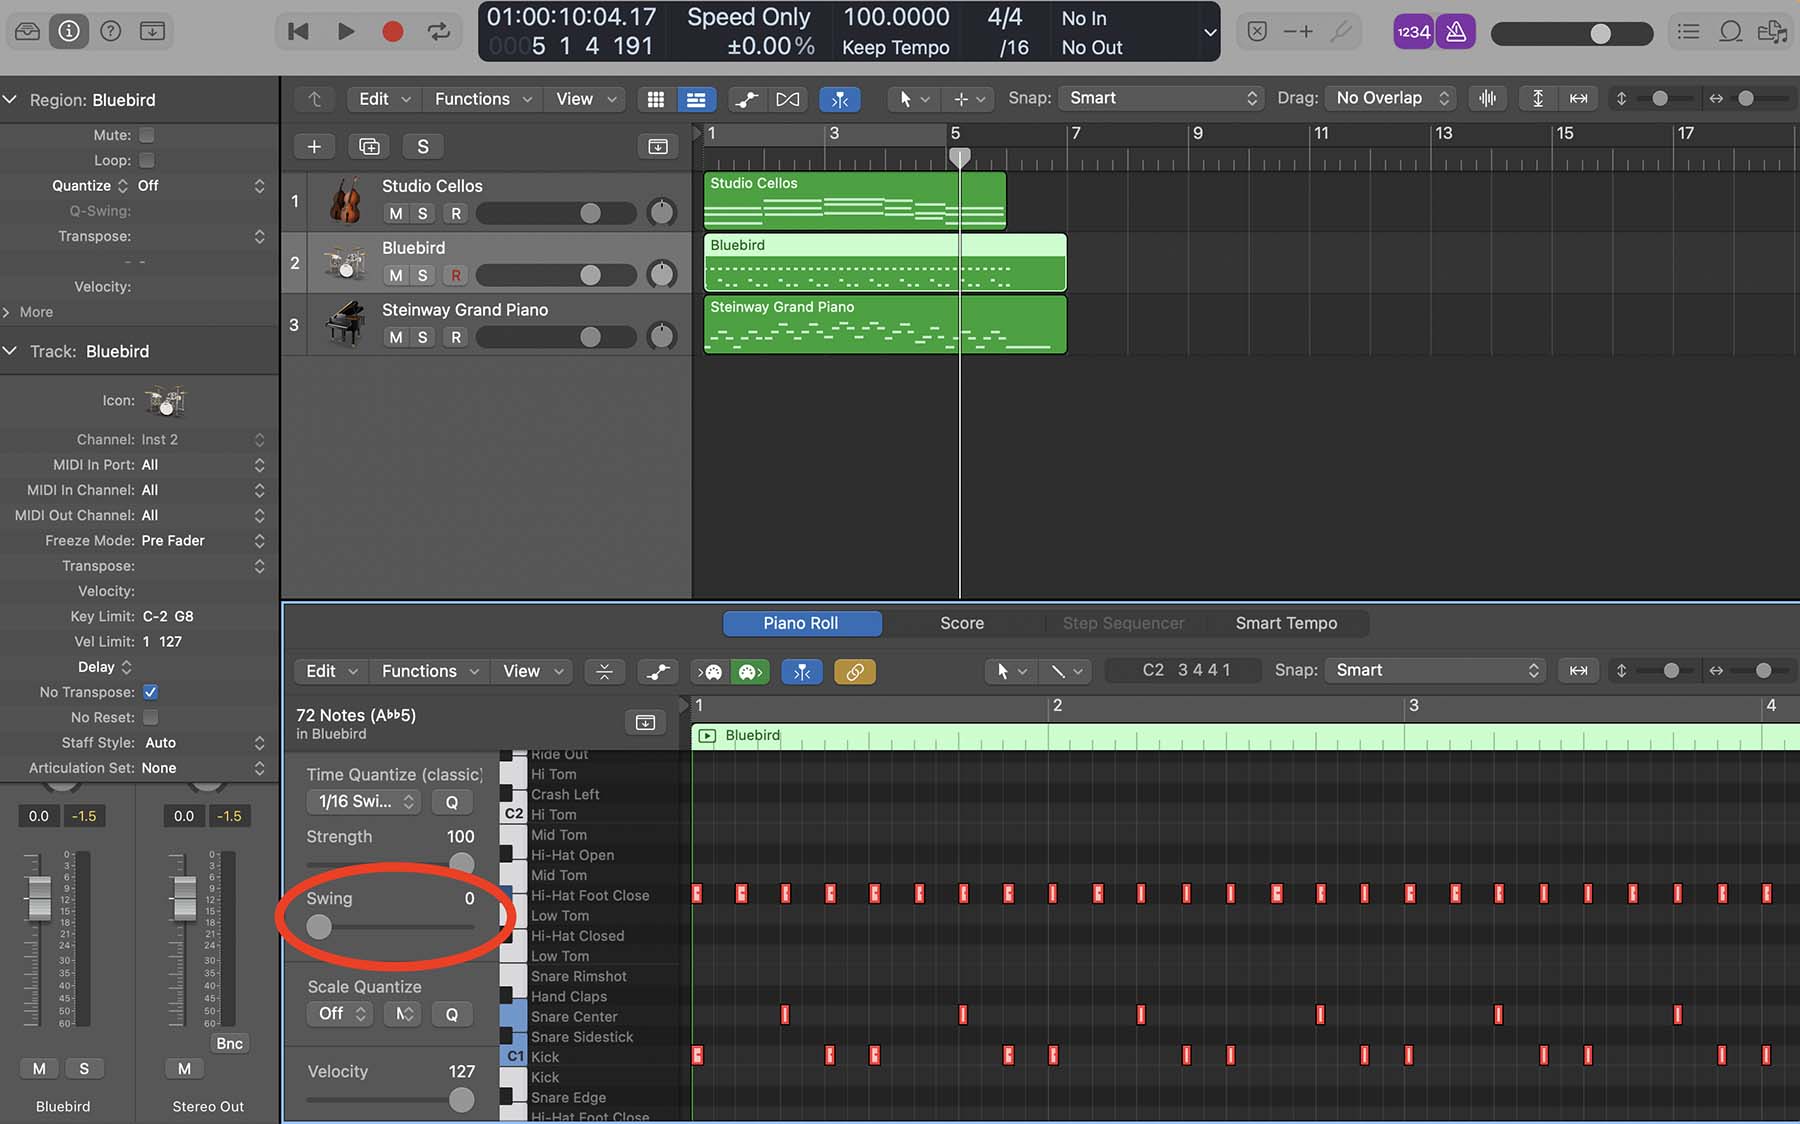
For example, you can make every other snare/high-hat note in a slow blues track swing to create a moody, expressive vibe for your song.
Tip: Many producers praise Logic Pro for its extensive stock library of plugins and virtual instruments. However, if you can’t find the exact sound you’re looking for to create MIDI regions, you might want to consider installing third-party VSTs on Logic.
4. Using Logic’s ‘Humanize’ Tool
If you don’t want to play around with different parameters one by one and want a one-button-does-it-all solution to making your MIDI tracks more dynamic, you can try Logic’s ‘Humanize’ tool.
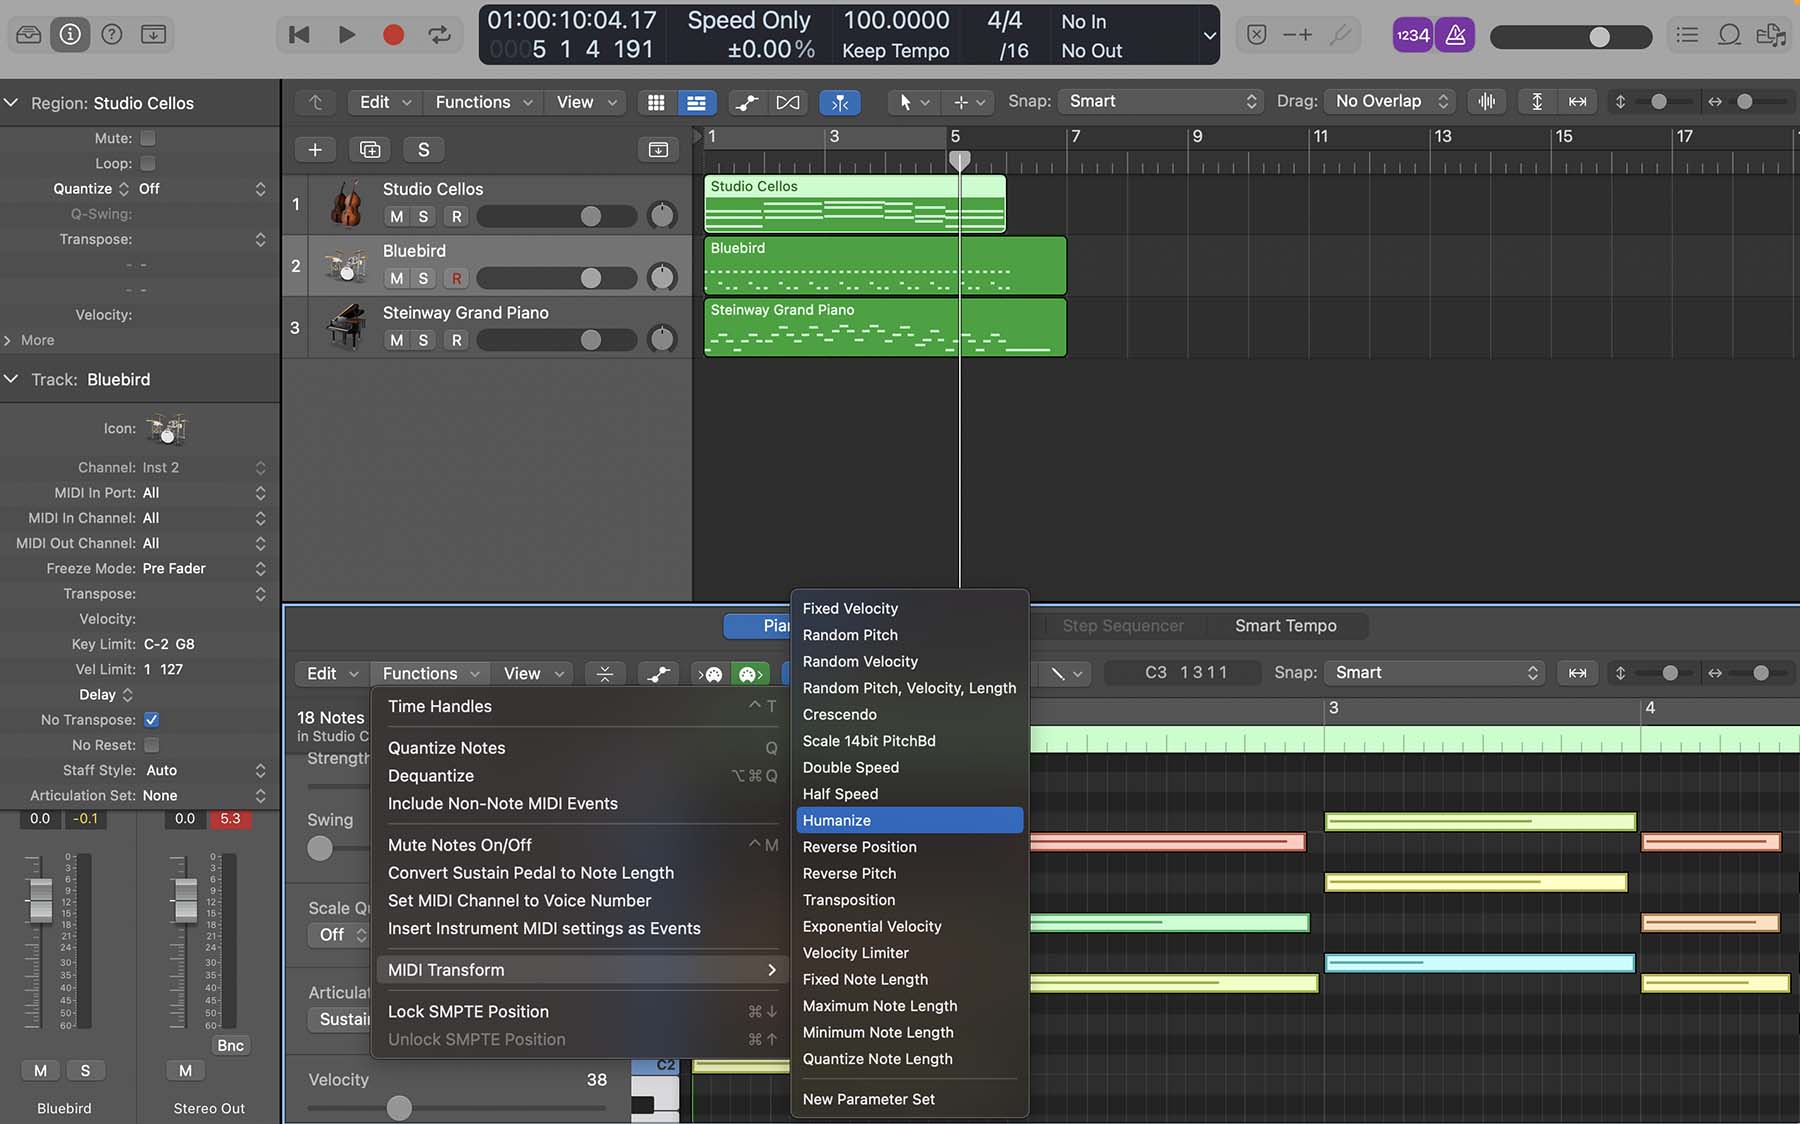
To use this tool:
- Click the “Functions” button and hover your pointer on “MIDI Transform.”
- From the MIDI Transform menu, open “Humanize.”
Logic’s Humanizer subtly changes velocity, length, and moves notes' positions ever-so-slightly. What I’d like to do when I’m using the Humanize transform tool is to keep all the changing parameters small, and operate the command a couple of times to make it sound more natural.

When it comes to MIDI drums, for instance, I initially quantize all notes. Once everything is in perfect order, I start playing around with different tools, including the humanizer, to make it sound more dynamic.
Again, don’t forget to create some sort of pattern after you’ve randomized different parameters so that your tracks won’t lose their groove. For drums, maybe make every second high-hat in each bar hit harder than the rest (increase the velocity), or increase the length of crashes and rides once every eight bars.
5. Using Dynamics From Another Region
If you have a track with a perfect groove in terms of quantization, you can use it as a template to apply to other tracks. Whether it’s a MIDI track or a bass/piano segment that you’ve recorded, you can use this method and apply its groove to other instruments.
Let’s take a look at an example: in the screenshot below, I’ve recorded a bass track, and I’m very pleased with how its groove has turned out. However, it has its unique swings and touches that make it a bit off of the grid.
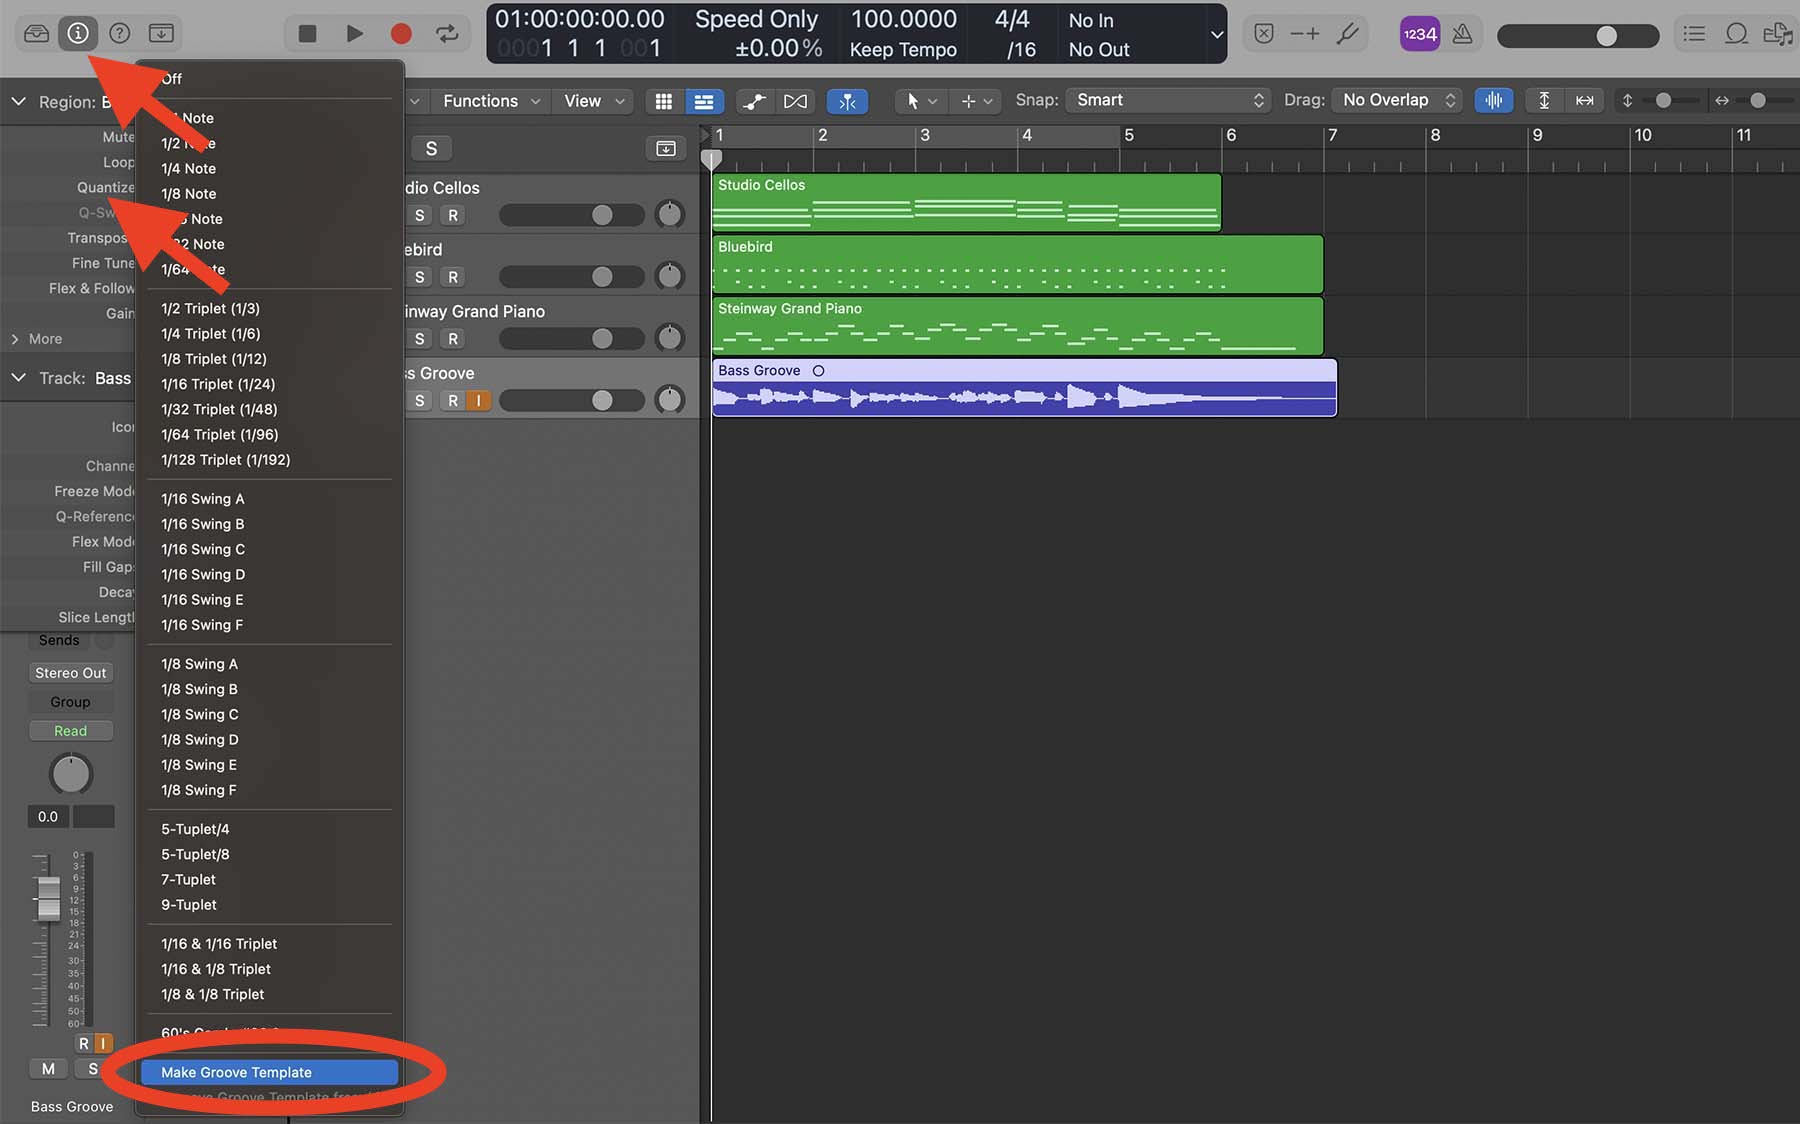
To make the drums follow the bass line’s groove:
- Select the bass track. From the Region Inspector menu, click on “Quantize.”
- Navigate all the way down and select “Make Groove Template.”
Now, Logic has a unique groove template entirely based on the ups and downs of your bass track. To apply that groove to your drums section:
- Select the drums track. From the Region Inspector menu, click on “Quantize.”
- Find the groove template you’ve created and select it.
Note that Logic will name these templates after the region’s name (not the track name).
Final Thoughts On Making MIDI Instruments More Natural
These tips should work as cornerstones for you to start taking your music production to the next level. Remember to try things for yourself and find out what sounds best for your projects. If some of these methods are still vague, check out my video on YouTube on how to make MIDI feel more human for further instructions.
Working with MIDI is only a portion of what Logic Pro offers. If you need more help regarding songwriting, recording, or music production, check out my free 6 Pillars to Learn Logic Pro Faster guidebook.


