How To Comp Audio In Logic Pro | Vocals And Guitars
Oct 02, 2023
Apple’s Logic Pro is jam-packed with features that allow musicians and producers to create the music they’ve always wanted. One of Logic’s most critical tools that aids producers in capturing vocals and other live instruments is audio comping.
The process of recording audio is a form of art in the world of music production. Recording that perfect take that captures the soul and essence of the performer is not an easy task. That’s where comping comes to help.
In simple terms, audio comping refers to recording multiple takes and stitching together the best parts into a single, perfect track. Regardless of what you’re recording, Logic Pro offers powerful tools that help you seamlessly create comps and create a perfect track from multiple recordings.
In this post, I will show you everything you need to know to comp audio in Logic like a pro.

Recording A Comp
Before you begin, make sure you have enabled Logic’s advanced features so that you can follow the steps as I show you how to comp audio:
- Click “Logic Pro” from the top-left corner of the screen.
- Hover your pointer on “Settings” and select “Advanced…”
- Check the box next to “Enable Complete Features.”

Once that’s out of the way, let’s get into recording. When you’re recording comps, you’d want to select small portions of your songs and record multiple takes. For example, if you’re recording vocals, try comping one verse at a time, or even break each verse down into multiple comps.
Before you start recording, enable the cycle button from the top of Logic’s workspace and place it where you want to record your track. You can also press “C” on your keyboard. When enabled, Logic will loop that section and allow you to record the same section over and over.

Now, arm your track for recording by clicking on the “R” button from the track header area and start recording. You’ll notice that Logic will stack up your takes on top of one another. Once you’re confident with your takes, you can move forward into editing your comp and creating the perfect track.

Note: it’s best not to make changes in your recording setup and condition when capturing multiple takes for comps. For instance, if you’re recording vocals, keep the same distance from the mic to avoid changes in volume and loudness in different takes. If you’re recording an electric guitar, keep the same touch, picking technique, and pickup position throughout all recordings.
Tip: professional producers use a variety of techniques, hardware, and digital tools to make vocal tracks sound crisp and clear and cut through the mix. In another post, I have covered everything you need to know about making your vocals sound professional in Logic Pro.
Editing Comp And Stitching Parts
Once we’ve recorded multiple takes for our comp, it’s time to focus on editing and finding the best performances to create a master track. Let’s take a closer look at our comp track:
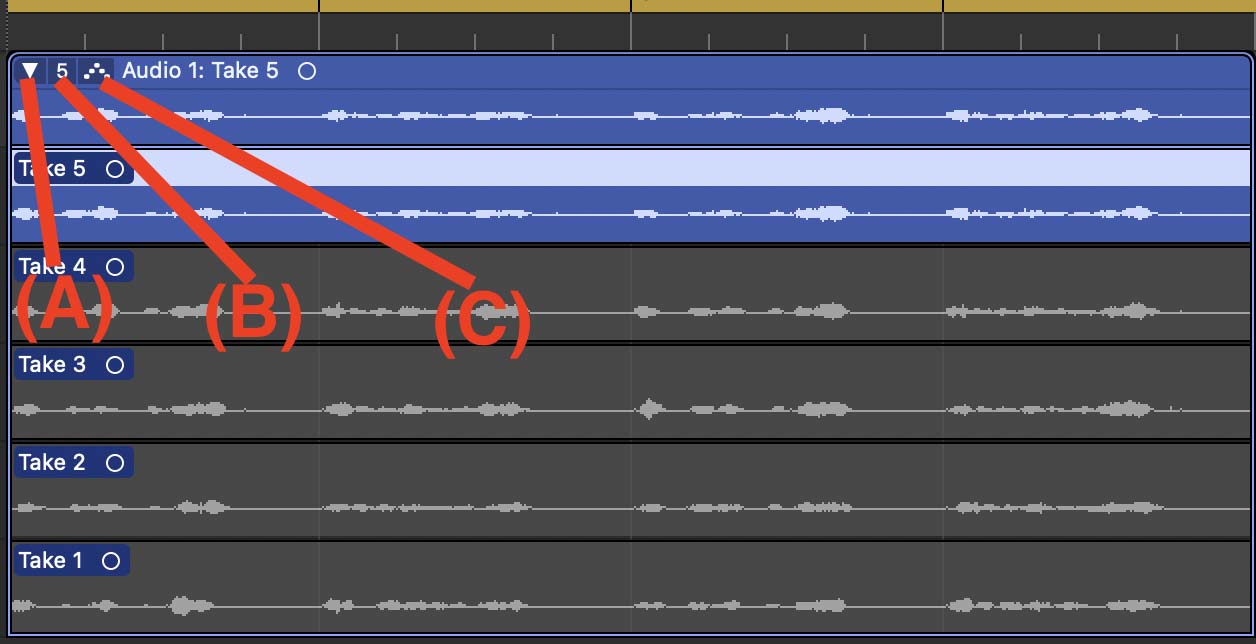
As shown in the screenshot above, there are three buttons at the top-left corner of the region. The first one (A) is for expanding closing/expanding all of the takes. Next (B), is the take folder pop-up menu that gives you access to take folder editing commands and allows you to choose a take as the primary. The third button (C) allows you to quickly switch between editing modes for your comp.
Listen to your tracks, both in solo and with other recorded instruments, to find which parts you prefer in each. Once that’s established, simply click and drag your pointer on different takes to quickly select and deselect different parts.

As you see, Logic will stitch selected parts, add X-fades between them, and create a new track that’s displayed at the top.
When selecting takes for a vocal comp, one of the things you’d want to have in mind is avoiding double breaths. So, be mindful of where exactly a selected part begins so that breath sounds from two different takes won’t collide.
If you’ve found desirable takes, but they’re not perfectly on time, you can change the editing mode (third button from the top-left) and choose the scissor to adjust the timing of each take. Click and hold a section to move it on the grid.
Once you’ve stitched desired parts, you can glue everything together and get rid of unused parts and takes. Click on the second button at the top-left of the region to open the editing commands and select “Flatten and Merge.”

Tip: one of the most fundamental audio processing tools in Logic Pro is the Compressor plugin. The Compressor allows you to level out the volume of your track to make it punchier and more present in the mix. Click here to learn more about using the Compressor plugin in Logic Pro.
Final Thoughts: Use Comps With Precision And Taste
Creating audio comps allows you to seamlessly capture the best parts of different takes to create a near-perfect track. The smaller your comp take is, the easier it is to fish out ideal parts. However, having too many takes might result in audible differences, which is undesirable. So, use comps with precision and taste. At the end of the day, you want your final track to feel like it’s one smooth and continuous take.
If you have more questions regarding working with comps, check out my YouTube video tutorial on how to do a comp in Logic with a guitar or vocal.
For more lessons on production, mixing, mastering, and songwriting, I recommend downloading my Free 6 Pillars To Learn Logic Pro Faster guidebook.


