How To Record Vocals In Logic Pro
Jun 15, 2022
So you want to learn how record vocals in Logic Pro but you don’t know the first thing about recording or more importantly, getting that clean, crips, and warm professional sound that the PROs do.
I will walk you through everything you need to know about recording vocals.
All the way from purchasing the proper equipment, getting setup in Logic Pro, and then finally pressing that record button. If you prefer to learn by watching videos instead, then allow me to each you how to record vocals by watching this video.

Equipment
Okay, so let's first talk about equipment. I hate talking about "equipment" because I honestly think great vocals come down to the vocal performance of the singer. However, it's good to get a grounding on the type of equipment you should consider purchasing if you're wanting to record yourself at your home studio or record other artists.
For recording proper vocals in Logic Pro, you will need to have the following recording equipment:
- A microphone
- An audio interface (unless you’re using a USB microphone)
- An XLR cable
Furthermore, for better results, I also recommend you consider investing in the following:
- A pop filter
- A mic stand that you can adjust to your height
- A vocal recording booth (for sound isolation)
You can also purchase recording bundles from a variety of companies. These vocal recording bundles can include everything from an audio interface, microphone, xlr cable, and pop filter. Here is an example of bundle by Focusrite. This is the interface I started out with. I'll give you more purchasing options below too.

Now, I'll show you how to choose the right equipment that fits your specific needs. For example, if you're a singer songwriter, rapper, or metal screamer then this would impact your decision on what equipment you may want to invest it. Also, the recording equipment you might want to invest in also depends on what type of recording you might be doing.
Will you be recording live in Logic? For example, on stage at a concert? Or are you recording harmonies? Lead vocal? Background vocals?
Often times I choose different equipment for different outcomes. However, I'll give you a general approach so you don't have to go out and buy thousands of dollars worth of recording equipment.

Choosing Equipment
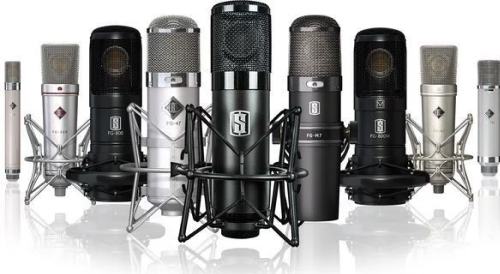
Microphones
There are two types of microphones that you need to wrap your heard around. They are:
1. Dynamic microphones and,
2. Condenser microphones
In my opinion, the best microphones for recording vocals are condenser microphones. Most engineers and producers would agree with me here. However, like anything in the music world, there is always room for debate and more importantly, there are no rules!

Dynamic microphones, such as the Shure SM58, are better for live performances. I guarantee that you've seen a Shure SM58 microphone at every live concert you've been too. They're the industry standard for vocal live performances. Dynamic microphones are also very useful for recording pianos, acoustic guitars, and electric guitars.
Here are a few of my microphone recommendations for recordings vocals. I'll start with the cheapest and then move to most expensive:
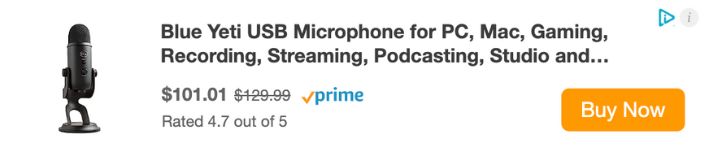
A Blue Yeti microphone. This is a cheaper condenser option that also allows you to bypass the audio interface since this microphone gives you the capability to plug it directly into your computer via USB. A great option for quick vocal takes. Notice how you can easily place it on your desk too. A wonderful option for a beginner.

The Rode NT-1A condenser microphone might be my favourite. I'm biased though because this was my first microphone I ever bought and I still use it today after many years of having it in my home studio. You'll notice in this video of me recording vocals, I'm using the Rode NT-1A. More expensive then the blue yeti. However, better quality. It's a good bang for your buck.

The Slate Digital VMS ML-1 condenser microphone has become very popular amongst home studio producers and engineers and rightly so because it offers a wide range of flexibility in getting different vocal tones. This microphone includes software that you can model several different microphones after. Basically, you're getting eight microphones for the price of one. Welcome to the modern age of vocal recording.
The Neumann TLM-103 works like a dream and has likely been used on some of your favourite records. It's a professional studio industry standard and has a very high quality. Not surprisingly based on the price of the mic. I've had the pleasure of using this mic in a professional studio environment and I've always been very happy with the result. For example, my song Goodbye, was recorded with this quality of microphone. Listen to how crisp but full bodies the sound is. Incredible vocal mic.
There are plenty of other options of microphones available. At the end of the day, don't stress too much about the microphone. Get one within your budget and learn it. Over time, as you get better, you'll realize that you might want to increase the quality of your microphone. There are often some great deals on Streetwater for vocal mics.
Audio Interface
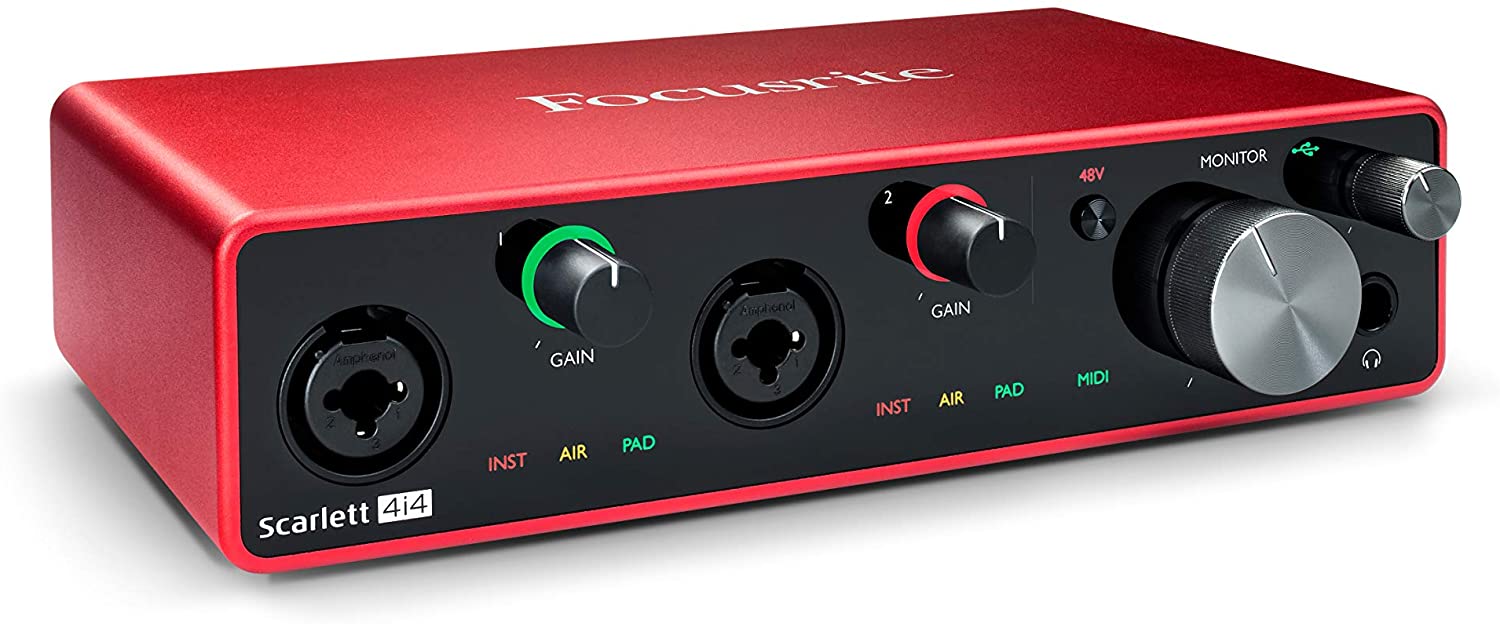
If you’re not using a USB microphone like the Blue Yeti, you will also need to have an audio interface with an XLR cable to connect the microphone to your computer. A popular audio interface with a reasonable price range is the Focusrite Scarlett 4i4. A high-quality brand for XLR cables is Mogami and Monster. I used the Focusrite Scarlett 4i4 for a long time and then after a few years I decided to upgrade to the Apollo Twin X. If you're interested, here's a link to all my equipment that I have in my home studio.
Is the audio interface important for getting a quality recording?
In short, yes, it is.
The audio interface is an essential piece to getting quality recording. However, as time moves on the quality of audio interfaces starts to increase and the price gets cheaper and cheaper over time as the technology becomes more available. Therefore, a $200 interface today is quite good quality today.
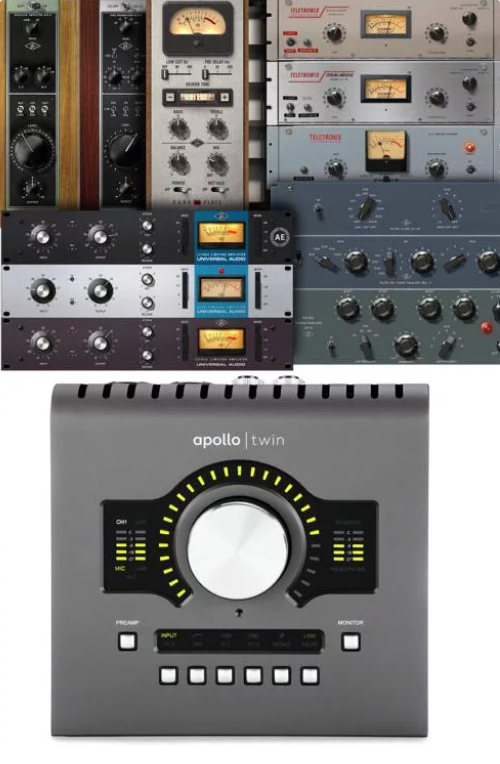
The audio interface is doing two things. It is amplifying the sound and it is also exchanging the analog signal (wave) into a digital signal so Logic Pro, or any other DAW, can understand. In most professional studios, you would have different equipment doing the amplification and exchange from analog to digital. Ever seen a picture like this below?
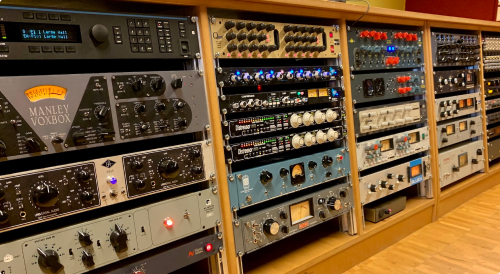
This picture makes up a lot of different analog hardware for recording. However, some of this analog hardware is also also know as pre-amps. This gives the signal more gain, essentially increasing the volume. It's exactly what your audio interface is doing but better. It's better because of the make quality. Some pre amps also give you the opportunity to EQ (equalize) the sound. This can help you clean up anything muddy or harsh before it's even recorded.
Most beginner home studio musicians and producers will not have the budget to purchase separate pre-amps to use in their studios. Some of this hardware is updates of $20,000 dollars!

This is why we use audio interfaces like the Focusrite 4i4 in their place. It gives us the option to do amplification and change the signal from analog to digital in once place.
So, if you're looking to be a producer for the long haul and you want the best quality possible then you should consider looking into pre amps as well as audio interfaces. A great starting point is the Apollo series by Universal Audio. This allows you to essentially do everything you would with hardware but with software instead. Remember the picture above with all that fancy analog gear? Well, you can have that too but it's software instead. This is the main reason I decided to switch from Focusrite to Apollo.

More Equipment For Better Quality
Pop Filter
An important piece of equipment to have in your home studio to record vocals in Logic would be a pop filter. A pop filter helps prevent hard consonant sounds like “P” and “K”s from clipping or sounding too harsh. Some microphones may come with a pop filter on your purchase with the mic. However, here is a list of potential pop filters you might like, you'll notice they all vary in price just a little bit.
Microphone Stand
To make sure you’re able to stand up comfortably and record with the best vocal technique, you should have a microphone stand that it is level with your mouth while you are standing. You can get a full-size stand, however, there are smaller ones as well where you can put directly on your desk. I usually stand up while I'm recording vocals but sometimes I sit down too. Do whatever will make you get the best vocal performance. I've even witnessed some people record their vocals lying down. Yes, lying on the floor!
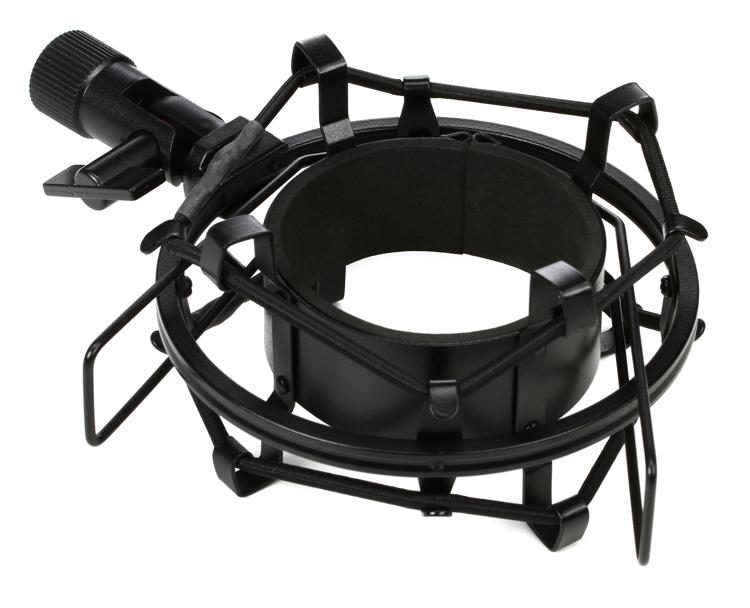
If your mic doesn’t come with a clip, you may need to buy a shock mount. A shock mount holds the microphone in place and ensures that it doesn’t fall off the stand. This is really important to protect expensive mics. See the image below for reference on what a shock mount looks like.
Isolation Booth
Finally, if you live in a noisy environment, a portable isolation booth may help you get a noise-free vocal recording. I wouldn't say it's as essential as the other equipment. However, it is worth the investment if recording vocals is more than just a hobby. If you do happen to find yourself in a situation where you have a lot of background noise in your recordings then be sure to read this article on how to remove background noise in Logic Pro.
Setting Up
Once you’ve got all the equipment you need, you’re ready to start recording in Logic.
Create a new Logic Pro session, add a few audio tracks, set the tempo at the top control bar and turn the metronome on, as shown below.
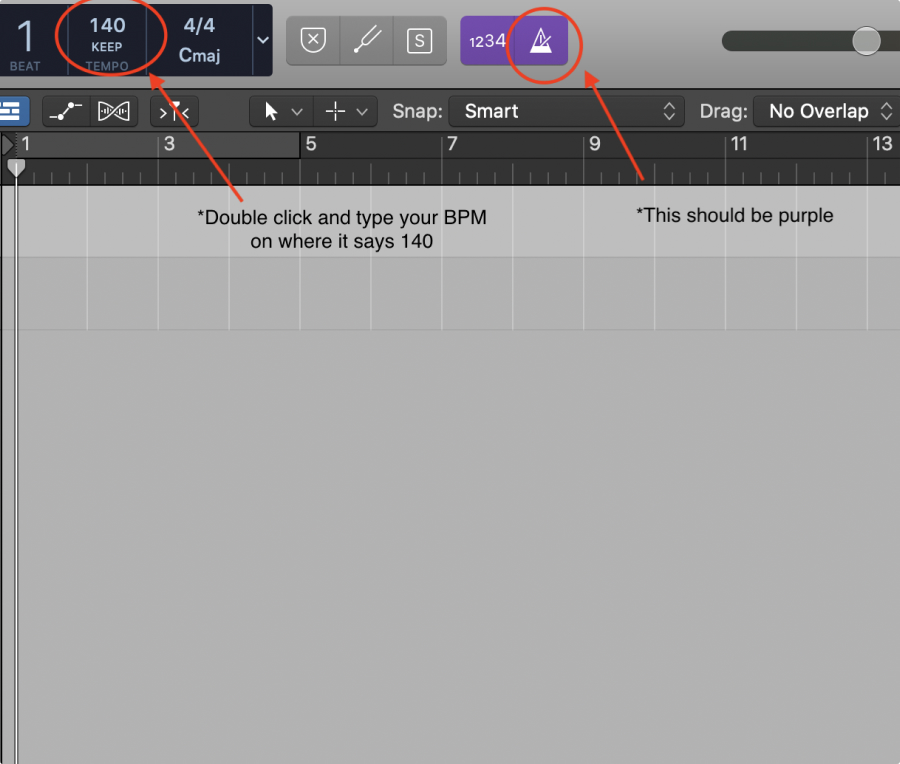
You can record without a tempo map if you’d prefer. However, if you’re adding more instruments to your track, it will be much easier to record to a click (metronome). I always record my vocals with the metronome on because it helps me sing "in time". It's also almost necessary to have the metronome on when you're recording over a section of your song that doesn't have any music. For example, often times there is a bar of no music before the chorus. This helps creates dynamic before a chorus but without a metronome on you'll likely not sing in time during sections like this.
Tip: For an industry-standard recording, make sure your sample rate is at 48 kHz (unless collaborating with someone who works in 44.1). Go to:
File > Project Settings > Audio > Sample Rate
Phantom Power
If your microphone is a condenser mic, it likely will require phantom power 48V. Read the manual of your microphone beforehand, as some delicate ribbon microphones can be damaged by phantom power. If you have no idea what this means, be sure to check out my post on everything you need to know about phantom power.
Tip: Only turn on and off phantom power when your microphone is plugged in, or you may bust your microphone!
Connect Your Audio Interface
When you plug in your audio interface, you should see a message pop up that asks you if you want to use this audio device.
Select “use”, and your device input and device output will automatically change to your interface.

If it doesn’t show up, go to:
Logic Pro X > Preferences > Audio > Devices
You can choose your devices manually on the this page.
Headphones For Recording
Plug in a pair of headphones into the headphone input on your audio interface. That is if you have chosen your audio interface as the output device. It's also completely fine to plug in your headphones to your computer. However, if you're doing that then just make sure the output device is set to "built-in output". After that, make sure the volume is on and you're ready to rock and roll. If you're unsure about what headphones to use then here's my recommendation on the best headphones for recording and mixing.

Recording In Logic Pro
Make sure your audio track is set to the right input and is record enabled.
Choosing the right channel input in Logic is often a common problem area for beginners. This has to do with where you plug in your microphone to your audio interface. For example, if you plugin your audio interface on the plug furthest left on your interface then this is input 1 in Logic. If you put your microphone into the channel on the second from the left on your interface then this is input 2 in Logic.
You must make sure both of these line up in Logic or there won't be link between your microphone and Logic. The same process goes for recording anything in Logic. For example, recording guitars in Logic, would be a very similar pre recordings setup.
You can change the inputs in Logic in the inspector window which is located on the left hand side:

Once that is set up, you're ready to record your vocals. The last thing we need to do is properly set the gain level on our audio interface. Then we're ready to record.
Setting The Appropriate Gain
You will need to set the right gain level in Logic so your vocal signal is coming in "not too loud" but "not to soft". There is a sweet spot that you can find when you're peak value is between -12b and -8db. The peak value is a level meter that is located in the bottom left of the inspector window.
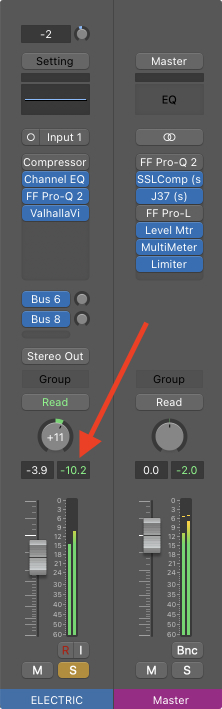
Get setup comfortable and start singing into your microphone to test the gain. You might notice that your peak value is showing -1db or maybe even -25db. Whatever it is, start to adjust the gain knob on your audio interface to find the sweet spot. If your peak value is -25db then you will need to turn up the gain. If it's -1db then you'll need to turn it down. Often times, it's best to find the loudest part in the song that are going to record to test the gain.
After setting the right gain levels, we are ready to record! Now the fun begins. Get comfortable. Find the right headphone volume balance because you don't over singing (sing to loud) if you don't have too. It's a common problem that your backing track is being played to loud and therefore you sing too loud. So make sure to have it at a comfortable volume. Turn on your metronome. Press "R" on your computer keyboard and then start singing your heart out.


Vocal Performance
Vocal Production Tips In Logic Pro
If you'd like to make your song sound wider and also give it more depth and dynamic then I would recommend recording background vocal harmonies. This is probably my favourite piece of music production. For example, you could try recording 2 harmonies. One would be panned completely to the left and the other to the right. Here’s an example of what my session looked like after recording a group of different vocal tracks. Also, here's a video here I walk through multiple vocal harmonies and a lead vocal and I teach you how to mix them together.

When you're finished recordings your vocals, now is the time to spice it up and add flavour. We do this by doing some mixing and production techniques. Here is a step by step article I have on how to mix vocals in Logic Pro. However, I can list the basics here for you below, these are the plugins I would recommend having on your channel strip in Logic:
1. EQ (equalization)
2. Compression
3. Reverb. Here's a video of me talking about one of my favourite reverb plugins.
I'll keep it slim right now in order not to overwhelm you on mixing your vocals. However, I do checking out my video tutorial on how to mix vocals. Sometimes, it can be helpful to hear what you're learning.

Final Thoughts On Recording Vocals
In my opinion, recording vocals is often the most difficult type of audio to record because your voice is constantly changing.
One day you're tired, the next day you lose your voice, your mood is off, your mood is on. It's an instrument that is constantly changing! However, it's an instrument that everyone loves to hear. The vocal is usually the priority of the track and needs to be recorded at such high quality if you want to draw the listener in. It will take time to build up your skill to getting a really solid vocal recording.
However, stay with it. Don't overwhelm yourself with equipment. Get the basics if you're just a beginner. Focus on what you can control which is your performance and your speed in Logic. Your equipment arsenal will build itself over time as you start to become a better engineer or producer. I can help you get there too, I suggest starting by getting by free 6 pillars on learning Logic Pro faster.


