How To Make Vocals Sound Professional
Oct 20, 2022
In this post, I’m going to teach you how to make vocals sound professional. I’ll show you how I sing, record, and process my vocals to get a very pro sound.
After this post, if you follow the steps, you’ll have a similar sounding vocal in your songs too. It doesn’t matter if you’re singing pop, country, rock, or if you’re rapping. The fundamentals are the same for all vocals and engineers. In most professional studios, around the world, there are standard tactics to get a fresh and modern sound.
This is exactly what we’ll be tacking in this post.

I’d like to break this post down into 4 different sections to make your vocals sound professional. They are all equally as important. Don’t just jump to the plugin section and think you’ll be good to go. No, you need to have all these 4 sections complete and done correctly if you’re looking to get a pro sound.

The four different sections to make your vocals sound professional are:
-
Tone
-
Recording
-
Plugins
-
Mixing
1. Tone - Your Vocals Are An Instrument
Your vocals are an instrument and they are completely unique to you and different to anyone else in the world. In other words, vocals are the most unique instrument there is in the entire world. Everyone has a different tone, timbre, and range. Some people might sound similar but everyone is unique.

With that said, each vocal track you record or each vocalist you record in your home studio will have a different tone, timbre, and range. This is going to effect how professional your vocals will sound. It’s the most important step to making your vocals sound professional.
You need to have a really good singer. For example, if you hire a someone who’s only sung a couple times but doesn't have much experience, it will be very difficult to get a professional sound. There’s only so much post processing you can do to make it better.

You need the right raw ingredients to get a pro sound. The first step is to get a really good singer or if you’re singing, practice and get good! The better you get at singing the more professional your vocals are going to sound.
Look at it this way, if you want professional sounding drums, would you record a beginner drum player? No, that's crazy. You would record someone who knows what they’re doing! So find a professional vocalist or something that's really good and that will give you the raw ingredients and a head start to getting a professional sound.
There are sites like SoundBetter where you can hire professional vocalists. You might have some luck on sites like Fiverr too. Either way, always get a sample of work they've done in the past so you can see what they sound like.

If you are recording your own vocals but you still consider yourself a beginner, that’s fine. You should still continue to do so but take special care in warming up your vocals before doing a vocal comp. Warming up your vocals will help a lot. I know it’s super annoying to warm up your vocals and that you’d rather jump right into recording but please do at least 10-15 minutes of a vocal warm up and you’ll be much happier with the results you’ll get. Here's a 10 minute vocal warm up I do on YouTube.

2. Recording
I want to say that recording is the most important part to getting a professional sounding but I can't lie, they're all equally as important. For example, recording your vocals is just as important as finding the right vocalist.
There's a lot to cover when it comes to getting the right vocal recordings. I'm going to focus on a few things that can really move the needle. They are:
-
Microphone
-
Pre Amp
-
Mic Placement
Microphone
In a perfect world, you'd have enough money to buy a really expensive microphone and that will help you get closer to a professional sounding vocal.
Most professionals studios will have a variety of different options to choose from when they're recording vocals. The super pro studios like Abbey Road in London or BlackBird in Nashville might have every mic there is!
In your home studio, you might only have one option or you don't even have a mic yet and you're looking for my recommendations. Don't worry, I'll get there.
Expensive Microphones
For your interest sake or if you can afford a microphone at this calibre, here is what the professionals use. Usually a collection Neumann, Wunder, Brauner, and Telefunken microphones. You probably recognize a few of these microphones and you may even recorded yourself on one of them in a pro studio.

A lot of them aren't even being made anymore which makes them more attractive because of the scarcity of sound they're able to produce. They've also stand the test of time and have been around for decades producing thousands of world hits.
Does that mean that pro studios only use these super expensive microphones like the Nuemann U67? No. Not at all. The benefit of being in an expensive professional studio is the option to record using any of these.
Like I said at the beginning, your voice is in an instrument and it's different for everyone. For instance, I think my voice sounds really great on a Neumann U67. My song Goodbye was recorded using this mic. Your vocal might not fit on it and could be better with a Telefunken U47. The benefit of recording in a professional studio is you'll have the option to try all of these.
If you're interested in seeing the quality difference of an expensive mic vs a cheap mic watch this video where I compare a $450 mic vs a $6,000 mic.
Reasonably Priced Microphones
Just because professional studios have the option to record with whatever mic they want doesn't mean they always do and it's not always the case that the most expensive mic will give the best result.

A big part of how the mic will function comes down to the quality of the pre amp as well. We'll get to that in the next section. Besides that, if you have a terrible singer, the best microphone in the world won't do a thing to improve the result. All of these topics have to work together.
So what kind of microphone should you purchase to get a good result but is reasonably priced?

I usually push people towards the Shure SM7B Mic or the Rode NT1A Mic as my go to options for microphones priced between $200 and $500. Both of these powerhouse mics, if paired with a quality pre amp (audio interface) will get you a very professional sound. I've heard that the 2019 Post Malone record was recorded with a Shure SM7B Mic. It's a solid mic with a lot of history and it stands the test of time.
Some newer microphones that I might recommend that don't break the bank either are the Audio Technica AT4040 mic , the Audio Technica AT2020, or the Donner DC-87.
If you're looking for something less than $100 then I would take a look at the Marantz MPM-1000 or the Tonor TC-777 I gotta say though, if I'm truly being honest, I would stay away from investing in a cheap mic. Find a way to dig a bit deeper into the bank and go for a mic that is $200. The quality makes a difference at this level and you'll be happy in the long run.
Microphones Between $199 and $499
Microphones Less Than $100
What Mic Do I Personally Use?
If I'm recording in a professional studio then I I'll use a Neumann U67. I hope to get one of my own some day soon. They no longer make the original model so it's difficult and expensive to find one.
On the other hand, if I'm producing in my home studio I'll use either a Shure SM7B but lately I've been testing out the new UAD SD 1 and the Slate Digital Virtual Microphone. The latter is new microphone and it has the ability to model older analog mics. Specifically, I like it because it models a lot of the popular Neumann mics.
Pre Amp
As I said above the quality of your pre amp is almost more important than the quality of your microphone. I had no idea about this until I was working in Germany with a professional producer who taught me this. For reference, when I say pre amp, I'm talking about your audio interface.
In professional studios, you would have a variety of pre amps to use for recording. Each pre amp will have a different tone and quality to it. Some sound warm and are great for vocals. Others are crips and good for guitars. It really depends on what you need.
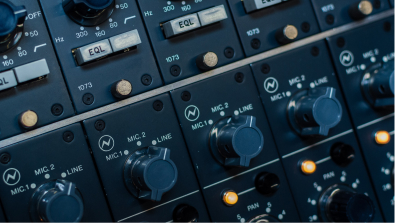
Take note of the image below. This is an example of an expensive pre amp that you might see in a professional studio. It's called the Neve 1073 which is one of my favourites that I use in my home studio.
Do you need a pre amp or can your audio interface do the job?
Your audio interface will do a good job at pre amplifying your vocal. Similar to microphones the cheaper the audio interface the cheaper the pre amp will be inside. The more expensive the better the pre amp. For example, a Focusrite Scarlett pre amp costs you about $200. The quality is good. However, the Apollo Twin X pre amp costs about $2000 which includes a better pre amp.
I gotta be honest again, if you're just a beginner producer or engineer you likely won't hear the difference between pre amps if I played you a Focusrite and an Apollo back to back. Over time, you will though.
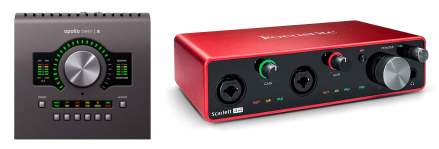
If you can afford it and you think you'll be in the music game for a long time, maybe it's not a bad idea to invest in something like the UAD Apollo Series or Apogee Symphony Series (which are equally as good). This is going to get you a professional sounding vocal!
Money is sometimes tight and I get it, it's totally fine if you want to start small and cheap with something like Focusrite or M-Audio. The quality will be good but just know that the professionals won't be using equipment like this to get professional sounding vocals.
Mic Placement
This is the next biggest lever that you can control when you're recording vocals to get a professional sound. I often find a lot of beginner producers get this wrong. In a perfect world, you'll be recording your vocal with a pop filter. For example, here's a cheap one, and here's a more expensive one. That's going to take away any plosives which are essentially bursts of air that make a vocal sound bad.
Warm up your vocal, I use this free 10 minute vocal warm up on YouTube. I then have my backing track being played at a comfortable level in my headphones. Not too loud because you don't want to sing too loud either. Have it at a low to normal listening volume.
Stand comfortably and have your mouth be about 6 inches from the mic. This is a good starting position. Next, move closer to the mic if you're singing an intimate part. Get right up in there. Like 1 or 2 inches away. Use your physical dynamics between you and the mic to get a professional sound.
Ever wonder how professional vocals sound so close and intimate? A big part of this is because the singer is actually really close to the mic. The same goes for stepping away from the mic to. If you want to give the effect that you sound further away, then step back. Overall, you shouldn't be in a stagnant position the entire time you're singing. Move a bit to work with the dynamics in your track and that's really going to help make your vocal sound more professionals.
If you're recording yourself you'll have to remember to do this. Ideally, in a recording situation, the producer you are working with should be looking at you physical dynamics between the mic and giving you feedback.

3. Plugins
This is the section where the vocal can come to life BUT only if you have done the previous two sections properly. Processing your lead vocal with plugins is going to apply polish and punch helping it pop out and be noticeable in a mix. However, if you apply polish and punch to a crappy vocal, well, you're just going to get a crappy polished vocal.
I will show you a plugin chain that I use on most of my lead vocal productions to make them sound professional. The plugin chain will vary sometimes depending on the genre of vocal and song or the style of vocalist (make or female). However, there are some staples that are always on my chain, no matter what.
Going further, I understand you might not have some of these paid plugins that I use so I'll recommend stock plugins that are available for free in Logic Pro or your DAW of choice.
Here's what a typical vocal plugin chain, for me, will look like. Every producer has their own flavour but I guarantee that the fundamentals will be the same:
Gain
This is not always a necessary plugin to have but I add it in order to do some gain automation on the vocal tracks. For instance, I will apply some gain to specific words phrases that might be too soft and I will apply reduce the gain in areas where it might be too loud. Doing a bit of gain automation will allow your compressor to work a little less intensely. However, gain automation on a vocal track isn't always necessary. In the case of this vocal production, it was.
Pitch Correction
I apply a very sudden amount of auto tune or pitch correction to smooth the vocal out. It's hardly noticeable to the ear but supports the lead vocal and adds very subtle help. There is a free pitch correction plugin in Logic Pro and there also a ton of paid plugins you can use as well.
Pro-Q2
This is a paid EQ plugin by FabFilter. Although, you can get the same result from using the Channel EQ plugin in Logic Pro or any other stock EQ plugin. For this plugin, I'm looking to do a subtle clean up the vocal. I'm not doing any surgical here. I'll usually do something like a low cut filter that removes any unnecessary low end. I'll sometimes do a small cut between 200 hz and 400 hz as well but in this case I didn't have to. Take note of the image below:

UAD Teletronix
This is a compressor plugin that is from UAD (Universal Audio). It's a paid plugin but you can also use the stock compressor in Logic Pro. Specifically, the Platinum Digital or the Vintage VCA. Experiment with all of them as well. This compressor isn't doing too much either. Instead, it's just controlling a little bit of the peaks. I'm only looking for about -1 db or -2 db gain reduction for the purpose of added control on the lead vocal. Notice a trend here? A lot of the plugins aren't doing much. They are doing subtle changes that add up to something big which is a professional sounding vocal.
RX8-Desser
This is desser plugin brought to you by Izotope. A stock desser plugin will do the same job and there is one for free in Logic Pro. Typically, after you start adding compression to a lead vocal the "s's" will start to sound more harsh and can be aggravating. A desser plugin will help solve this and reduce the harshness. My tip to you would be, hover around your lead vocal and find a section where the singer is singing a lot of "s's". Add a desser plugin and find the right level where you are taming the s sounds.
SSL EV2
This is a channel strip EQ plugin that I add on most lead vocals to apply some warmth or brightness in a specific frequency range. This is a paid plugin however the applicable free stock plugin in Logic Pro would be the Vintage Console EQ.
For this plugin, ask yourself, "can anything be boost in the vocal?" For instance, perhaps the vocal could be brighter so you might boost the high gain 1db or 2db. Or do you need more warm in the mids? This type of EQ should be an "additive eq". Not necessarily looking to subtract anything but instead add the frequencies that sound good.

UAD Pultec EQ
This is my favourite EQ plugin to add. It does something very special to the vocal in my opinion. I usually do a boost around 10-12k to give some sparkle to the lead vocal. I sometimes look in the low mids as well to see if I can reduce any muddiness that might be in that problem area.
This is a paid plugin by UAD but in Logic Pro there is a modelled EQ after this specific one and it's called the Vintage Tube EQ. I really recommend you checking this one out.

UAD 1176
This is where the vocal starts to really glue together. I use another compressor by UAD. It's modelled after an analog compressor called the 1176. I really like the sound on lead vocals. The best part, there is a stock Logic Pro compressor that is very similarly modelled after this compressor as well. It's called the Vintage FET. I'm looking for a lot more compression than the Teletronix compressor I added first in the chain.
I don't have a specific aim for db reduction, instead, I'm listening to the vocal. If I like the way the vocal sounds at -10db reduction then I go with that. For me, it's all about the sound, which it should be.

RX8-Desser
Now that the plugins and processing are really adding up. Especially, in the compression area, the "s's" can start to pop out again. Sometimes adding another desser plugin is a little trick to tame them down a b bit.
Fresh Air
This is a free plugin brought to you by Slate Digital. The purpose is to add more "air" to the vocal. That very nice top end that can sparkle. It usually works really nicely out of the box but sometimes adding this plugin can bring out too much high end and it doesn't work. This one for me is not that necessary but for this vocal production it was just right.
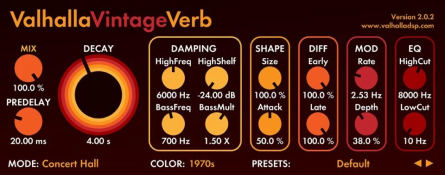
Valhalla Reverb
This is not something I do on every vocal I'm producing either, however, sometimes it works. This is adding a whole reverb on the entire track. Of course, I will add reverb but usually in bus sends instead of on the track. Adding it directly on the track though can really put it in a nice space for the listener. Valhalla is a paid reverb but the applicable stock Logic Pro reverb will work as well. For instance, the space designer reverb. If you're interested to hear Valhalla reverb in action, here's a reverb video tutorial where I talk about it.

Reverb and Delay Bus Sends
I will typically bus out 1 reverb and 1 delay on every vocal track I do. But like anything it depends on the production. I've found myself doing 2 different bus sends for reverb and sometimes 3 delays on a vocal. I know, it's wild, but you never know what kind of production you might find yourself in.
I won't dial to deep on choice of reverbs because there are literally thousands. I find myself using the Valhalla reverb a lot and the Soundtoys Echoboy delays. They are both tools that I know really well. That's the important lesson. These plugins are tools. Get to know how the tools work.
What Is Going To Make Or Break Your Reverb And Delay
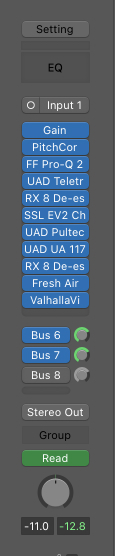
This is where professionals are separated from beginners. Take note of the image below. The right hand track in the inspector window is Bus 6 which is my vocal reverb.

Notice there are 4 different plugins on the bus track itself. We have, Reverb, EQ, De-esser, Compressor.
What I see with a lot of beginners is only 1 plugin. Just the reverb. While there is nothing wrong with that, however, there still is a lot of room to improve how this reverb will sound. A big part of this is EQ. You can apply a lot of subtractive EQ to your lead reverb so it does not fight with the dry signal of the vocal. Does this sound like gibberish? If so, then what this video of me bussing reverb and delay.
I also like to de-ess my reverb because the high-end of a reverb can sound very harsh and it really is aggravating and distracting. A de-esser plugin can really help here.
Besides that, a compressor plugin is a very cool trick that can really help clean up the reverb in your lead vocal. The compressor will compress the reverb sound while the singer is singing and then will let the reverb shine will the singer is not singing. This gives you an effect that the reverb is lush and big when there is no vocal being sung. When the vocal is being sung the reverb is reduced which cleans things up and makes it sound like the singer is still close.
Final Thoughts On Vocal Plugins
Test. Test. Test. The best way to get really good at understanding vocal processing and using the different tools you have is to use them more. Focus more on the sound vs what you're looking at within the plugin. And don't forget, there are no wrong answers/
4. Mixing Vocals
Mixing vocals should be the easiest and most fun part of all because at this point, you should have a beautiful sounding vocal track which comes from a perfect vocal recoding and subtle processing that helps the vocal shine.
The biggest focus on mixing your vocal in to the rest of you mix should be on the volume balance with respect to all the other instruments in your mix. Take a listen to my song Don't Start Now. Take note of how loud the vocal is compared to the drums, the piano, and bass.
Are you striving for an indie pop feel like my song? If so, balance the volume in a similar manner. If you're in a different genre you may balance the volume of the vocal a bit differently. For example, in hip hop you might have the beat or the 808 bass be "as loud" as the vocal. In rock, you might have a more even volume balance between the vocal and the instrumentation. Go by feel and if you're lost, load in a reference track or listen to other songs in a similar genre. By listening to them, you'll get a better idea of what you should do.
Doubles and Harmonies
Adding lead vocal doubles and harmonies are really going to help make your lead vocal pop out more. In general, they're going to help your overall production level up and sound more professional. Watch this video tutorial of me where I'm mixing vocals, doubles, and harmonies.
What are doubles?
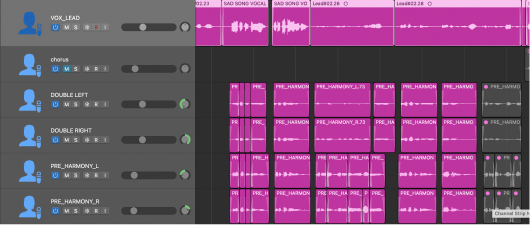
Vocal doubles are duplicating the lead vocal by singing it exactly the same on a different track. My preferred approach is to record 2 double vocal tracks. If you do this way, you can pan double vocal to the left and the other double vocal to the right. Given the listener a perspective of width in your mix. Take note of the image below. See how I added two vocal tracks. One is called DOUBLE LEFT the other DOUBLE RIGHT. I'm singing the exact same part as I do in the VOX_LEAD track.

Adding vocal doubles will help support your lead vocal. Tuck them back in the mix by lowering them in volume so they are hardly noticeable but still supporting your lead vocal. This is a tried and tested trick that very professional producer does to support the lead vocal.
Going a bit further, when you're recording your double, don't sing with as much gusto or passion as you did with the lead. Sing it a bit more relaxed with a software tone. This is going to help it sit within the mix better. On the other hand, if you sang it as it was a "lead vocal" it would still work well but it might fight a bit too much with your actual lead vocal.
What are harmonies?
Vocal harmonies sing a different note in your key scale and it sounds very pleasing to the ear but also supports the lead vocal. I recommend watching this mixing vocals video where I show you how to mix in harmonies. On the other hand, if harmony is a new concept for you, that's okay. Watch this video on how to sing harmony and I will walk you through step by step.
An easy harmony to add to your songs without knowing much music theory at all is to sing the lower octave or higher octave to support you lead vocal. I recommend recording two tracks and pan them each left and right. Take note of the image below where I've recorded a PRE_HARMONY_L and a PRE_HARMONY_R.
Final Thoughts On Getting Professional Vocals
This section might hurt you to hear but it's full honesty. If you're just a beginner producer and you've done your best following these four sections to make your vocals sound more professional but something is still missing. Like, it still doesn't sound radio ready. If you're a beginner, that will happen
Why does that happen? Because you're not trained enough to understand what to listen to. How should you? You just started. It takes many hours of practice to train your ears but if you do it consistently you'll get there faster.
I can help you get there faster by being a better producer. I suggest you start with my free six pillars on learning Logic Pro Faster.


