How To EQ Vocals In Logic Pro
Apr 24, 2023
There’s no denying that an unforgettable vocal can make or break a song. In this post, I'll be specifically talking about how to EQ vocals.
Learning how to properly EQ your vocal will help you get closer to this unforgettable vocal you're searching for.
One of the primary devices to enhance vocals is the Equalizer (EQ) plug-in. There are many other techniques and plugins as well, to make vocals sound professional, however, we will narrow this post to EQ.

Although there are many third-party plug-ins you can add to your Digital Audio Workstation (DAW), Logic Pro’s stock Channel EQ plug-in is a powerful tool that can get you the results you need.
Working with an equalizer can be daunting at first. But don’t worry; I’m here to tell you everything you need to know about the basics of EQ to get you on the right track.
Before you start EQ'ing vocals, make sure you’ve recorded your vocal lines as cleanly as your setup allows you to do so. For example, using a pop filter to prevent plosives (blasts of air), a vocal booth, and appropriate microphone positions are some things you should take care of when recording.
At the end of the day, the less EQ you need on your vocals, the better.
What Does And Equalizer Do
To put it in simple terms, you want to use an equalizer plug-in for two important reasons.
Reason 1
An EQ plugin gets rid of unwanted frequencies.
Reason 2
An EQ plugin can boost desired frequencies.
These two reasons are the main intentions you should consider when making any sort of adjustments to a vocal. For example, let's say you have some background noise or perhaps you're singing very high in a specific part of your song and it sounds harsh. You would use an EQ plugin to remove these unwanted frequencies.
On the other hand, let's say you have recorded background vocals you created and you'd like them to sparkle in the high end of your mix. You might use and EQ in this example to boost the high end frequencies.
To fully grasp what frequencies you'd' like to remove or boost, you need to know what these frequencies are.
So, let's dive into each of the frequency ranges and what you can expect each sound to be on the frequency spectrum. Although it differs depending on your setup, type of microphone, and the vocalist, the list below should help you get a general grasp on different frequency characterizations:
-
Low-end noise (20 Hz to 80 Hz): This frequency range contains rumbling and humming sounds from the mic stand, the room’s acoustics, or sometimes the air conditioner. This might be an area where you might want to remove this this background hum.
-
Low-mids (Boominess) (80 Hz to 250 Hz): This is where you typically sense the warmth and fullness of the vocals. However, too much of it can result in a boomy sound. Most of the time, we’d want to reduce these frequencies to some extent.
-
Muddiness (Boxiness) (250 Hz to 500 Hz): Similar to the previous category, this is an area you’d want to attack if your vocals don’t have much separation from other instruments in your track. In other words, your vocals sound “muddy.”
-
Nasal Honk (800 Hz to 1.5 kHz): Due to our microphone’s sensitivity, frequencies in this range can create too much of a nasal or honky sound in our mix. We’d want to look for those sounds and reduce them to create a more natural-sounding vocal track.
-
Presence (Clarity) (4.5 kHz to 9 kHz): One of the main areas you want to focus on to make your vocals tracks cut through the mix and sound livelier.
-
Airiness (Breathiness) (10 kHz to 15 kHz): This is where that sparkle in the vocals resides. Boosting frequencies in this area will make the vocals sound brighter and give them a high-pitched character.
Remember that this is not a fixed list and can change entirely based on the vocalist’s sound character. For example, frequencies around the 15 kHz mark can sometimes be too piercing. Therefore, boosting them a lot can add too much sharpness and hurt the listener’s ears. For example, if you're recording with the Rode NT-1A Microphone, there is already a lot of high end "crispy'ness" that comes from the microphone itself.
Tip: Besides using the EQ plug-in in Logic Pro, adding reverb is another excellent way to make your vocal tracks stand out. What’s more, you can EQ the reverb to shape its sound and ensure it won’t clash with other sounds in your production.
Adding The “Channel EQ” Plug-in To Your Track
Okay, let’s say you’ve recorded your vocal track. Listen to the raw recording and take note of any problem areas:
Does it sound too muffled?
Do you hear the A/C’s rumbling noise?
Are there any harsh or piercing frequencies?
These are some of the areas you’ll want to address with EQ.
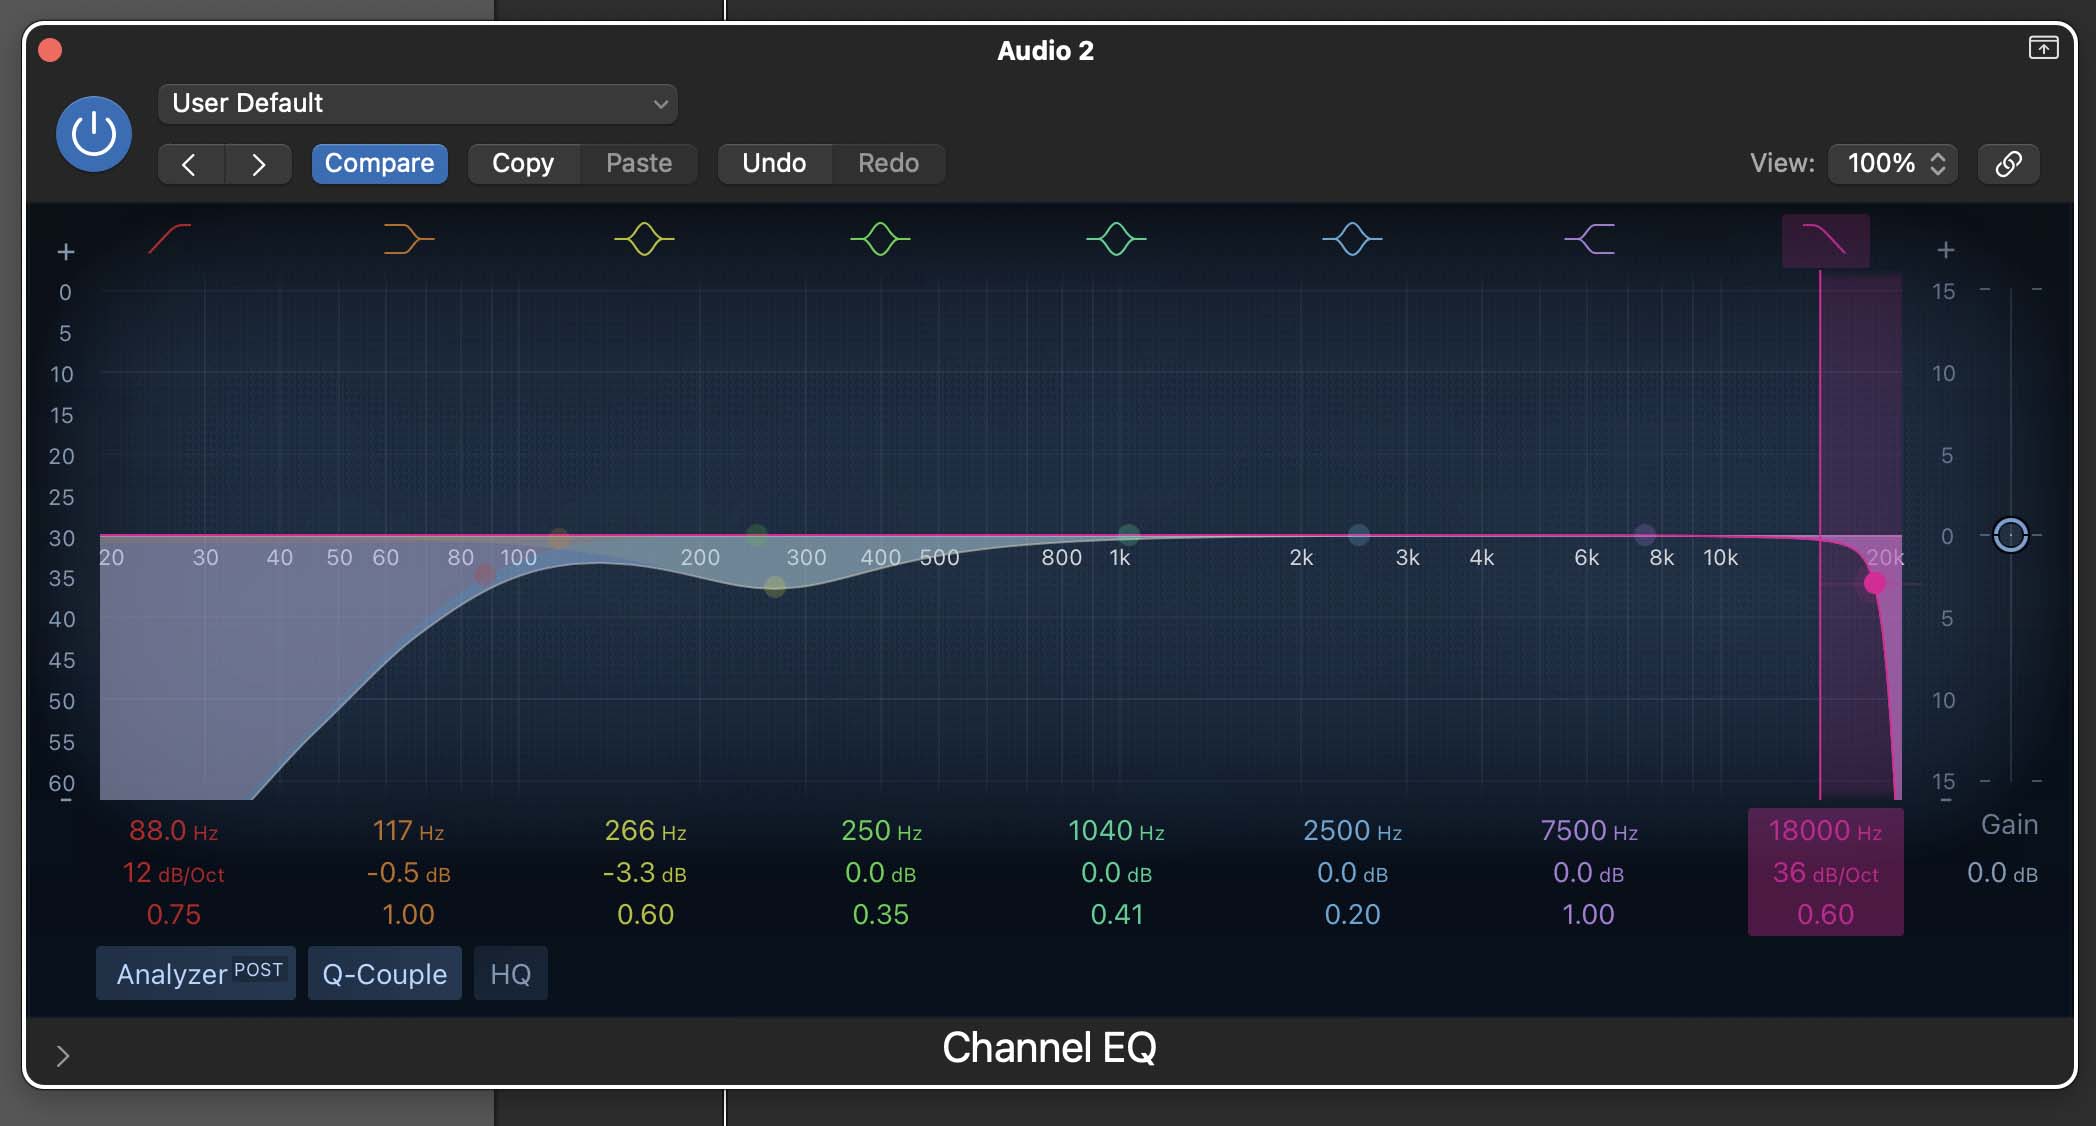
There are many different types of EQ plug-ins that producers use. Logic Pro’s “Channel EQ” is a parametric equalizer, allowing you to adjust specific frequency bands by controlling different parameters, including mid/side frequencies, bandwidth, and gain.
The Channel EQ plug-in gives you 8 bands of parametric equalization, making it a versatile tool for shaping the tonal balance of your tracks.
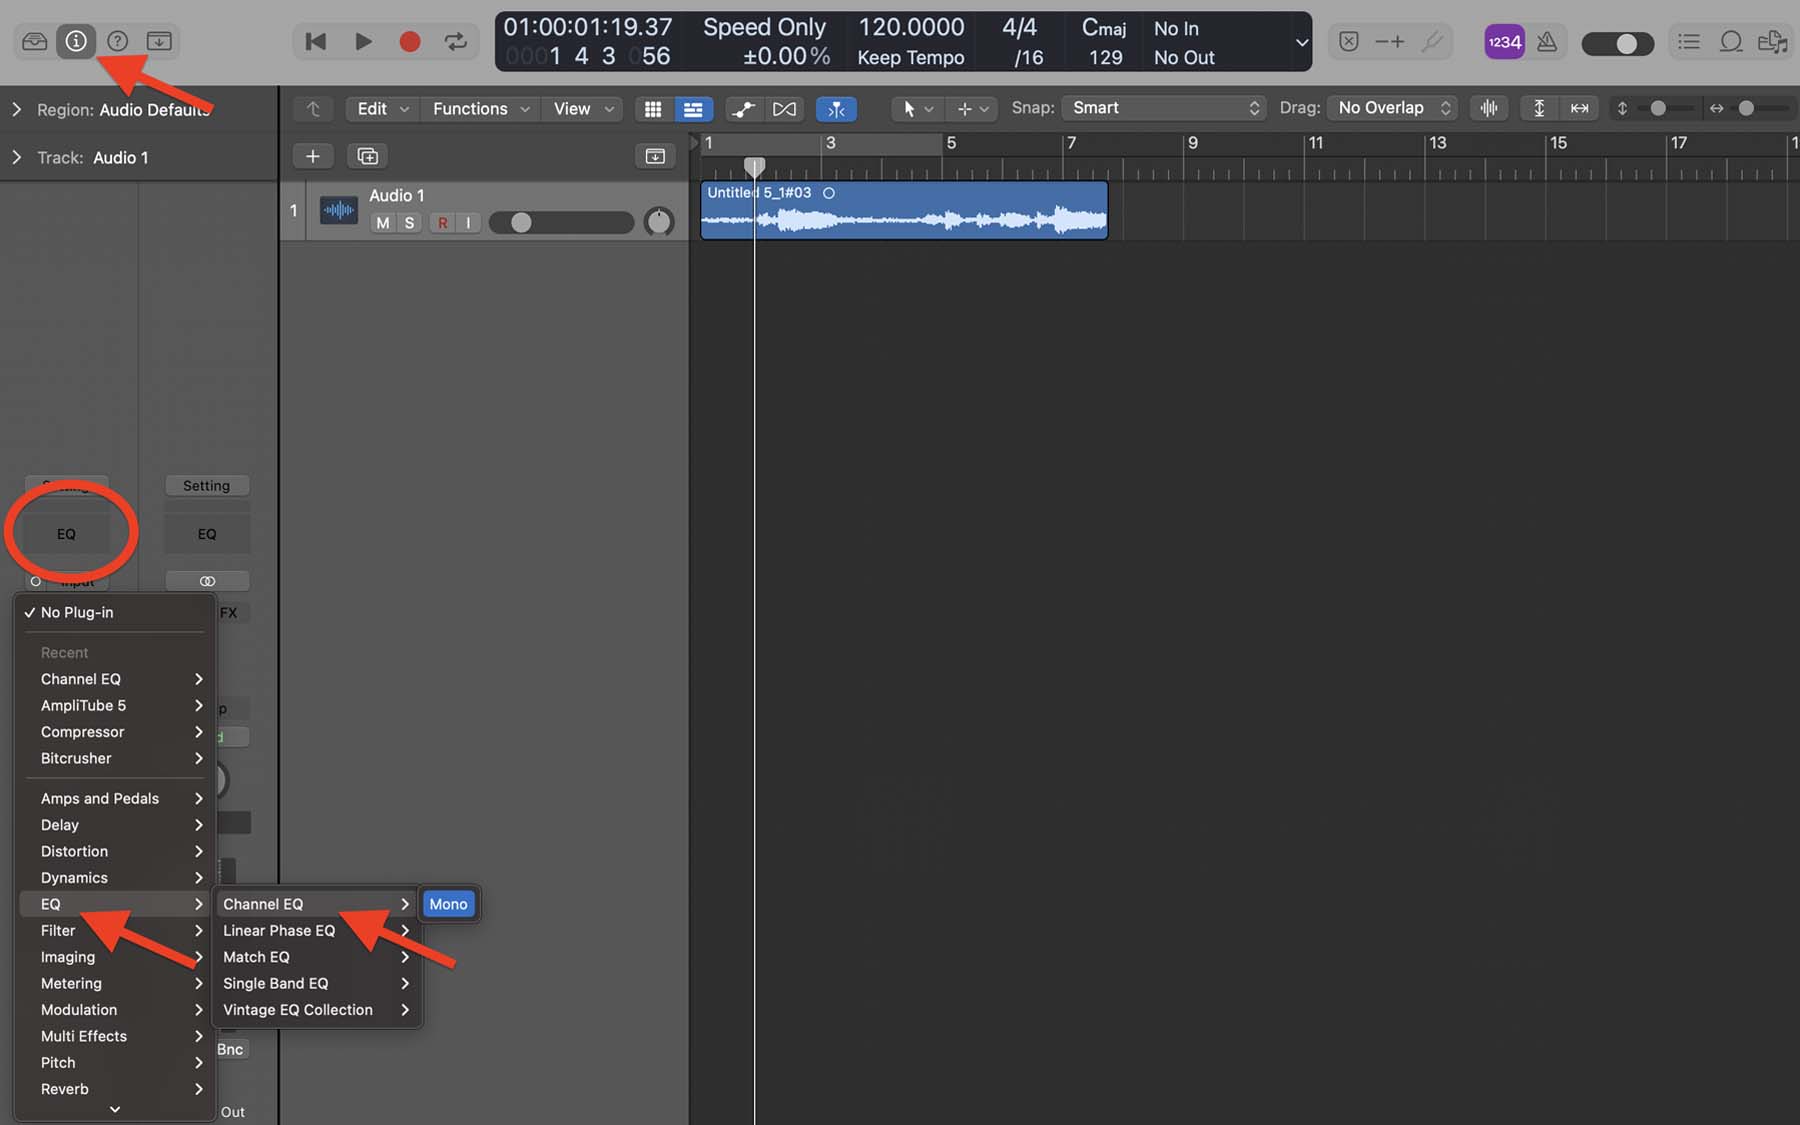
To add the Channel EQ plug-in to your vocals track:
-
On the top left corner of Logic Pro’s workstation, click on the inspector menu (the little i in a circle).
-
You’ll see a little box that says “EQ.” That is your EQ display. Clicking on it will automatically add Channel EQ to your track.
-
You can also add it from the Audio FX menu > EQ > Channel EQ.

Now, I know this might look challenging and complicated at first. But don’t worry. I’ll go through everything you need to know about the basics of EQ step by step.
Let’s take a look at some of the essential parts of the plug-in’s interface.

To make it easier, I’ve added numbers close to some of the tools we’ll be using in the equalizing process:
-
High pass filter: a filter that allows high frequencies to pass through and cuts off low frequencies below a certain point.
-
Low shelving filter: a filter used to boost or decrease frequencies below a certain point while leaving higher frequencies untouched.
-
Parametric filters: these are filters to boost or cut low frequencies with precision regarding bandwidth.
-
High shelving filter: opposite of a low shelving filter, boosts/decreases frequencies above a certain point and leaves lower frequencies unaffected.
-
Low pass filter: opposite of a high pass filter, allows lower frequencies to pass through and cuts off frequencies above a certain point.
-
Analyzer: This tool displays your audio signal’s frequency spectrum and waveform.
The Analyzer can come in very handy if you’ve just started working with the Channel EQ plug-in. But I suggest not depending on it too much and trusting your ears more than the visuals of the audio waveform.
Another terminology that you should know is the “Q Value.” It refers to the width of a filter. A higher Q value means a narrower bandwidth and a more precise boost or cut. On the other hand, a lower Q value results in a more gradual boost/cut.
To adjust the Q value of a filter, click on the assigned dot on the horizontal line in the centre. Once the line changes colour to the chosen filter, you can adjust the Q value by moving the vertical lines around the filter. Here’s a screenshot to guide you further:

Play around with different filters and their Q values to get a grasp on how each behaves and changes the characteristics of your vocal track.
Note: if two of the filters collide with one another, not allowing you to adjust them both, temporarily turn one of them off by clicking on its icon, adjust the other one, and turn the previous one back on.

Vocal Track Frequencies You Should Get Rid Of
Let’s focus on frequencies we want to reduce or cut off entirely.
First and foremost, you’d want to roll off all the unwanted low-end bass and rumbling noises that your microphone has picked up.
This will also help reduce the exaggerated bass in your recording, which typically occurs when the microphone is positioned too close to the vocalist’s mouth.
Select a high pass filter (far left, coloured red) and position it around 90 Hz. Try not to give it too much Q value to have a smooth roll-off as you move deeper into the bass frequencies.

Next, you’ll want to attenuate the muddiness that comes from your room/vocal booth. No matter how well your acoustic treatments are, that boomi'ness character can appear in your vocal tracks. It is more noticeable if you listen to the vocals along with other instruments. My room is as treated as much as I could. Even then, I still use a plugin called Sound ID at the end of my master chain that helps balance my room even more. If you're interested, here's a video of me setting up Sound ID in my home studio.
Continuing on, select a parametric filter and slightly reduce the gain. Try not to reduce it to more than 5 or 6 dBs. If you think you need to go lower than that to get rid of the ‘mud,' you should probably rerecord your track. Also, make sure to keep the Q value reasonably low to avoid the changes getting jarring and too obvious to the listener.

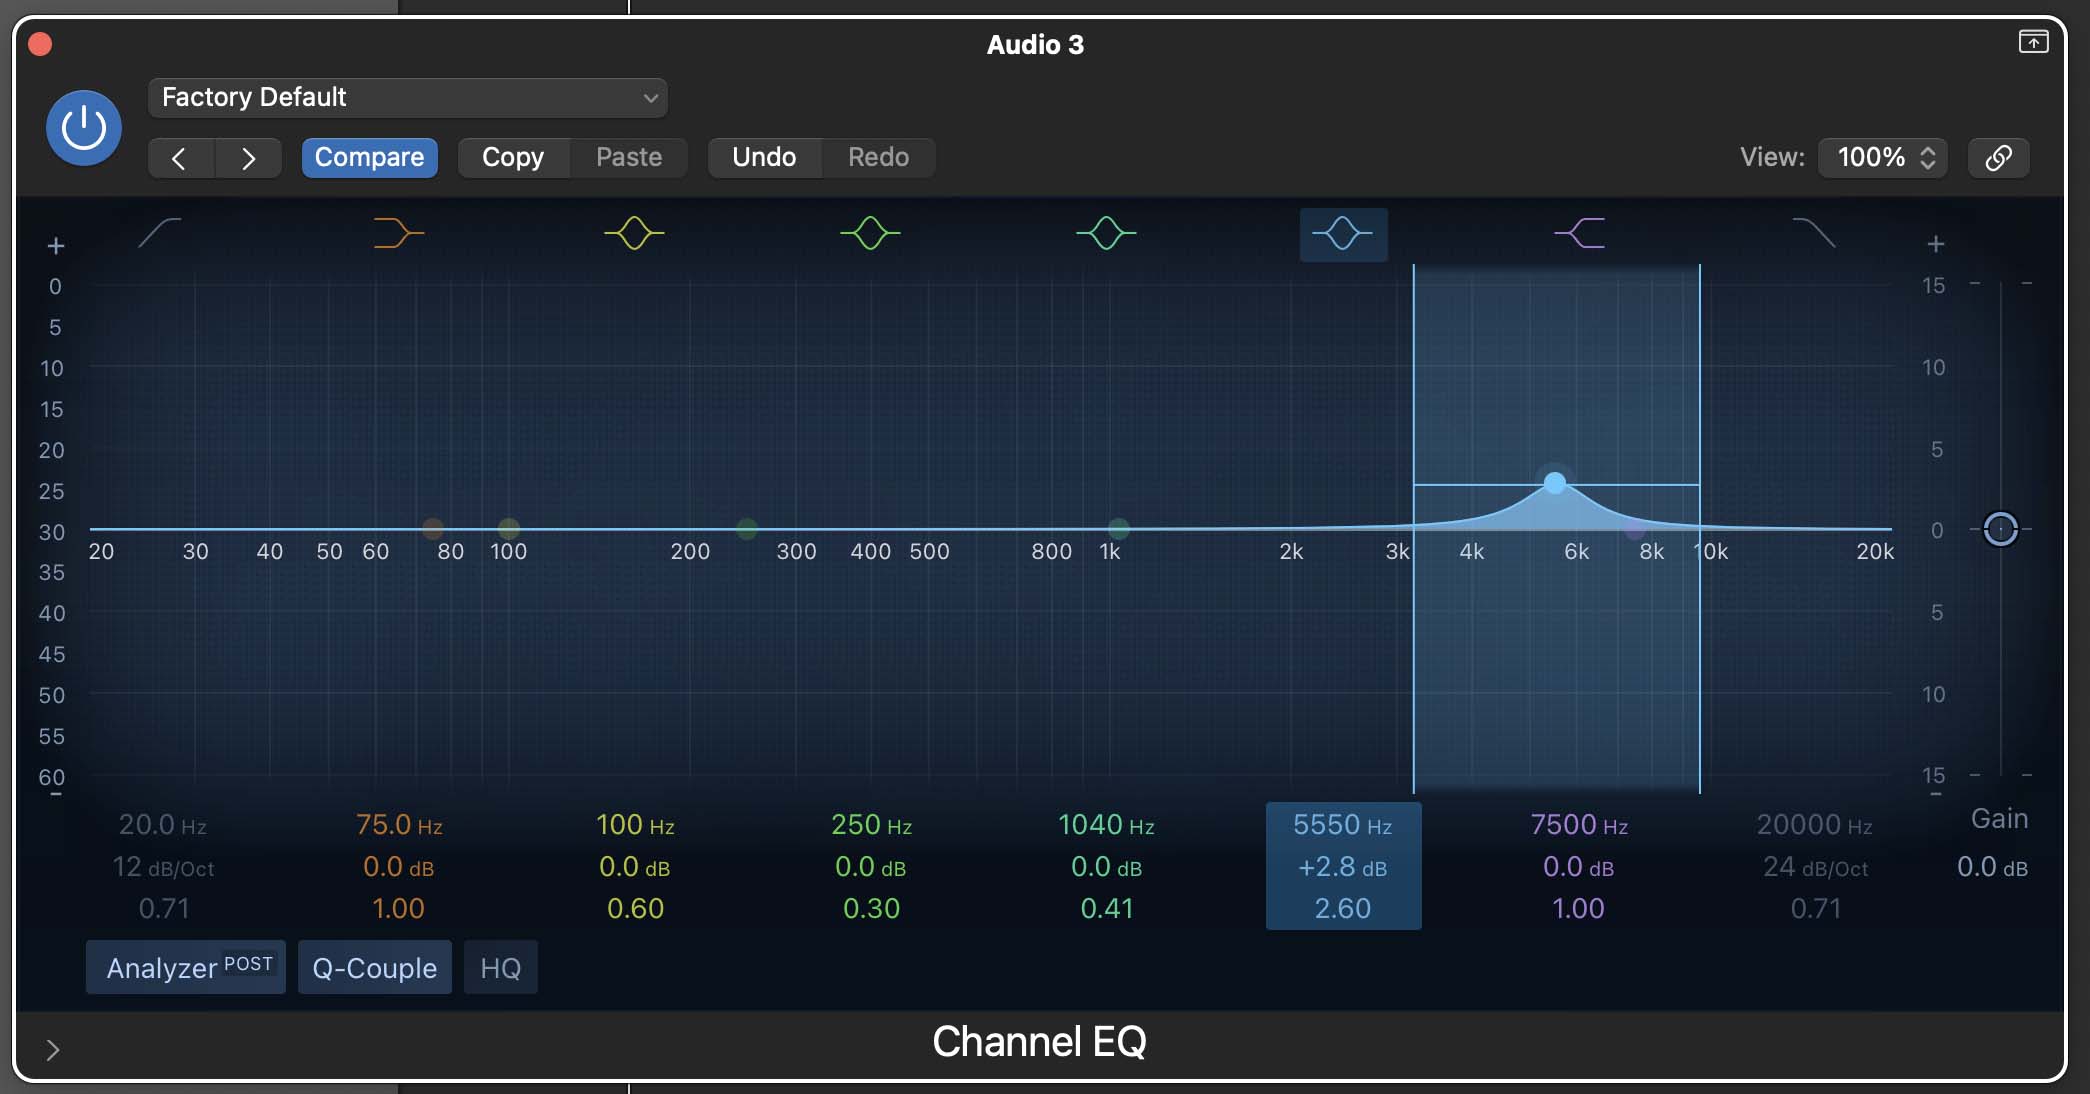
Lastly, you’ll want to cut off the high-pitched, piercing frequencies in your vocal track.
Select a low pass filter (far right, coloured purple) and bring it to around 18 kHz. Make sure you tighten the Q width to avoid losing the airiness/sparkle of the vocals. It should look something like the screenshot below.
Once you’ve done all three, most of the unwanted sounds and frequencies should be out of your vocal track. But we’re not done yet.
Now it’s time to boost the desired frequencies to make the vocals really stand out. This is where your vocal will come to life!

Vocal Track Frequencies You Should Boost
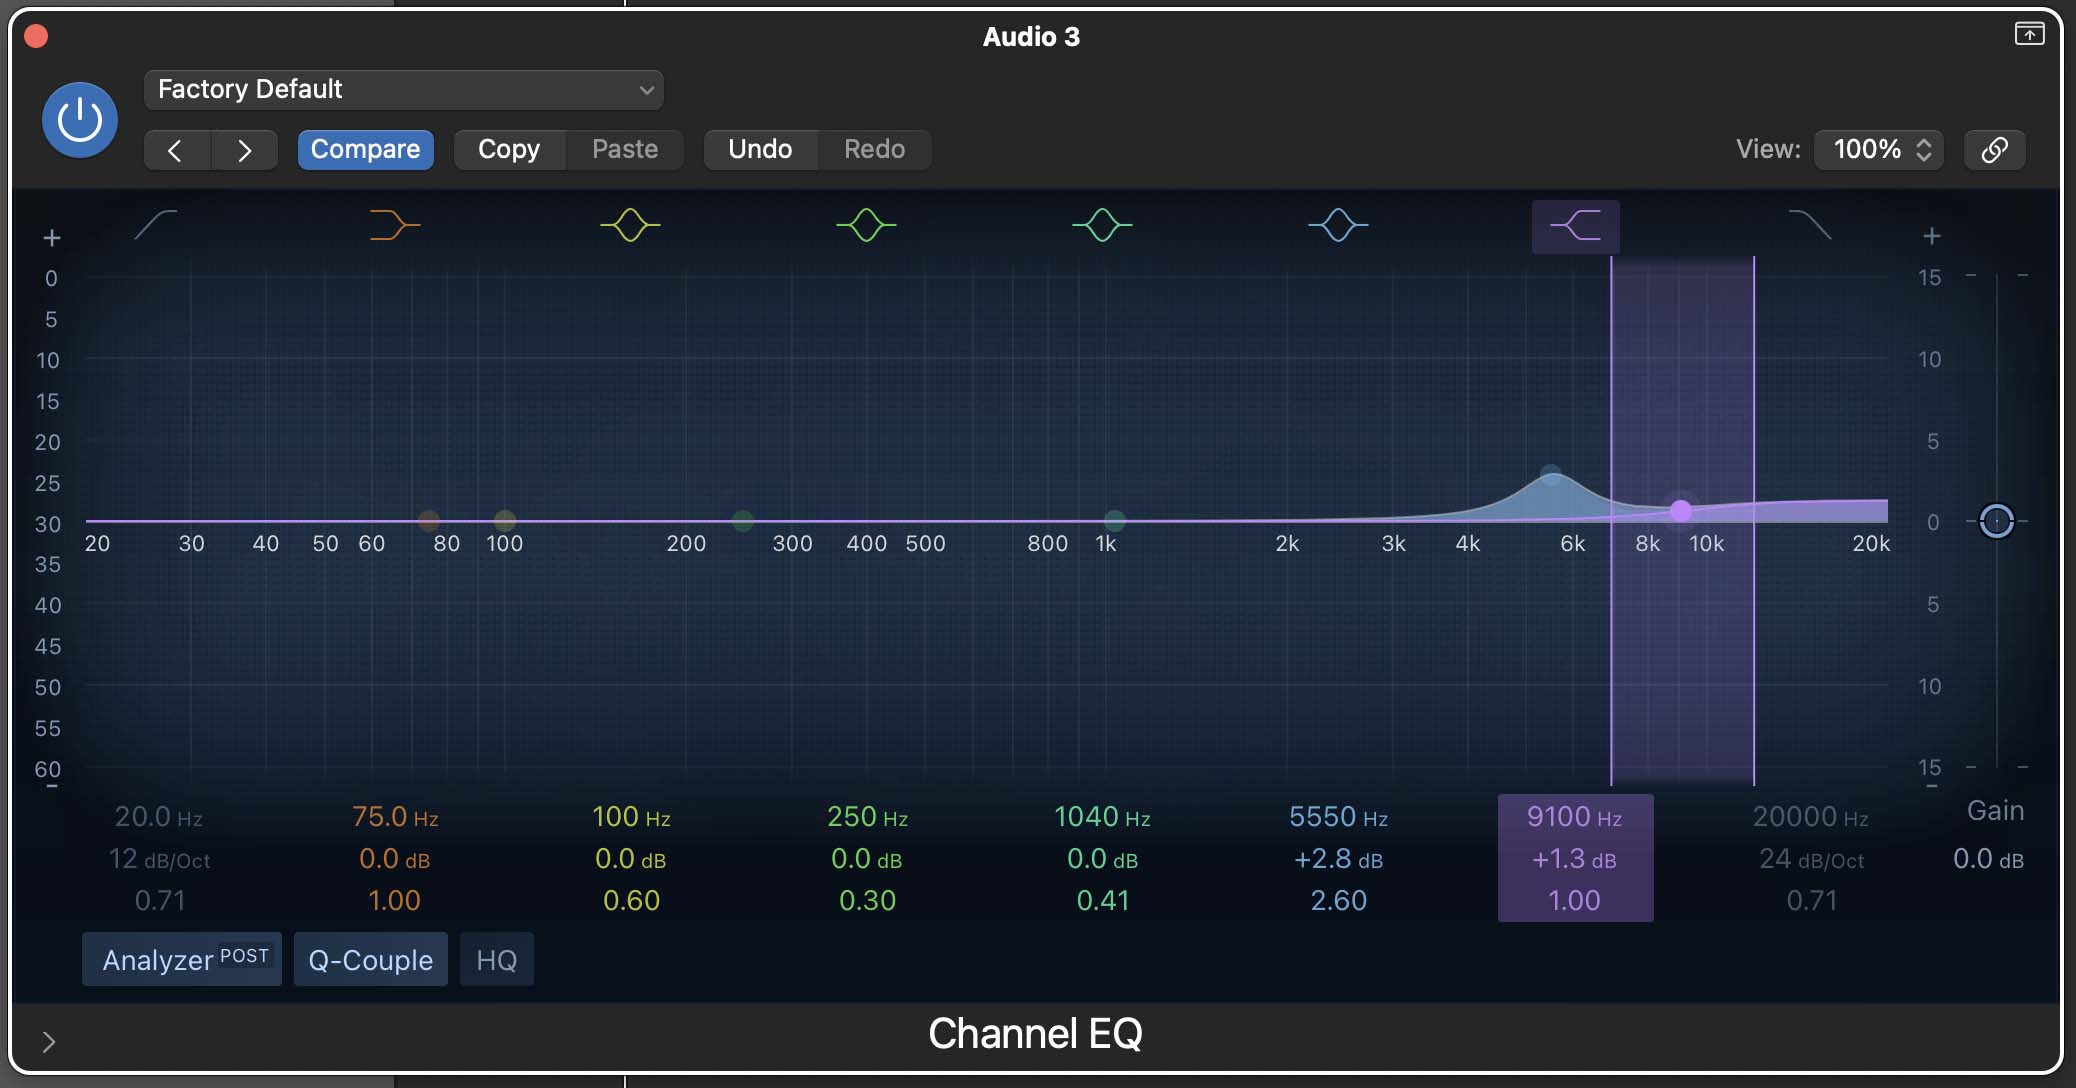
Let’s start this section by increasing the sense of presence in your vocals. Typically, you’d want to target frequencies around 4 kHz to 6 kHz. Boosting these frequencies will bring a certain solidness to your track.
Select a parametric filter and increase the gain gently. You’ll want to have a fairly high Q value for this part. Again, you shouldn’t go overboard with the gain. It’s best if you avoid going above 5 or 6 dBs. Always fall back on your "ears". If you think the Q value is making the vocal to harsh or 'nasally' then widen it out a bit.
Tip: another trick to add more presence to your vocals is to adjust the EQ on your main instruments. Try to address the same frequencies you increased for more presence in vocals, but this time, reduce them by 2 to 5 dBs on your guitar and keyboard tracks.
Next, we want to focus on increasing the airiness (or the sparkle) of our vocal tracks. This can help the words to be more intelligible to the listener.
Grab a high shelving filter and increase the gain ever so slightly. You don’t want to go over 2 dBs, even if it sounds fine in your monitoring speakers/headphones. Adjust the Q value to your liking.
Tip: Listen to your mixes on different speakers, headphones, and sound systems to ensure none of your EQ adjustments sound jarring. Open-back headphones, for instance, allow for a more natural and spacious sound. Pay attention to higher frequencies of your vocal tracks while listening with this type of headphones to detect any piercing frequencies.
Ideal EQ Settings For A Vocal Track

If you apply all the adjustments we discussed, your Channel EQ workstation should look something like the image above. Such settings will generally enhance your vocal track. But it’s definitely not a one-size-fits-all solution to get the best results possible.
I know it's much easier to slap on a preset or do exactly what I do but that will not get you the best result. That's the voice is an amazing instrument, every single one is unique.
Play around with your own vocal recording and see if you can make the vocals sound more natural and less boxy by adjusting frequencies around the 1.5 kHz mark. Depending on your setup, you might need to boost or reduce these frequencies.

Adding EQ Colour With Vintage EQ's
You may have seen some producers use a variety of EQ's that you're not familiar with. For example, I often like to use a collection of Vintage EQ's in my processing. So, what are vintage EQ's and what is EQ Colour?
Vintage EQ's are physical hardware that look something like this in an older studio. This specifically is a Pultec EQ:

This is a physically box that would sit on your desk or beside your studio desk on what we called "rack gear". This box is completely analog. It involves sophisticated circuity that equalize the sound of an audio signal. We call it 'vintage' because it was popular in the 60's-90s. However, today, it's rarely used because we can have a similar effect by using software.
For example, in Logic Pro, there is a free plugin called the Vintage Tube EQ. You can get to it by adding a plugin on the channel strip:
Channel Strip > Plugins > EQ > Vintage EQ Collection > Vintage Tube EQ

When you add the Vintage Tube EQ in Logic, you'll notice it looks almost identical to the Vintage EQ image above.

Notice how similar they look! That's because the Logic Pro Vintage EQ is modelled after the Pultec EQ. In other words, they both have the same "colour" . But you might be asking yourself, what does colour in an EQ mean?
Colour means each EQ ever made has a specific sound. In other words, a specific colour. This sound (or colour) comes from the physical vintage EQ's. Because they were hardware pieces made from metals, wires, steel, and more, every single model was unique. Not one EQ sounded like the other. Although, every model was consistent, they all had different colours. Especially when many companies started building their own EQ's.
With all this said, it can be sometimes very tasteful to add a specific Vintage EQ to an instrument. For example, a vocal. Specifically, the Pultec EQ has a very warm colour to it versus a parametric channel EQ in Logic.
Final Thoughts On Using EQ: Practice Makes Perfect
The world of equalizers has no limits. While there are some general tips and tricks on how to get a good sound, at the end of the day, you should trust your ears on what sounds best.
Try as much as you can to EQ different tracks to see what works best for your projects. If you’re still not sure how to use the Channel EQ plug-in in Logic Pro, you can watch my YouTube video tutorial on how to EQ vocals.
In this video, I also go through different EQ presets that Logic Pro offers for different purposes. Those can be helpful cornerstones to get you going on the right track when dealing with multiple tracks and instruments.
If you need more help with music production, mixing, and mastering in Logic Pro, I am more than happy to help you out. I suggest getting my free 6 pillars on learning Logic Pro faster.


