How to Use Reverb In Logic Pro
Jan 19, 2022
We can use either a stock reverb plug-in or a paid reverb plug-in, whichever you prefer would work.
In this post, I'll show you how to use a stock reverb plug in.
By the way, if you prefer to watch a video on how to add reverb in Logic Pro then you can find the video below. You might also be interested in my 6 pillars to learn Logic Pro fast. I can help you become an expert, really quickly.

The reason why we add reverb is mostly because we don’t want certain sounds to sound too dry or artificial.

We will be looking at a stereo recording of an acoustic guitar. Stereo tracks have both left and right channels which make it sound wider.
We can add reverb to both tracks by adding it to the bus output track. Also, known as the summing stack in Logic.
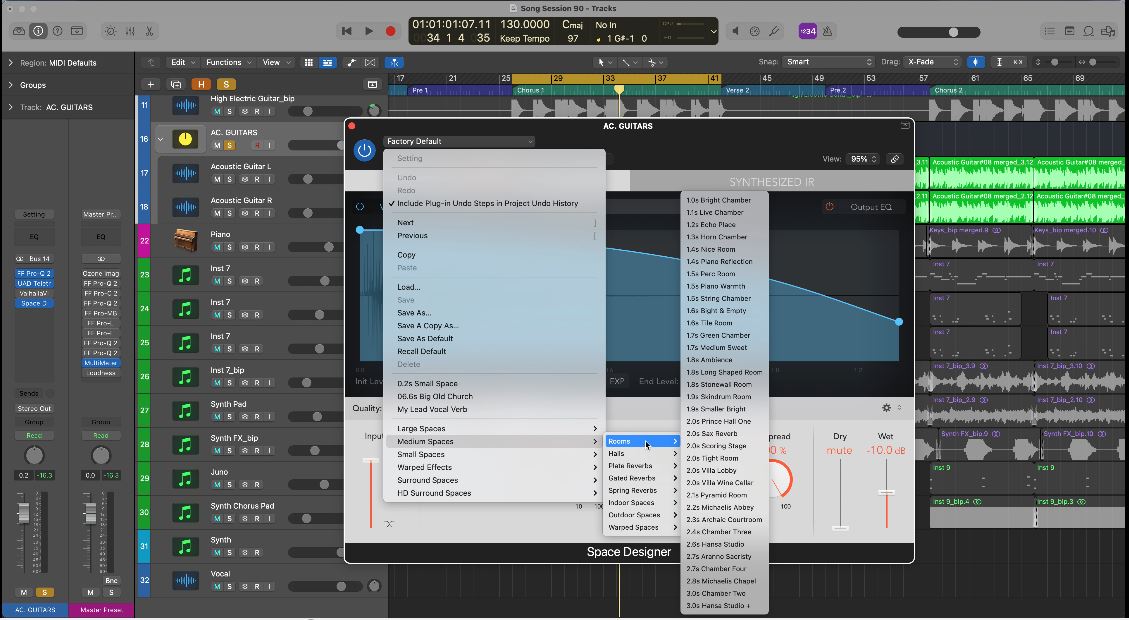
Navigated to FX > Reverb > Space Designer > Stereo.
For the sake of this post, we will use Stereo under Space Designer.
The easiest way to add reverb is to choose from the drop down presets that are available at the top of the plugin.
Now you must be wondering why we are adding a reverb, think of it like this:
Where do you want to hear this clip?
Do you want to hear this as if it's in a big space or do you want to make it sound close and intimate?
For this post, we'll choose the medium space just for balance and neutrality, after clicking on medium you will have options to choose from including Rooms, Halls, Plates etc.
For now we can click on:
Room > Bright and Empty
I'm choosing this reverb preset as it would be compatible with the vibe of the guitar.
Once you add the reverb and play the acoustic guitar track, it would no longer sound dry anymore. The reverb added character and depth to the track as if it was played in a bright and empty room. You can further adjust the wetness of the reverb or the pre delay so that you can further test out which would fit the vibe more. Adjusting the wetness gives you the opportunity to place the guitar in your mix. This is why reverb is such an important tool when you are mixing in Logic.

You can test out the other options too, however, do take note that adding a reverb is almost synonymous to adding a new sound.
Adding too much reverb and stacking sound on sound can make the whole track sound muddy because you're essentially pilling more sound.
Reverbs are cool but just use them to taste.

As a beginner, take it a step back and experiment with small amounts. When you are producing a song and mixing tracks together you can also EQ the reverb. This is a more advanced production technique but often used in professional recordings. It helps shape the sound of the reverb so it won't clash with any other reverbs or tracks in the production.
Another thing is we can also try “bussing a reverb” which is different and faster than adding adding reverb as a plugin.
Click on an empty bus in the track inspector window.
Search for the desired bus number and you can rename it to “Small Reverb”. Or anything you'd like.

Add the Space Designer plugin to the newly generated bus track (or any other reverb plugin of your choice) then choose your desired reverb in the plugin.

Notice that once you choose a reverb and play the track, nothing with happen. This is because you need to send signal to the bus track. This happens to do with the green circle that is located underneath the FX's.

Click and drag on this circle to add the desired amount of signal you would like to add to your bus track that has your included reverb on it.
This is a more convenient and productive way to add this effect as you don’t have to add a plug-in all the time. Not to mention, you can reuse the same setting of reverb on the track by adding the same bus.
Experiment with adding reverb as a plugin on the track but also get comfortable with adding reverb as a bus too. Each have their own advantages and as you start to become a more experienced producer then you will gravitate towards an options that works best with your process.
Reverb Automation
One of my favourite production techniques is too add the effect of a reverb automation. If you're unfamiliar with automation then here is a great post on how to automation in Logic Pro or better yet here is an automation video tutorial.
Reverb automation allows you to control any parameter on the reverb as your track plays through.
This could be pre delay, wetness, EQ, size. For example, I like to control the wetness of the reverb before leading into a chorus. Let's say we did this on an electric guitar part. This gives the effect to the listener the electric guitar is getting bigger and further away as the listener gets closer to the chorus. Then, when the chorus starts, the electric guitar reverb ends and it goes back to being a drier sound guitar. It provides dynamic and suspense that something new is about to happen.
Automation, in general, is a valuable production tool that I highly recommend you get comfortable with. This is where your mix comes to life!

Final Thoughts On Reverb
If I could only leave you with one thing.
Reverb is amazing. It makes everything sound good but don't get carried away with it. It can also be one of the main elements that can kill your mix. Trust my, at the beginning of music production career, I loved reverb maybe a little too much.
I put it on everything because when you're listening to your instruments in "solo" with reverb, they all sound great! However, when you're mixing all your instruments together, reverb could be killing your mix.
If you're interested in learning more about reverb, music production, songwriting, and mixing then I would recommend checking out my 6 pillars on learning Logic Pro Faster.


