How To Export A Song In Logic Pro
Mar 24, 2022
When you have completed your song in Logic Pro, you will most likely want to learn how to export your music in Logic Pro so you can share your work. There's no point of it keeping it on an external hard drive, export it so people can hear the music you've created!
Since you cannot send an entire project file to a streaming service, it is necessary to convert your music into a wav, mp3, or a similar audio file type. This process is called “bouncing”.

Additionally, you may want to export the other parts of your song to send to another producer, mixer or other artist, in order to collaborate with them. For instance, you might prefer to bounce the stems of a song in Logic Pro or send the stems of your music to a mixing engineer or video editor.
Bouncing and exporting are commonly confused because they do very similar things. When I first started producing music, what helped me at the beginning was thinking of each like this:
Bouncing: You are trying to get your entire song as a WAV or MP3 file.
Exporting: You are trying to get specific audio files within your song. For example, you only want the drums as 1 audio file.
In this specific post, I'll explain how you can achieve both bouncing and exporting.
If you would prefer to watch a video on how to export and bounce songs in logic pro, then you can do so below. Alternatively, here is a post on exporting in GarageBand.
Bouncing
1. Set The Range You Want To Bounce
There are a variety of ways to do this.
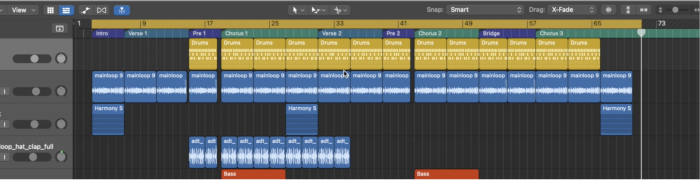
One common way is to use the cycle range to define what area of the song you want to be bounced. Wherever you have the yellow range marked out on the timeline is the part of your song Logic will bounce into the audio file. This is what it should look like.
If you're trying to get better at Logic Pro then I suggest you join my community of over 15,000 music producers by getting my free guide on Learning Logic Pro Faster.

2. Bounce The Project
Go to File > Bounce > Project or Section to bounce your project (the shortcut for this is ⌘B).
Below is an image of this option in the dropdown menu:

3. Choose Your Format Options
Be sure to click on the name of each destination to display the settings for that mode. Tick the boxes for each destination you want to bounce, whether it is PCM or MP3 (or both).
PCM is an uncompressed high quality option and MP3 is compressed to a lower quality, but much smaller file size (in most cases the quality difference is negligible). In other others, just think PCM as a WAV file. Here are some options you could choose for a PCM bounce.
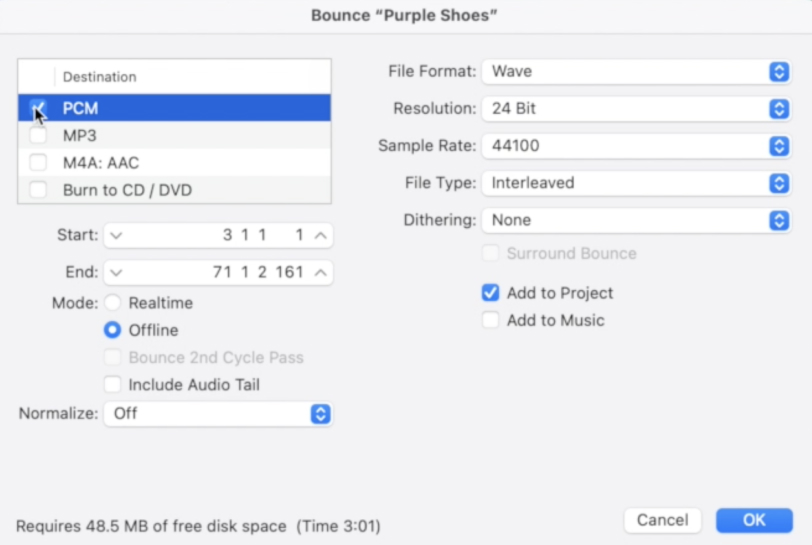

Note: Normalization looks for the loudest peak in the song and then change the amplitude of the audio so that the loudest point is at 0 dB FS. This can help if your master bus is clipping or is too quiet, but most of the time it is better to simply leave it turned off.
If you're planning on bouncing your project to upload to a streaming service, for instance, Spotify, then I recommend you master your song or get a mastering engineer to to it for you.
And in case you want to bounce to MP3, here are some good options you can copy:


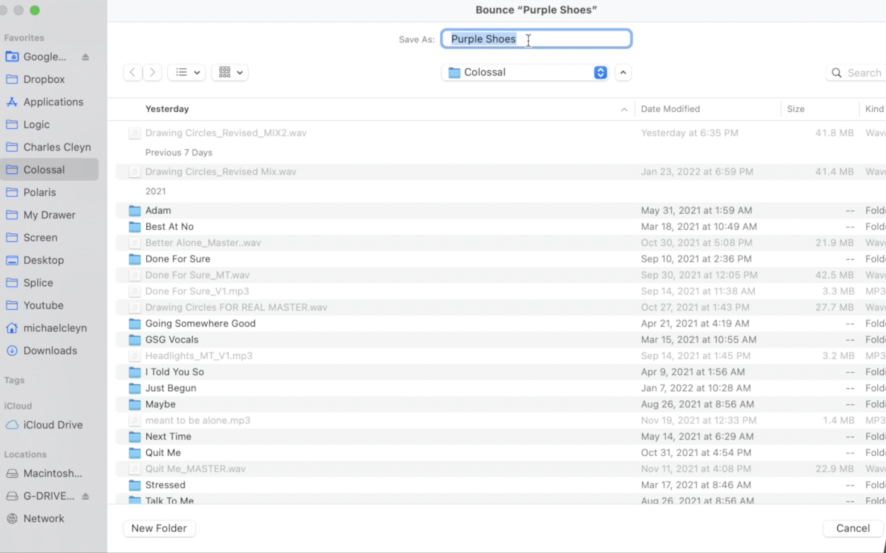
4. Name The File And Location
Give your song a name and then choose a location for it to be saved to. Below is an image of the window you will be shown to do this:
Exporting
Exporting is a useful function that allows you to share audio files & MIDI files of tracks or groups of tracks. This is necessary, for example, if you want to send your music to a professional mixer or even mix the audio yourself in a separate session.
These audio files that contain tracks or groups of tracks from a session are called “stems”. It is common to create stems for groups of instruments (such as drums, bass, guitars, vocals, etc) as well as for each individual track in your session.

Exporting Groups of Instruments
1. Create The Group Of Instruments
Do this by holding shift and selecting all the instruments you want in the group.
Right click on one of the tracks and select “Create Track Stack” followed by the option “Summing Folder”. Your group of tracks should then look like this:

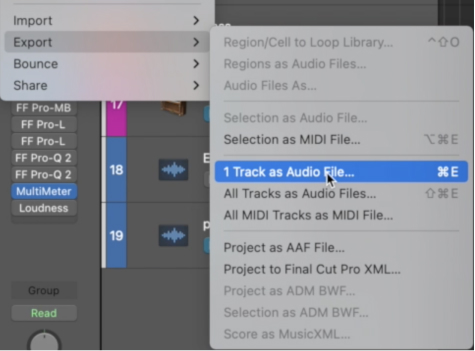
2. Select “Export Track As Audio File”
Now that you have the desired instruments on a single track, you can export this track as a single audio file. Select the track and go to “File > Export > 1 Track as Audio File”. Below is an image of this menu:
Tip: Exporting a track as a MIDI file allows you to send melodic information to somebody to use in their own DAW. This could be useful if that person owns a software instrument that you don’t.

3. Exporting All Tracks
In order to export all you tracks as audio files, go to “File > Export > All tracks as Audio Files”. This will then open up the following window giving you some options:

The settings above are good for achieving high quality exported stems so feel free to copy them. It is also recommended that you click the “New Folder” button in the bottom left corner so you can keep the resulting files organized in one place.
Note: The option to Bypass Effect Plugins is useful if you want to send the stems to somebody without all the processing baked into the audio file. Otherwise, any reverb/compression or other plugins on the track will be hard-coded into the stems.
If you're interested in learning more about Logic Pro or music production then I recommend check out my free 6 pillars on learning Logic Pro faster.


