How To Freeze Tracks In Logic Pro
Nov 02, 2022
In this post, I will teach you how to freeze tracks in Logic Pro. Grab your winter jacket, it's going to get cold. Oh, and I don't mean freezing your computer so it gets slower, quite the contrary!
There are number of ways why you might want to freeze tracks in Logic and we'll be sure to go through most of them. However, the most popular reason to freeze a track in Logic is help with computer processing.

For instance, if you have a slow computer then freezing tracks will really help your computer processing speed. If you're looking for a new compute in general, here is a video tutorial on the best macs for music production.
Either way, a good computer or and old computer, it's helpful to understand why you should freeze tracks in Logic Pro.
What Does Freezing Tracks Do?
You can think of freezing tracks in Logic as temporarily disabling and instrument or effect plugins there is on a channel strip.
This will offload any processing that your computer has to do to run the plugins. When you freeze a track, in the back end, Logic will transfer (bounce) your software instrument track to audio.
How To Freeze Tracks In Logic Pro
I'll break the freezing track process down into a series up steps that you can easily follow. In no time, your computer will be smiling up at you.
Step 1
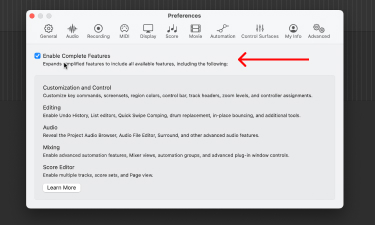
You'll need to make sure you have Complete Features on in your Logic Pro preferences. Without it, the freezing options will not be available.
Navigate to: Logic Pro X > Preferences > Advanced Tools and select Enable Complete Features. Take note of the image below.
Step 2
Select the track you that you would like to freeze in Logic by clicking on it. In the image below, I've clicked on my Synth track which is a software instrument track with MIDI data. However, notice I also have two audio tracks.
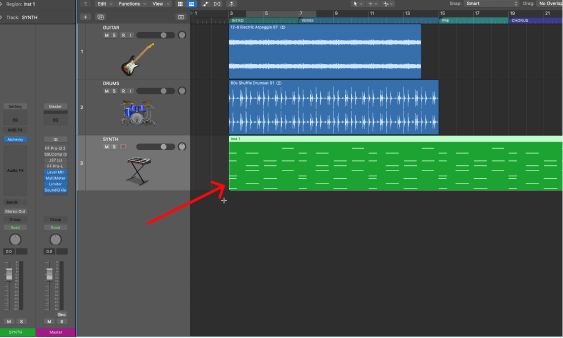

I've decided to freeze my Synth track because it requires more computer processing speed. For instance, every time I press "play" Logic will have to process the software instrument and output the sound. On the other hand, my audio tracks, there is no processing at all. Logic Pro and your computer love audio.
Step 3
Right click on the track. In our case, my Synth track. You'll notice a menu of options appears. Take note of the image below. Navigate to Track Header Components and then click on Freeze.
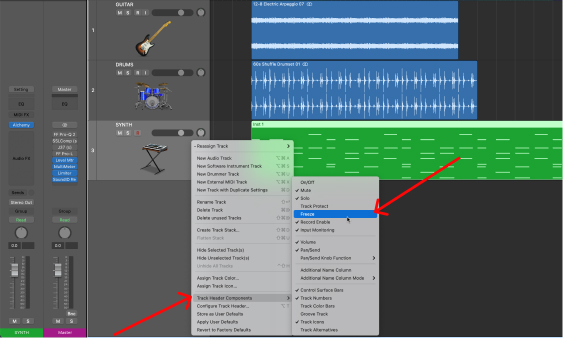
Some of you might think at this point the track is frozen. However, nothing has happened yet. We've only now included the option to freeze a track on the track header components.
What Are Track Header Components?
In short, track header components are the elements that exist on your track. They give you the opportunity to do things to your track. Whether that is to freeze your track, or even simple options like mute or solo.
Here are some popular track header components that I use on my tracks:
-
Mute
-
Sole
-
Record Enabled
-
Freeze
-
On/Off
-
Input Monitoring
-
Track Alternatives
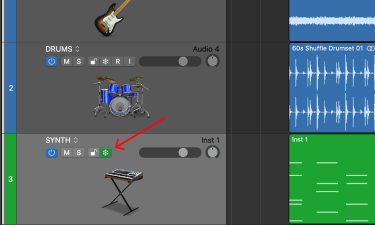
Here's what it looks like to have all the track header components visible on a track. Take a close look and try to find the freeze option. Do you see it?

If you guessed the snowflake. Then you're right. The snowflake icon represents our freeze option.
Step 4
In order to freeze our Synth Track, click on the snowflake. Once you do so, the icon will turn green.

We're still not completely done yet. Our track has yet to be fully frozen. In order to complete the freezing process, you'll need to press space bar. Once you press space bar, Logic will kick into action and start the freezing process. You'll see a freezing loading bar. Take note of the image below.

Your track is now frozen. Now, Logic will not have to use as much computer processing speed to run your software instrument track. In response, you'll perceive your computer to be running faster.
Essentially, what is happening is, Logic takes your software instrument and MIDI data and bounces it into audio on the backend. The next time you play your software instrument track, Logic is running an audio version of your track instead of the software itself.
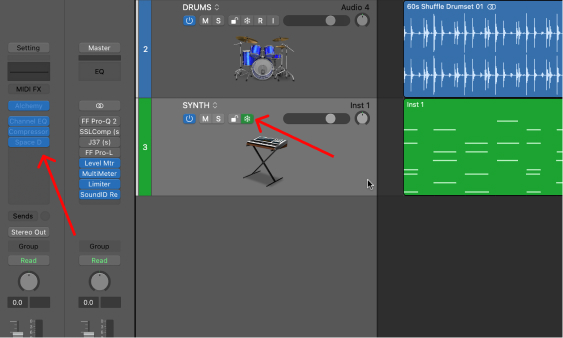
It's literally "freezing" your software track so that you can no longer edit it. For example, notice the plugins in the image below. They are greyed out. Specifically, the instrument plugin Alchemy and the effect plugins; Channel EQ, Compressor, and Space Designer. You can no longer edit or use these plugins until you "unfreeze" the track.
How Do I Unfreeze My Track?
In order to unfreeze your track. Click on the green snowflake icon in your track header. This will unfreeze the track and give you the option to edit your instrument plugin or effect plugins. For example, you might want to quickly EQ the low end or high end or you might even want to quantize the track more.
Once you've finished making the changes to your track, you can press the green snowflake and re-freeze the track.

Should I Freeze Audio Tracks Too?
You don't have to freeze all audio tracks because most of the time audio will not be very exhaustive on your computer processing speed. However, this will start to change when you introduce "process heavy" plugins to an audio track.
For example, let's say you've finished recording a vocal track and now you're starting to mix the vocal. You begin by adding a bit of EQ, maybe some compression, reverb, saturation or de-essing. Overtime, your vocal channel strip starts to grow and it become more difficult for your computer to run.
A killer to your computer processing speed is autotune or pitch correction in Logic. Even worse, is if you're using a lot of paid 3rd party plugins. Paid plugins will always be more process heavy than stock plugins that come for free in Logic.
Coming back to our vocal track. If your channel strip starts to look like the image below, then I would consider freezing this track.

Although, if I'm still mixing the vocal and working on the sound, I will save the freezing until I'm finished.
This is because when you freeze a track, it freezes the plugins. It would be annoying to freeze and unfreeze back and forth. It's a good rule of thumb to freeze a track when you are convinced on the sound.
Are There Other Ways Besides Freezing To Help Computer Speed?
Yes, there are many. The most popular method to bypassing freezing tracks is to bounce the track to audio.
You may have heard of this before, it's called "bouncing in place" or "bounce regions in place". This will take your software instrument and change it to audio completely. You'll lose entire access to the software instrument. I would typically do this when I'm "sold" on the sound of a software instrument. For instance, let's say I'm working on this midi track below with the alchemy synth in Logic.
For the sake of this example above, let's assume I'm "sold" on the sound of the Alchemy synth I've designed. For instance, I am happy with overall sound and I don't see myself wanting to change it for the rest of the production. If so, I will bounce this in place by clicking ⌃⌘B (control command B).
Instead of freezing this time, Logic will bounce instead. You'll have a few different options to choose from while you're bouncing tracks in Logic. Without going to deep into it now, here is a great video tutorial on bouncing tracks in Logic Pro.
In the end, your Alchemy software instrument track will look like this:
A common question that comes up when I teach how to bounce tracks in Logic Pro is, what happens if you want to make edits? Well, you can't. It's over. You no longer have access to the midi or software instrument. However, there is a cool trick around it and I'll teach you that in the next section.
Besides bouncing tracks in place, when it comes to computer processing speed the biggest thing you can do is get a really good computer. That's a no brainer. In this music production equipment post, I go over some computer specs that you should consider when you're looking at getting a new computer.
Another thing you can do with your current computer is to offload the storage processing to an external hard drive. You could also offload any sound libraries or the Logic sound library to save processing speed as well. Here is a post on best external hard drives for music production.
A Production Trick I Do All The Time
In every production I'm working on I'll have many software instruments. I'll also have a lot of vocal tracks with different plugins. In other words, my Logic sessions are big and clunky and it usually takes a toll on my computer.
Here's my trick. Not only will I bounce down all my midi and software instruments to audio but first, I will freeze them and hide them. This allows me to keep the software instrument as a backup in case I need to make and changes.
The problem when you bounce down to audio completely, is you cannot make any more changes to the software instruments. That's because there's no more software, it's just audio! This is why I keep a hidden and frozen track in the back end.
It's not clogging up and space for the computer to run and it's visibly hidden from my perspective so I can work without even know it's there. Here is a great YouTube shorts video of me doing this on a vocal comp that I'm mixing.
Final Thoughts On Freezing Tracks In Logic Pro
Freezing tracks should be a tool you use in almost every Logic production. This is going to save you many future headaches. It's also important to ask yourself first before freezing, should I bounce this down to audio or freeze? Or maybe both.
When you're producing, you should consider what is happening in your projects. Your goal should be to get your tracks down to audio. I'd love to help you on your music journey to become not only a better producer but a better songwriter too. I suggest you get my free 6 pillars on learning Logic Pro faster.


