How To Use Alchemy In Logic Pro
May 01, 2023
One of Logic Pro’s advantages over other Digital Audio Workstations (DAWs) is its wide range of stock instruments and plug-ins.
Alchemy is a powerful and versatile digital synthesizer that’s included with Logic Pro. Learning to use Alchemy can take your music production skills to the next level.
Alchemy gives you access to an endless list of sounds, effects, and modulations. From traditional analog-style synthesizer patches to complex soundscapes and textures, Alchemy’s library ensures your imagination is the only limit in creating sounds.
Although it might initially look intimidating, Alchemy’s interface is really user-friendly once you understand the basics.
In this post, I will show you everything you need to know to start creating sounds with Logic Pro’s Alchemy.

Getting Started With Alchemy In Logic Pro
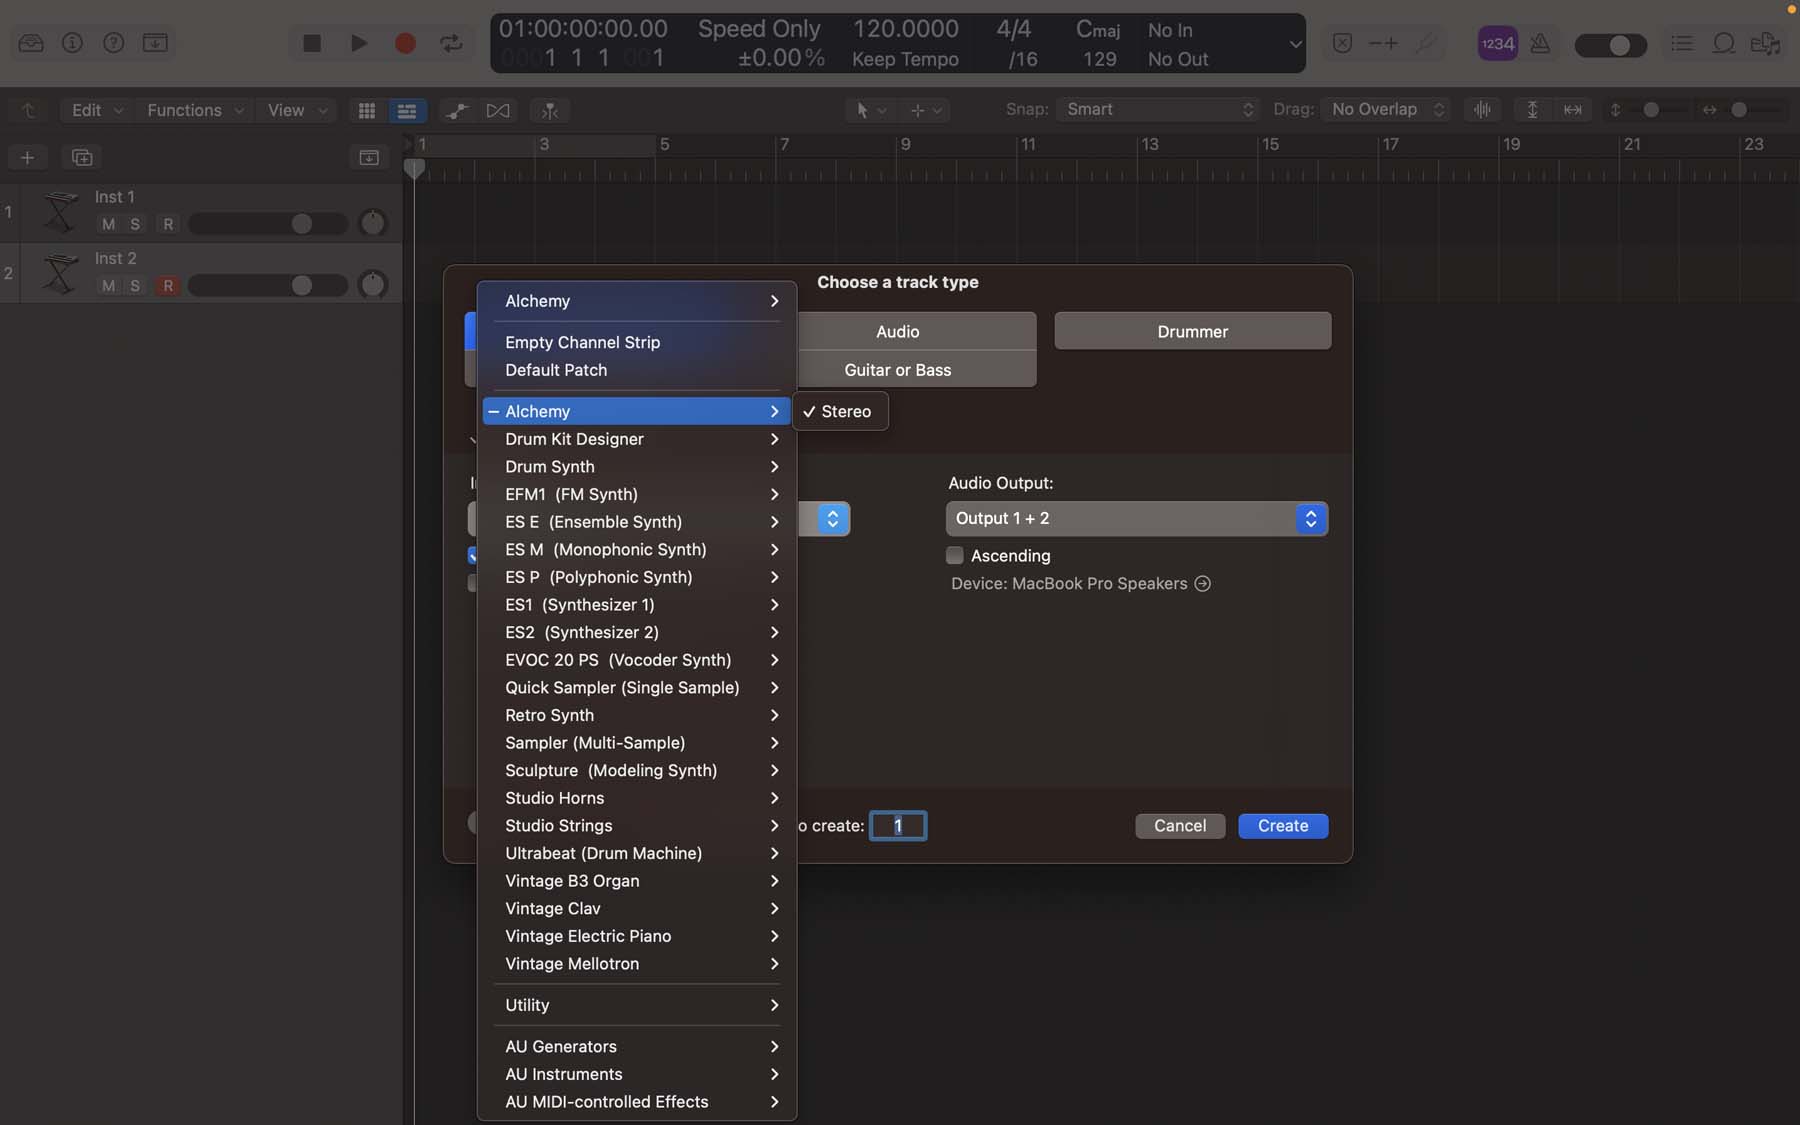
Let’s start by opening Alchemy in one of our sessions in Logic Pro:
-
From the top track header area, click on the little + button to add a new track.
-
Select “Software Instrument” as your track type.
-
Under the Details drop-down menu, open the Instruments list and select Alchemy.
-
Click on “Create.”
Now you have a software instrument track that you can control using a MIDI keyboard. If you don’t have a MIDI keyboard, you can use Logic Pro’s built-in Musical typing feature from the Window menu at the top. You can also use Logic’s key commands to open musical typing.
To open Alchemy’s interface:
-
Click on the little “i” from the top left corner of your screen to open inspector channel strips.
-
Click on Alchemy from the instrument slot.


Understanding Alchemy’s Interface
For this guide, I will stick mainly to the “BROWSE” menu. However, I will briefly switch to the “ADVANCED” view to explain what Alchemy does.
Don't be overwhelmed by the interface just yet, we're going to get into the details of how you can easily start finding sounds right away.
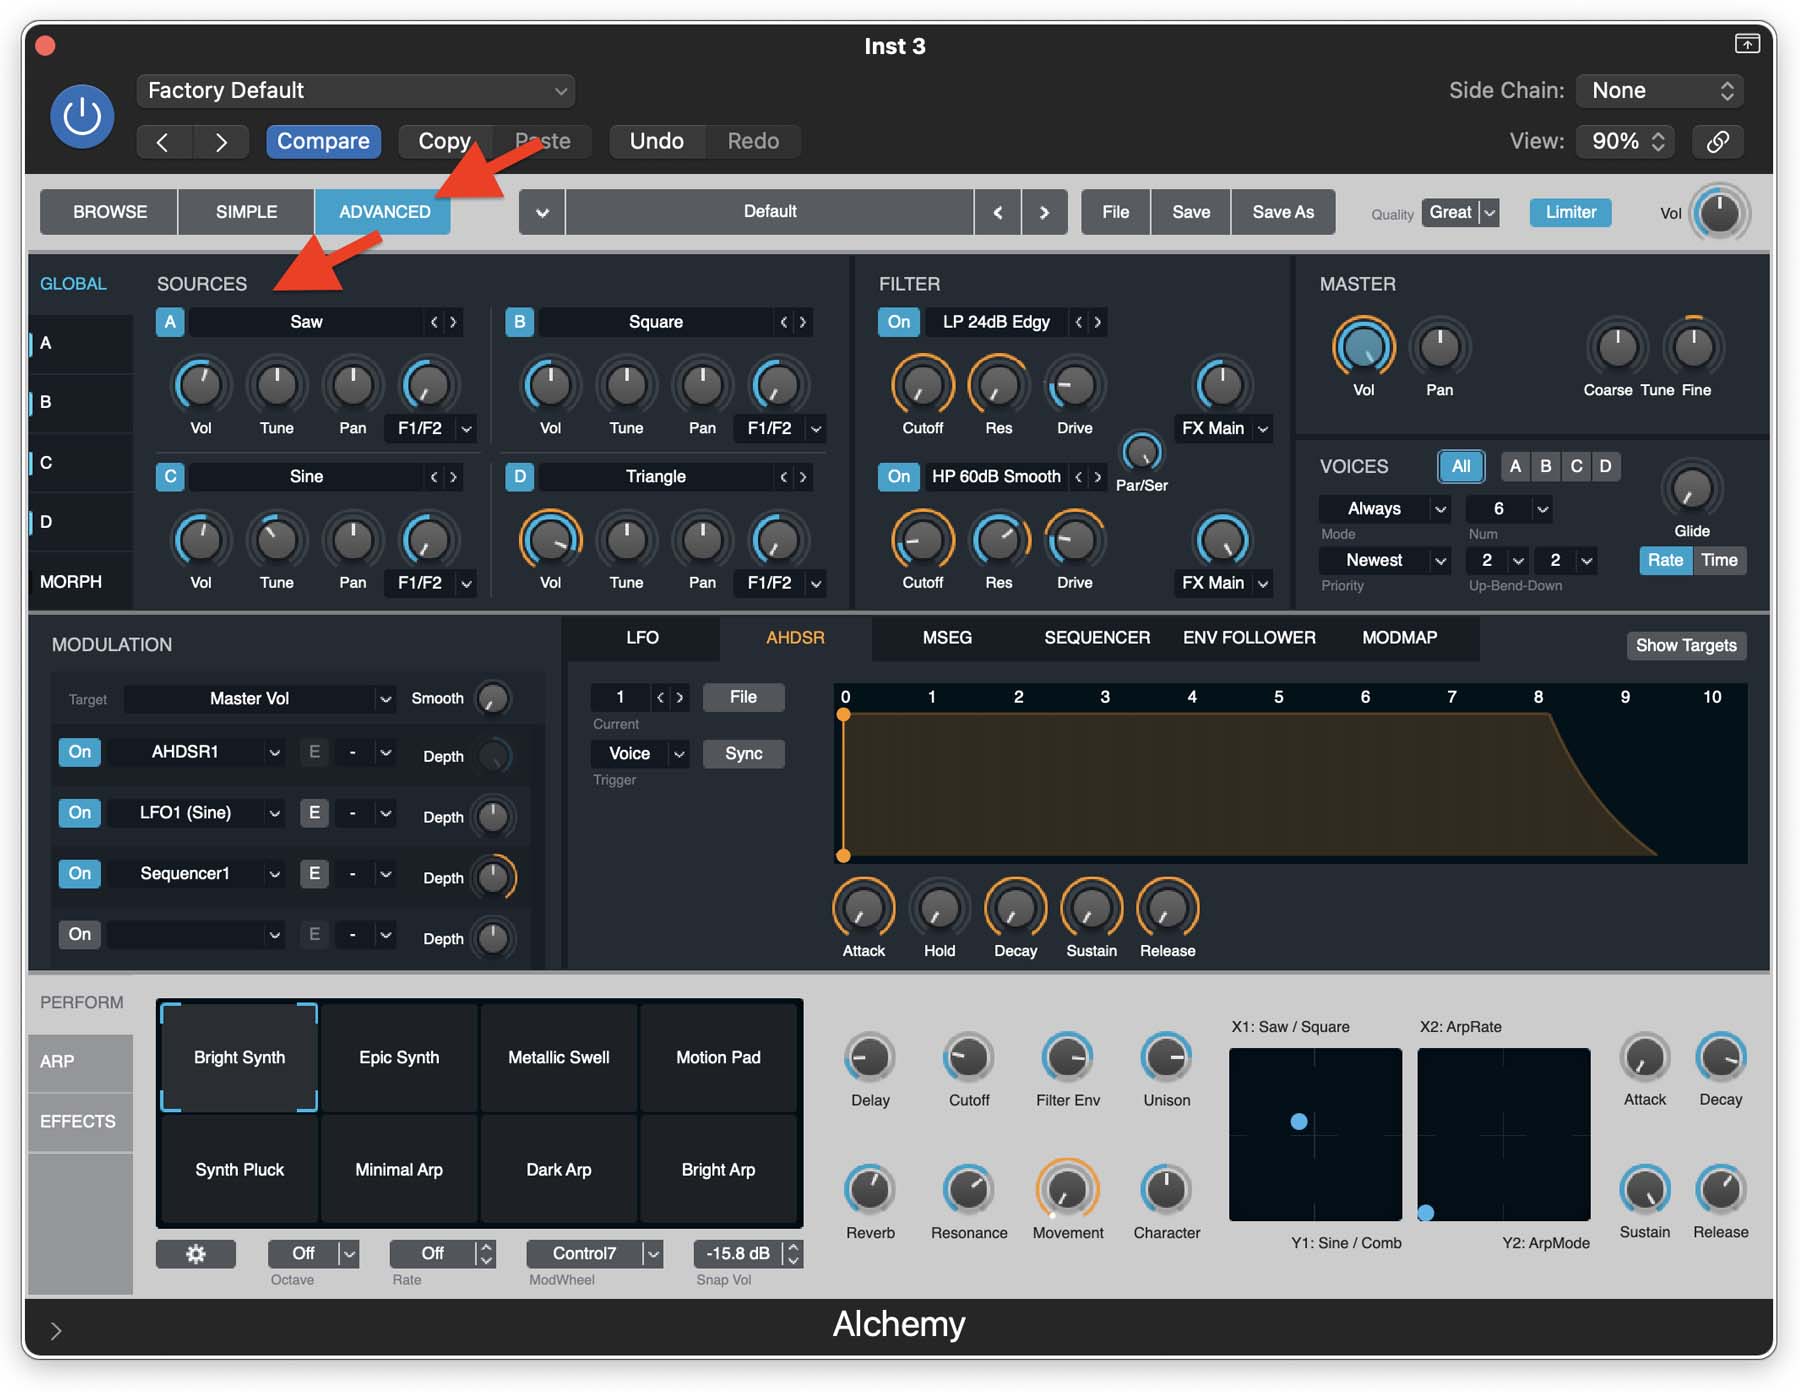
As you can see, Alchemy can have up to four different sound waves/audio inputs to create a vibrant sound.
Once you get more familiar with Alchemy, you’ll be spending most of your time playing around with each sound wave here. But for now, let’s switch back to the browser menu. In the browser window, it's much more user friendly to select sounds and start creating music.
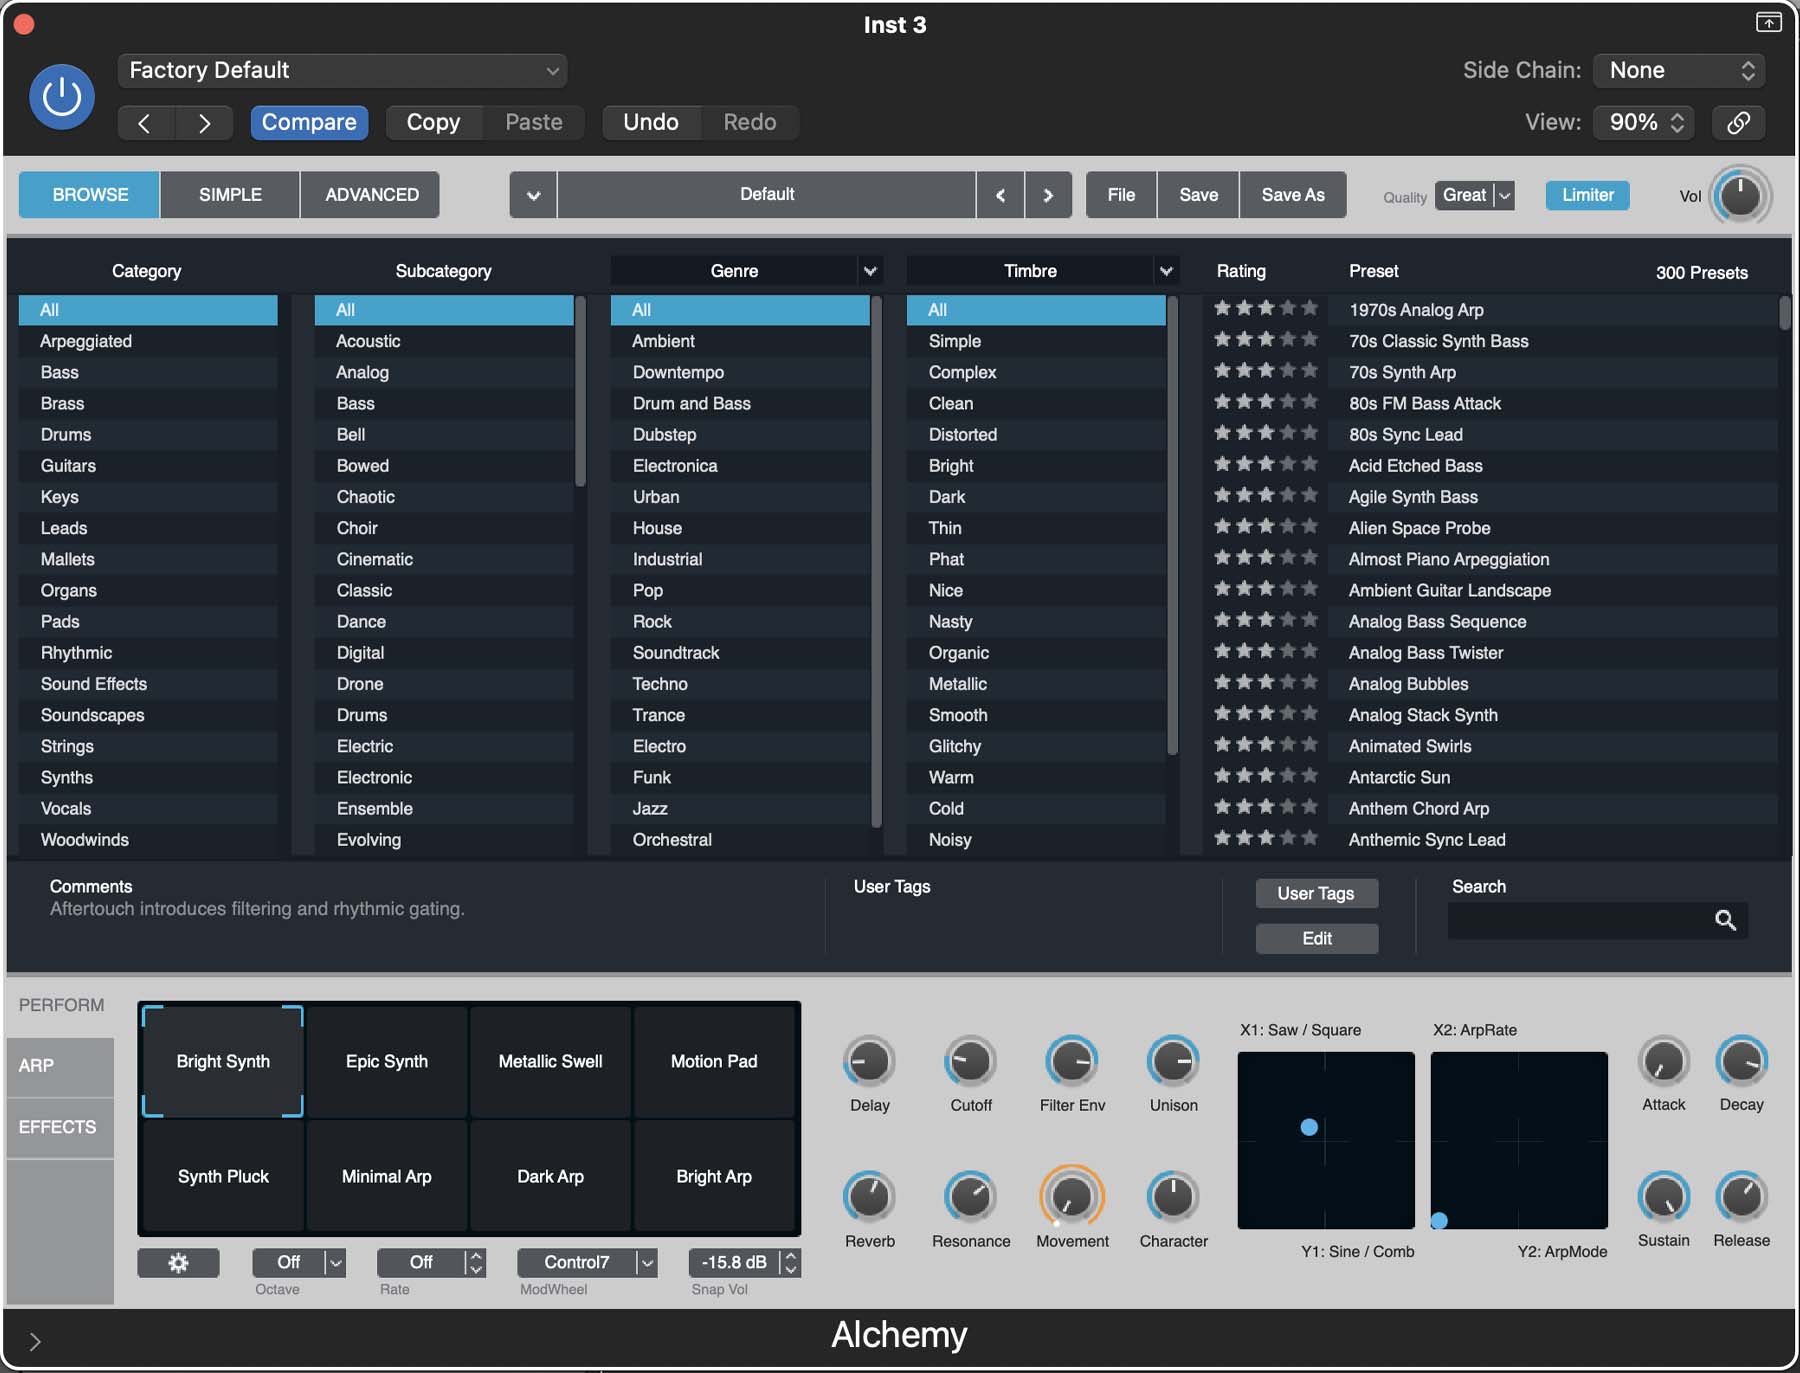
Alchemy’s sound library takes a significant portion of its interface in the browse menu.
From left to right, you have category, subcategory, genre, and timbre to browse and find the type of sound you want. The very right column consists of the presets you can choose from.

On the top right, you have your master volume knob, the limiter—which prevents clipping of the signal from all voices at the end of the signal path—and a quality pop-up menu. You can lower the quality if your computer doesn’t have much processing power to run everything in your current Logic session.
Tip: If you’ve used Alchemy for your project but some notes are not in sync with your song’s tempo, you can quantize the MIDI inputs in that segment to make them all stay on beat.
Creating Dynamic Sounds With Alchemy
Go through different presets to see what Alchemy offers. You'll notice there are thousands of preset sounds available. Take your time and find the right sounds that might fit best with your production. What I find helpful is not too rush your sound selection process when you're producing a song in Logic because the quality of sounds will make mixing your song much easier.
Once you’ve stumbled upon a sound you like, you can start tweaking different parameters from the bottom part of Alchemy’s interface.
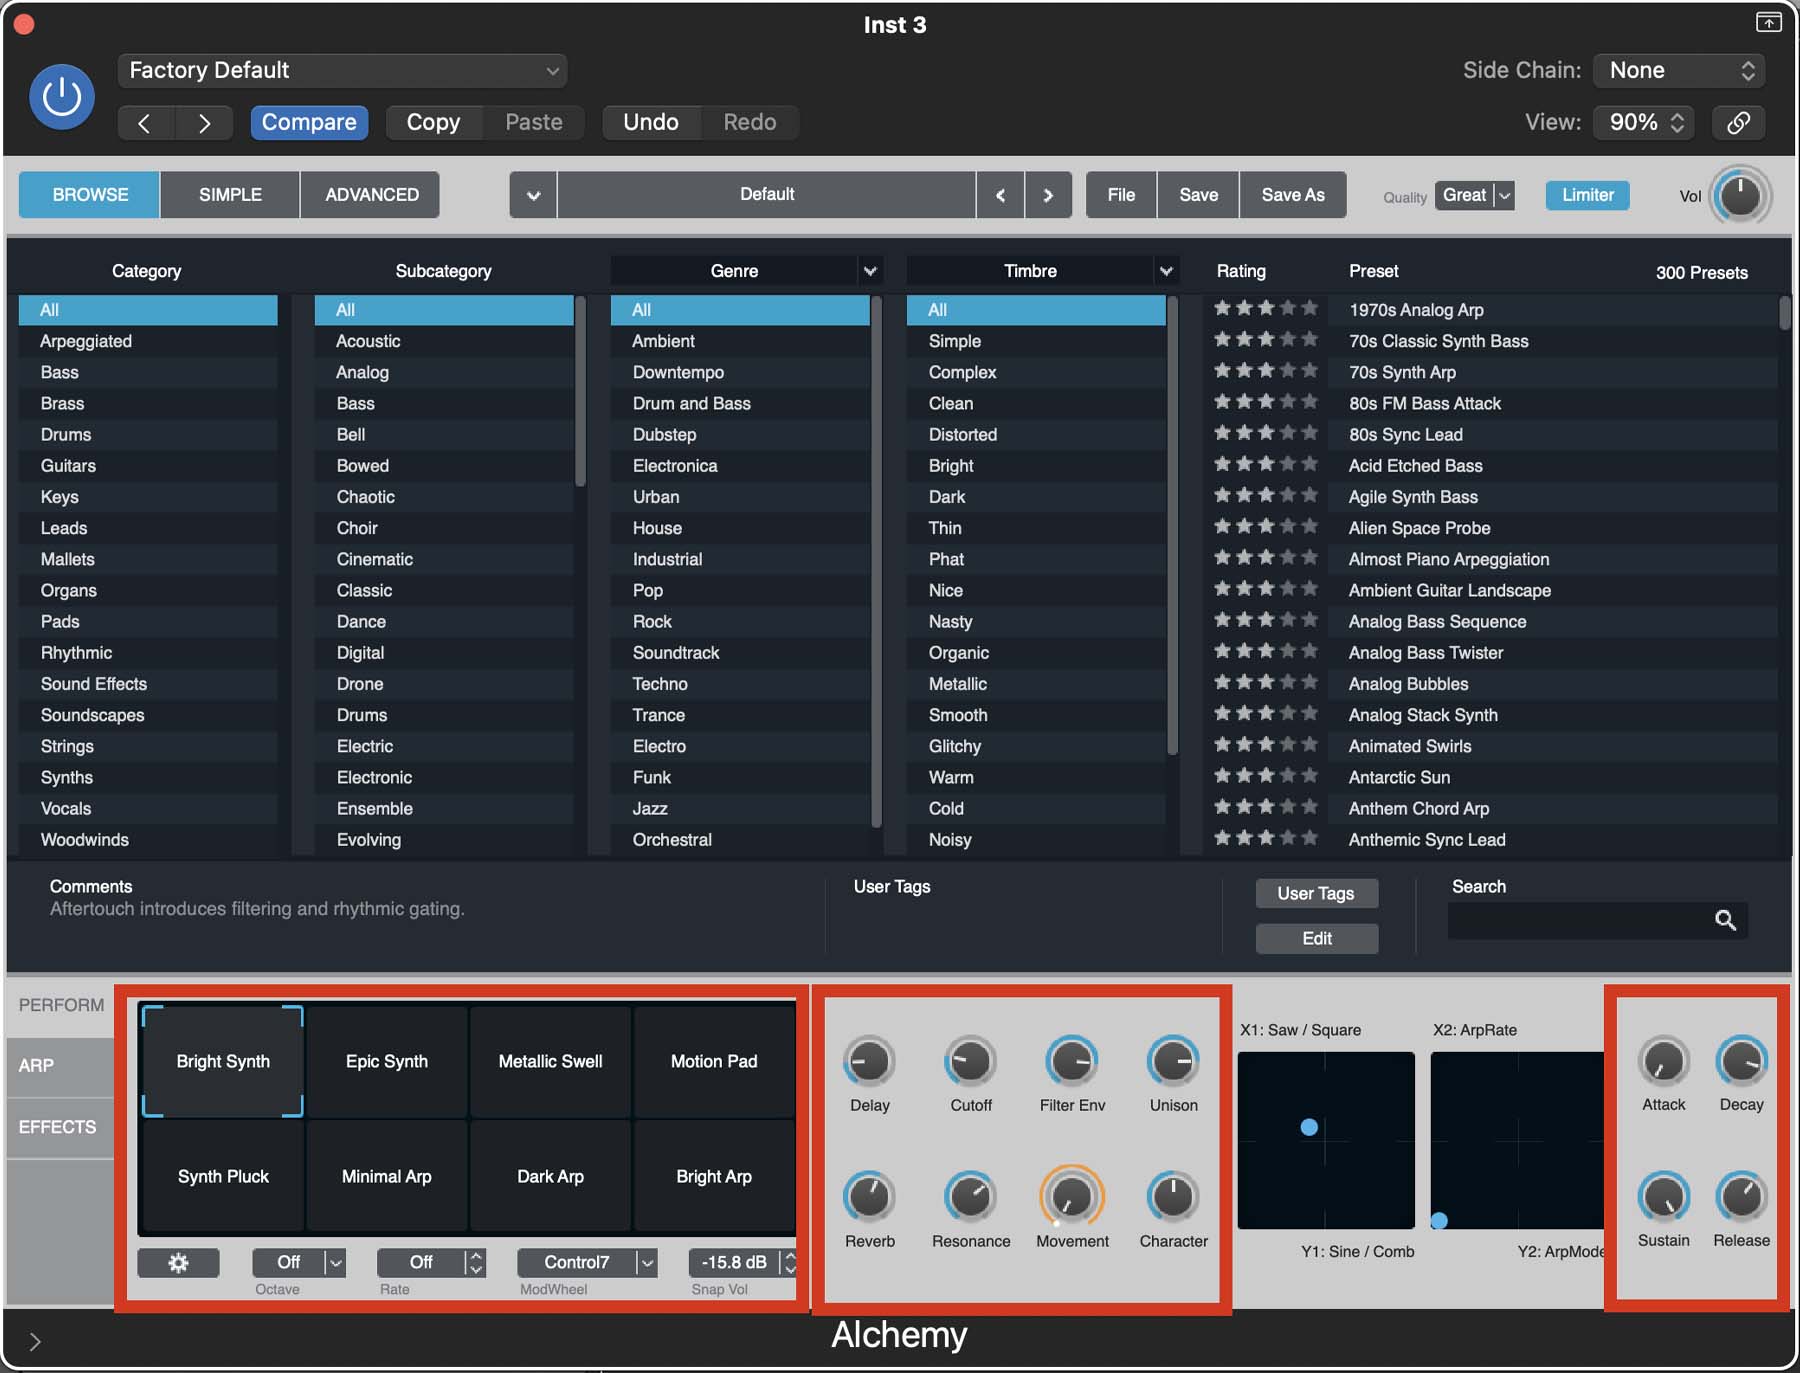
Four knobs on the right allow you to control the main parameters of your preset; attack, decay, sustain, and release.
The knobs in the middle let you change the sound characteristics of your preset.
On the left, you’ll see the Transform Pad. For each preset, the transform pad offers up to eight different “snapshots” that not only you can choose from, but you can also move gradually between them in real-time. I love this feature in Alchemy because it allows you to quickly change the sound characteristic without changing it completely.
One of my other favourite features within Alchemy is how it can arpeggiate sounds. We usually think of an arpeggiator as an on/off switch. However, Alchemy allows you to slowly morph from a non-arpeggiated snapshot to one that has an arpeggiator. Powerful stuff!
Tip: using the automation tool in Logic Pro is an essential step toward honing your music-making skills and producing complex, interesting dynamics in your songs. Anything from volume and pan to EQ and reverb can be adjusted over time using automation.

Editing Individual Sound Waves In Alchemy
Now that you’ve gotten familiar with the basics of Alchemy, let’s move further to some more advanced sound design elements. Even if you're just beginning with learning how to use synths, I still recommend going through this section with me because it will, at minimum, set you up for success in the future by learning some important things.
You’ll see three different menus on the bottom-left of Alchemy’s interface.
Switch to “ARP” to edit the arpeggios of different channels available in your chosen preset.
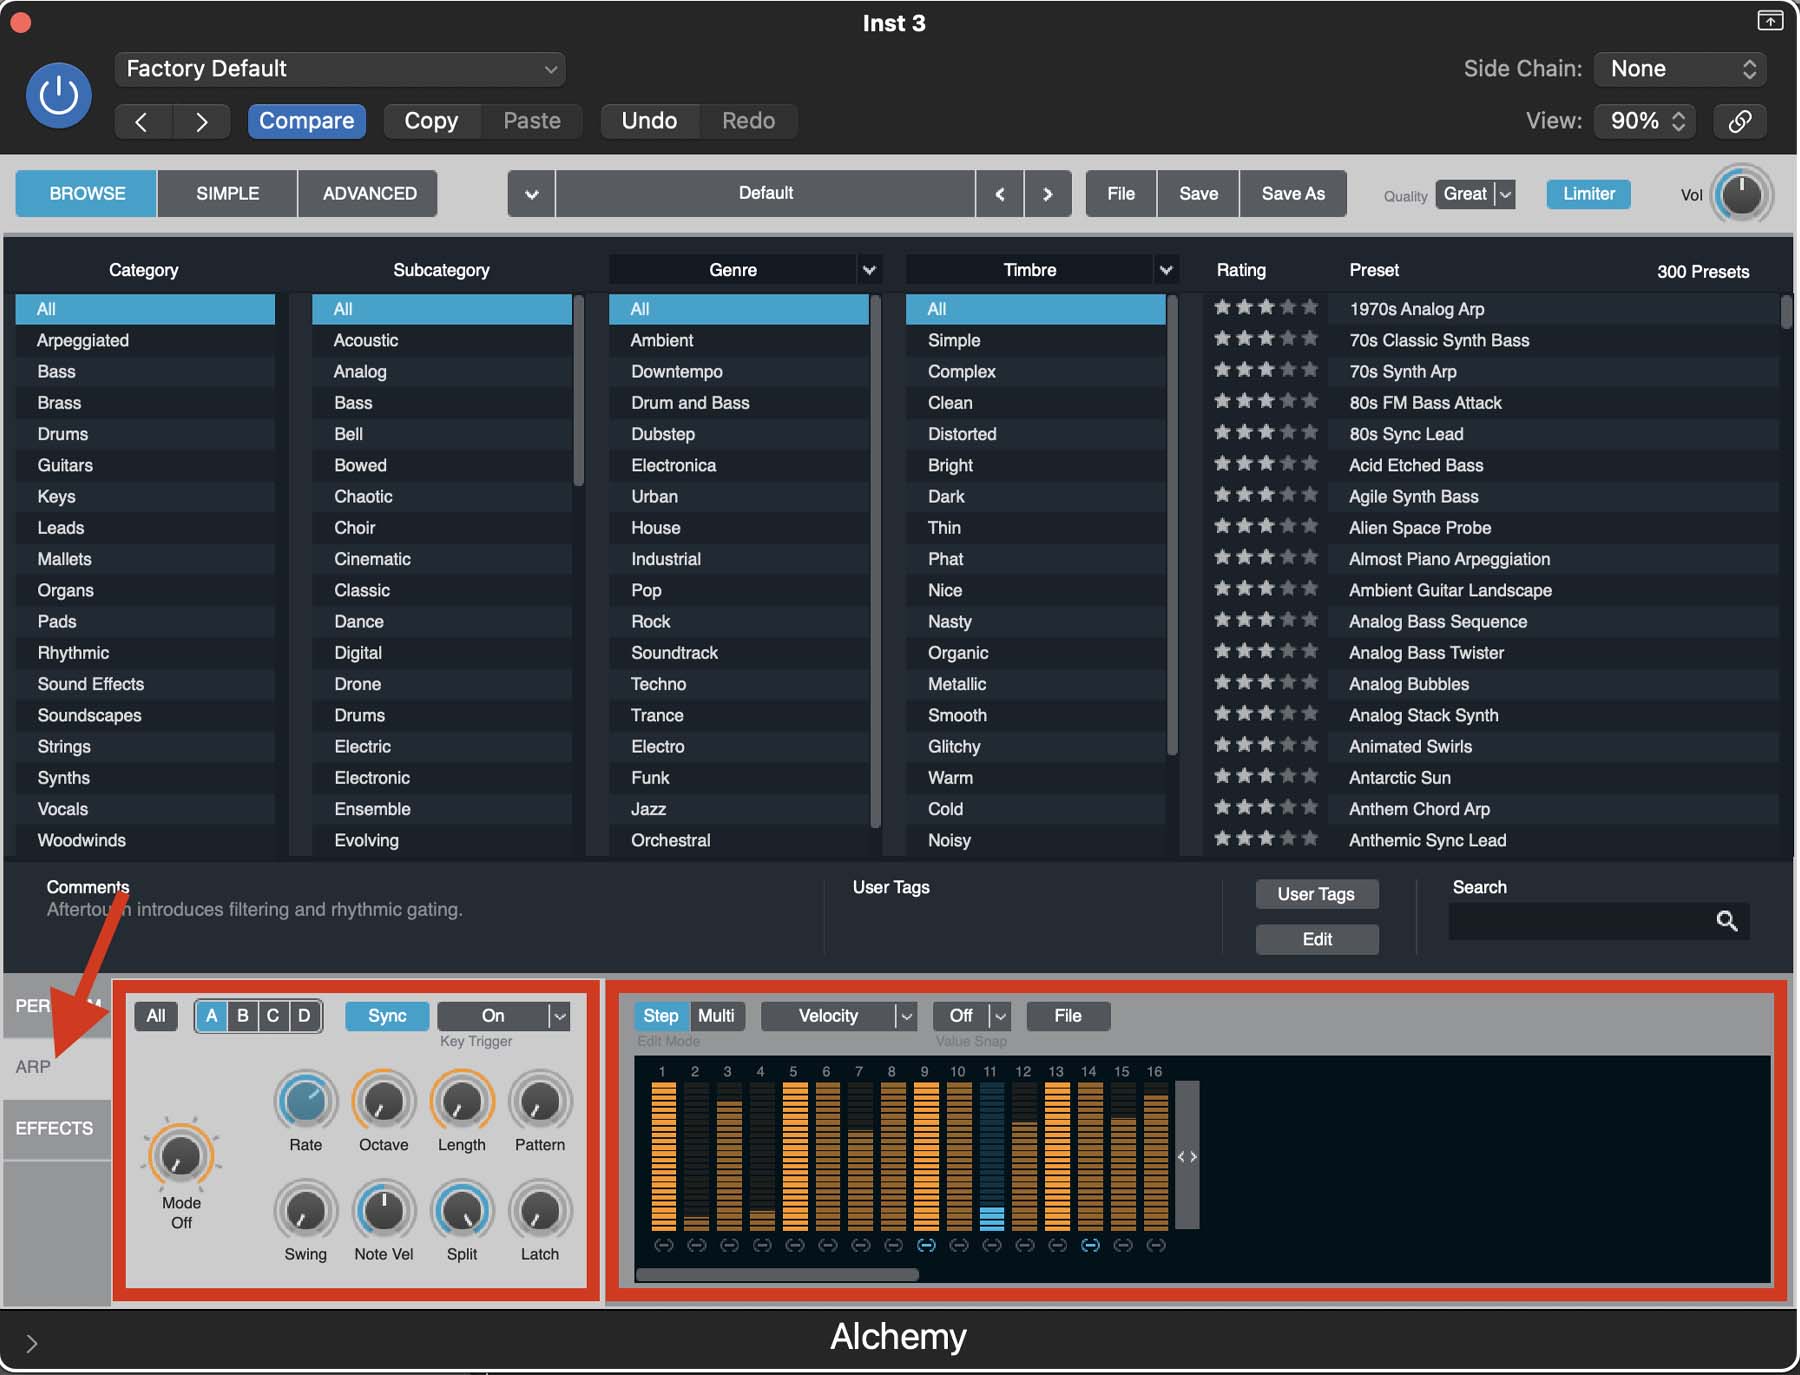
You’ll see an arpeggiator visualizer that dominates most of the arp menu. By default, it shows the velocity of each repetition.
From the top left of this menu, you can switch between editing arpeggios of different sounds (A, B, C, D) or target them as a whole by clicking on “All.”
Underneath the ARP menu, you’ll have the “EFFECTS” menu. Similar to Alchemy’s arpeggiator, you can change the effects of the whole preset or change parameters on each sound wave individually.
I would recommend diving into the ARP and EFFECTS sections and playing around with the dials. Don't be afraid to mess things up, it's important to experiment and learn what each dial does, this is the best way to learn music production.

From the left side, you can add/change/remove different effects. The right side gives you knobs to control each parameter for those effects.
Note: most of the knobs you see have blue circles around them. Those parameters stay fixed across all snapshots. On the other hand, knobs with orange circles indicate effects that change when moving around different snapshots on the transform pad.
Final Thoughts On Using Alchemy In Logic Pro
Now you should have a basic understanding of what Alchemy does and how it works.
If it feels a bit daunting at first, don’t worry. Try to create different sounds and segments, and soon you’ll get the hang of it.
Working with Alchemy’s presets can give you a ton of different unique sounds to utilize in your music projects. However, If you’re feeling brave enough, you can use Alchemy’s advanced menu to truly unleash its creative power!
If you don’t have a MIDI controller to work with Alchemy, you can check out the keyboards I use in my studio. I would love to help you on your songwriting, mixing, and music production journey. If you're curious to learn more, I suggest getting my free 6 Pillars To Learn Logic Pro Faster.


