20 Logic Pro Shortcuts You Must Learn
Apr 28, 2023
In this article, I will teach you the 20 most useful shortcuts in Logic Pro. Otherwise, known as key commands, more specifically. These are going to save you tons of time and boost your productivity.
Let's recap, Logic Pro is a Digital Audio Workstation (DAW) famous for its versatility, advanced tools, and high-quality stock plug-ins.
Whether you want to produce music or mix songs, Logic’s user-friendly interface allows both beginners and seasoned producers to achieve their creative goals. I've been using Logic for over 5 years and I took the time to learn all the necessary shortcuts to master the software. I suggest you do the same.

One of the best parts about Logic Pro, is it offers more than one way to get the desired results.
One of the best strategies to do things quicker and streamline your workflow is to use key commands in Logic Pro.
Getting everyone on the same again. Key commands = Shortcuts. Logic Pro likes to call them key commands instead of shortcuts.
There area hundreds of key commands in Logic Pro and I do suggest starting to learn them one by one but that can take forever, right!? So, I’ve created a list of the 20 most essential shortcuts you should learn right off the bat to take your audio production skills to the next level.
Some of these key commands include a combination of two or three keys. Therefore, before we start, it's important to get familiar with these keys on your Mac keyboard:
⌥ - Option
⌘ - Command
⇧ - Shift
⌃ - Control
To make it easier, I’ve included names and symbols for these keys when going through each shortcut.
Last thing, before you start, make sure you’ve enabled the advanced tools in the DAW. To do that, on the top left corner of your screen, go to:
Logic Pro > Preferences > Advanced Tools
Once the new window opens, check "Enable Complete Features."

Now that this is out of the way, let’s go through the key commands you should learn. I will start with simpler ones and gradually get to more advanced shortcuts.

1. Record Tracks - “R”
Pressing “R” on your keyboard lets you quickly start and stop recording selected tracks in Logic Pro. This shortcut is handy for musicians and producers who want to capture ideas without navigating through Logic’s menus or using the mouse/trackpad to press record.

I often find myself using this recording shortcut when I'm recording vocals in Logic. I like to record vocals standing up so whenever I'm recording vocal takes standing up, I don't have to navigate with my mouse to record. I simply press "R".
2. Mute/Unmute Tracks - “M”
Logic Pro offers multiple ways to mute/unmute tracks. The quickest way to do so is by pressing the key “M” on your keyboard.
This is useful for quickly checking a track’s effects on your project while listening to it. For example, if you record an acoustic guitar but you're unsure if you want it in your mix. Play your song, and toggle the acoustic guitar track by muting it. Does it sounds better or worse with the guitar in it?

3. Solo Tracks - “S”
Soloing a track refers to isolating its signal so that you can hear it separately from the rest of the mix, making it easier to focus on specific parts or elements of your project. Pressing “S” on your keyboard while having a track select enables/disables the solo button.

Some mixing engineers might tell you "never to solo". This is because we never actually listen to the song in "solo". However, some times you need to solo instruments to dial in on the sound and perfect it. On the other hand, be cognizant that you don't go "to deep" into solo land. You risk losing sight of the whole song.

4. Toggle Metronome - “K”
The metronome button lets you hear the “click” synced with the project’s tempo during playback or recording. This helps you stay on the beat when you’re recording an instrument. If you're not used to recording with a metronome or "click" then please get used to it! This is your key to playing in time.
I often find myself pressing "K" while I'm recording vocals to make sure that I'm singing in time. However, when I stop recording, I usually press "K" again to quickly run the metronome off because I don't like to hear it when I listen to the playback.

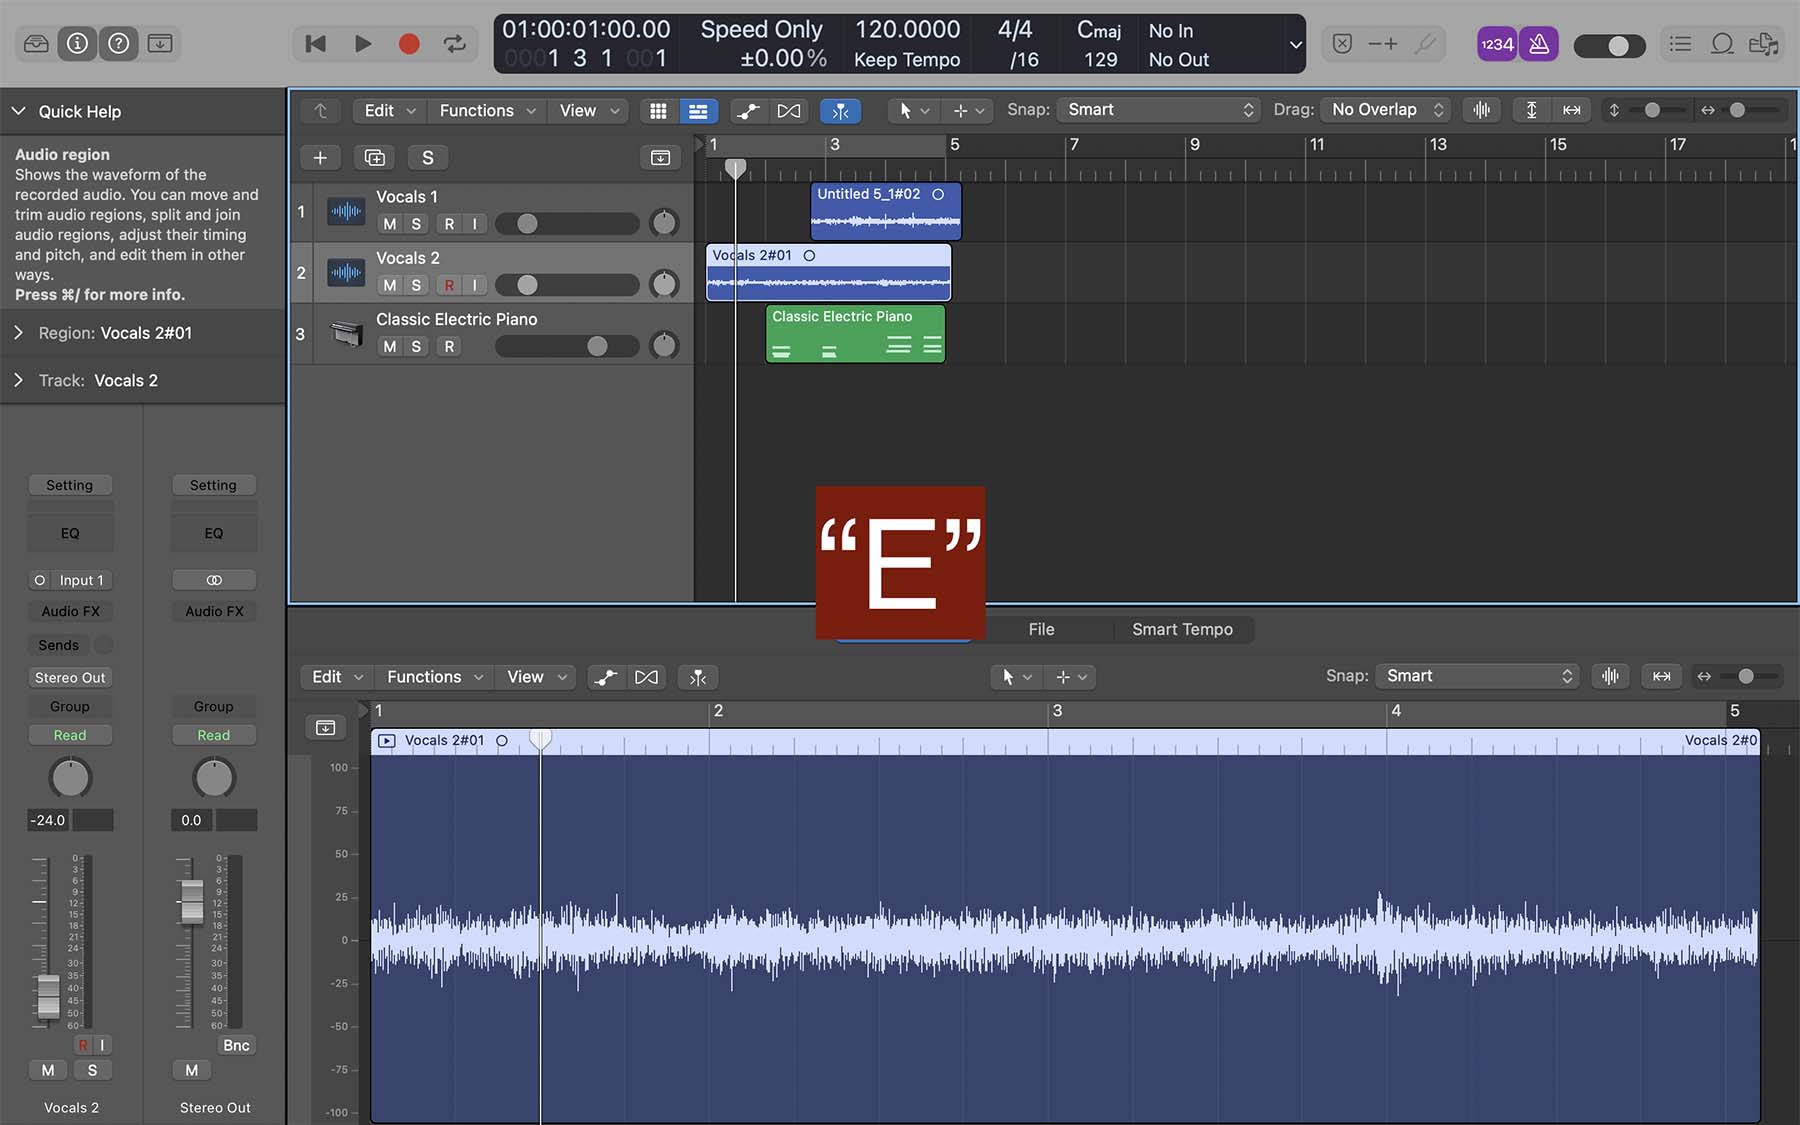
5. Open Editor Menu - “E”
The editor menu offers a collection of tools to manipulate MIDI and audio regions in Logic Pro.
It provides access to different functions, such as quantization, transposition, velocity adjustment, and note duration modification. You can toggle this menu by pressing “E” on your keyboard.
Whether you are working with midi or audio, it's important to get comfortable with editing. Editing allows you to clean up your track and focus on timing and groove.

6. Open/Close Mixer Window - “X”
The mixer window gives you access to change different parameters of individual tracks and buses, including volume and pan controls, EQ and compression settings, reverb, and delay effects.
Press “X” on your keyboard to open this window. To take it a step further, you can press ⌘2 "command 2" and this will open up the mixer in a separate window.
I bring up the mixer using both methods. Choose the one that works best for you with regards to your workflow. Some times, bringing up the mixer in a different window can give you a sense of working with an analog SSL desk and allows you to focus on your ears instead of your eyes.

7. Quick Zoom - “Z”
By pressing “Z” on your keyboard, Logic Pro zooms in on all of your tracks.
This is useful for getting a quick look at an audio track’s waveform or a MIDI track’s notes and events. It's important to know that by pressing “Z” again, you can zoom out to see all the channels with their previous sizes.

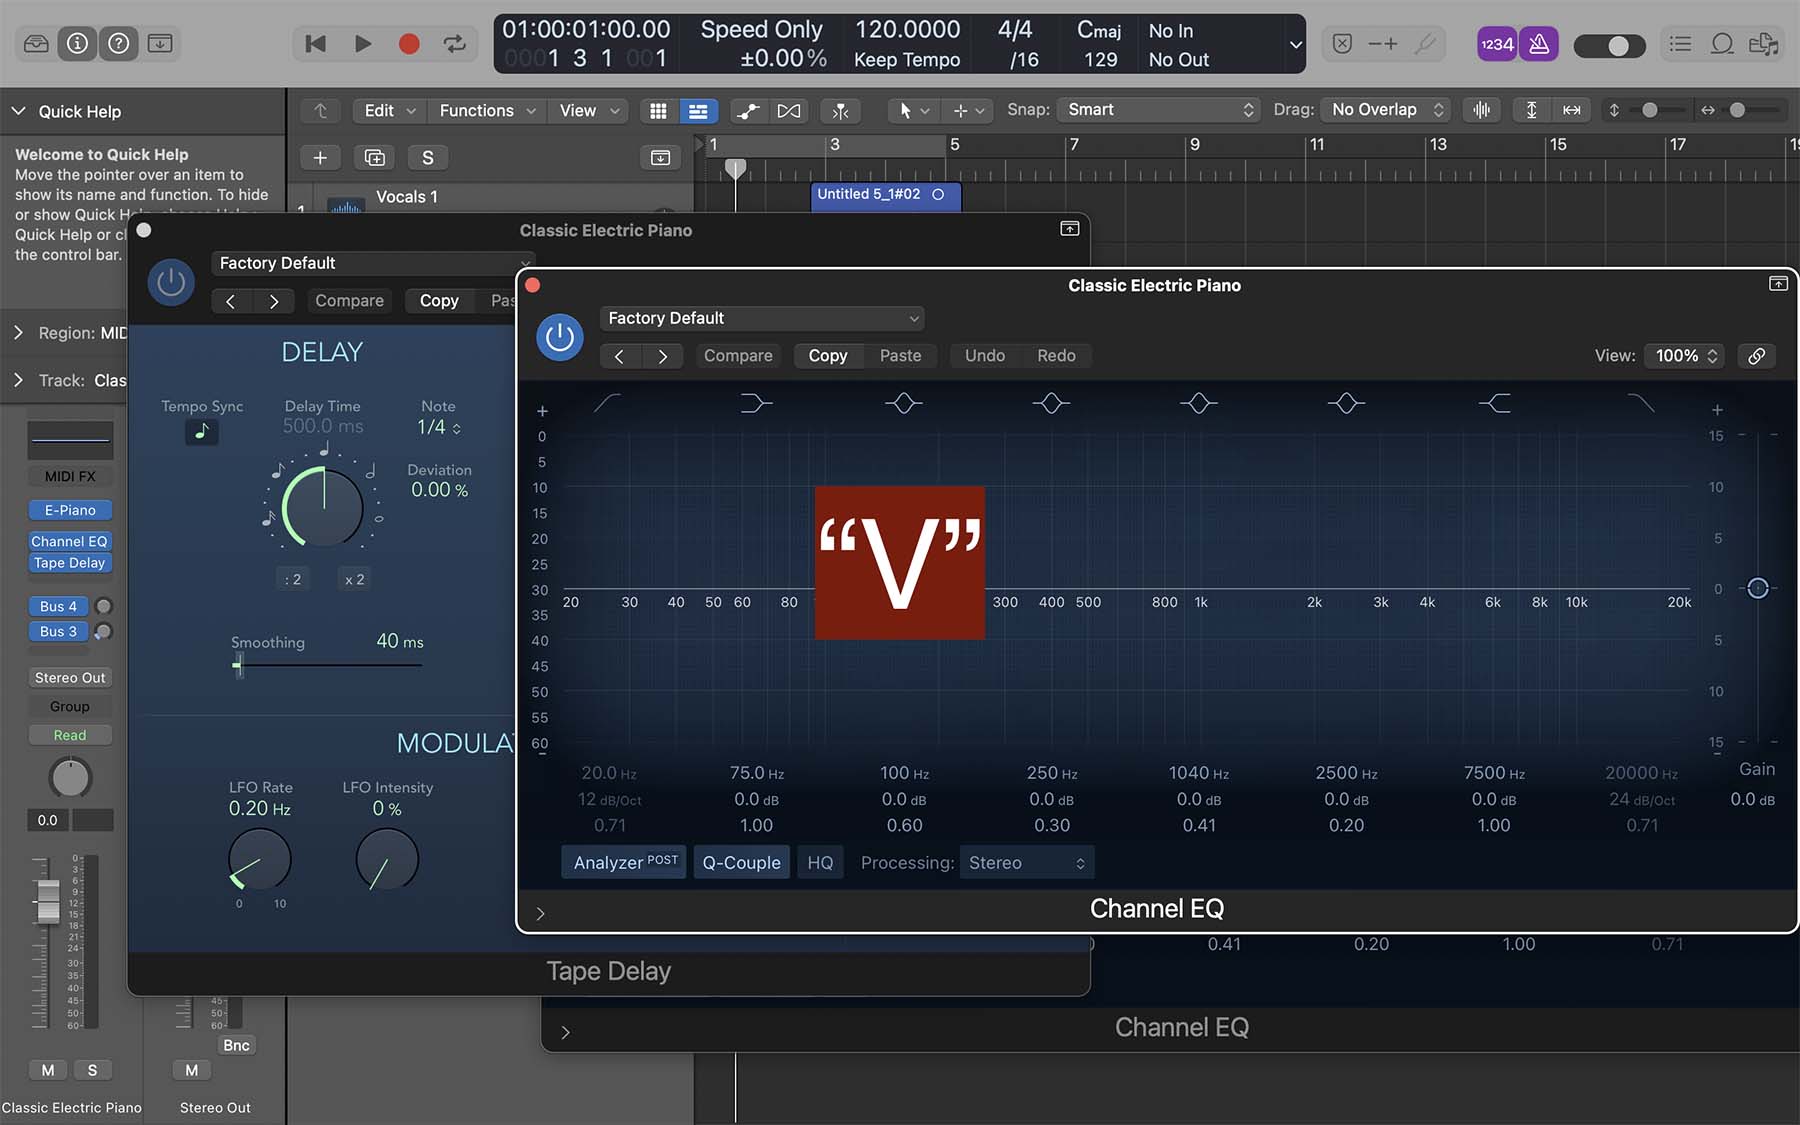
8. Open/Close All Plug-ins - “V”
When working with different plug-ins and VSTs, it is easy to get a cluttered session and lose track of what you want to do.
Luckily, you can easily close and open all the plug-ins by pressing “V” on your keyboard. You'll never have to try to land your cursor on the upper left "x" of the plugin window. Simply press V and the previous plugins that you had up will open or close.

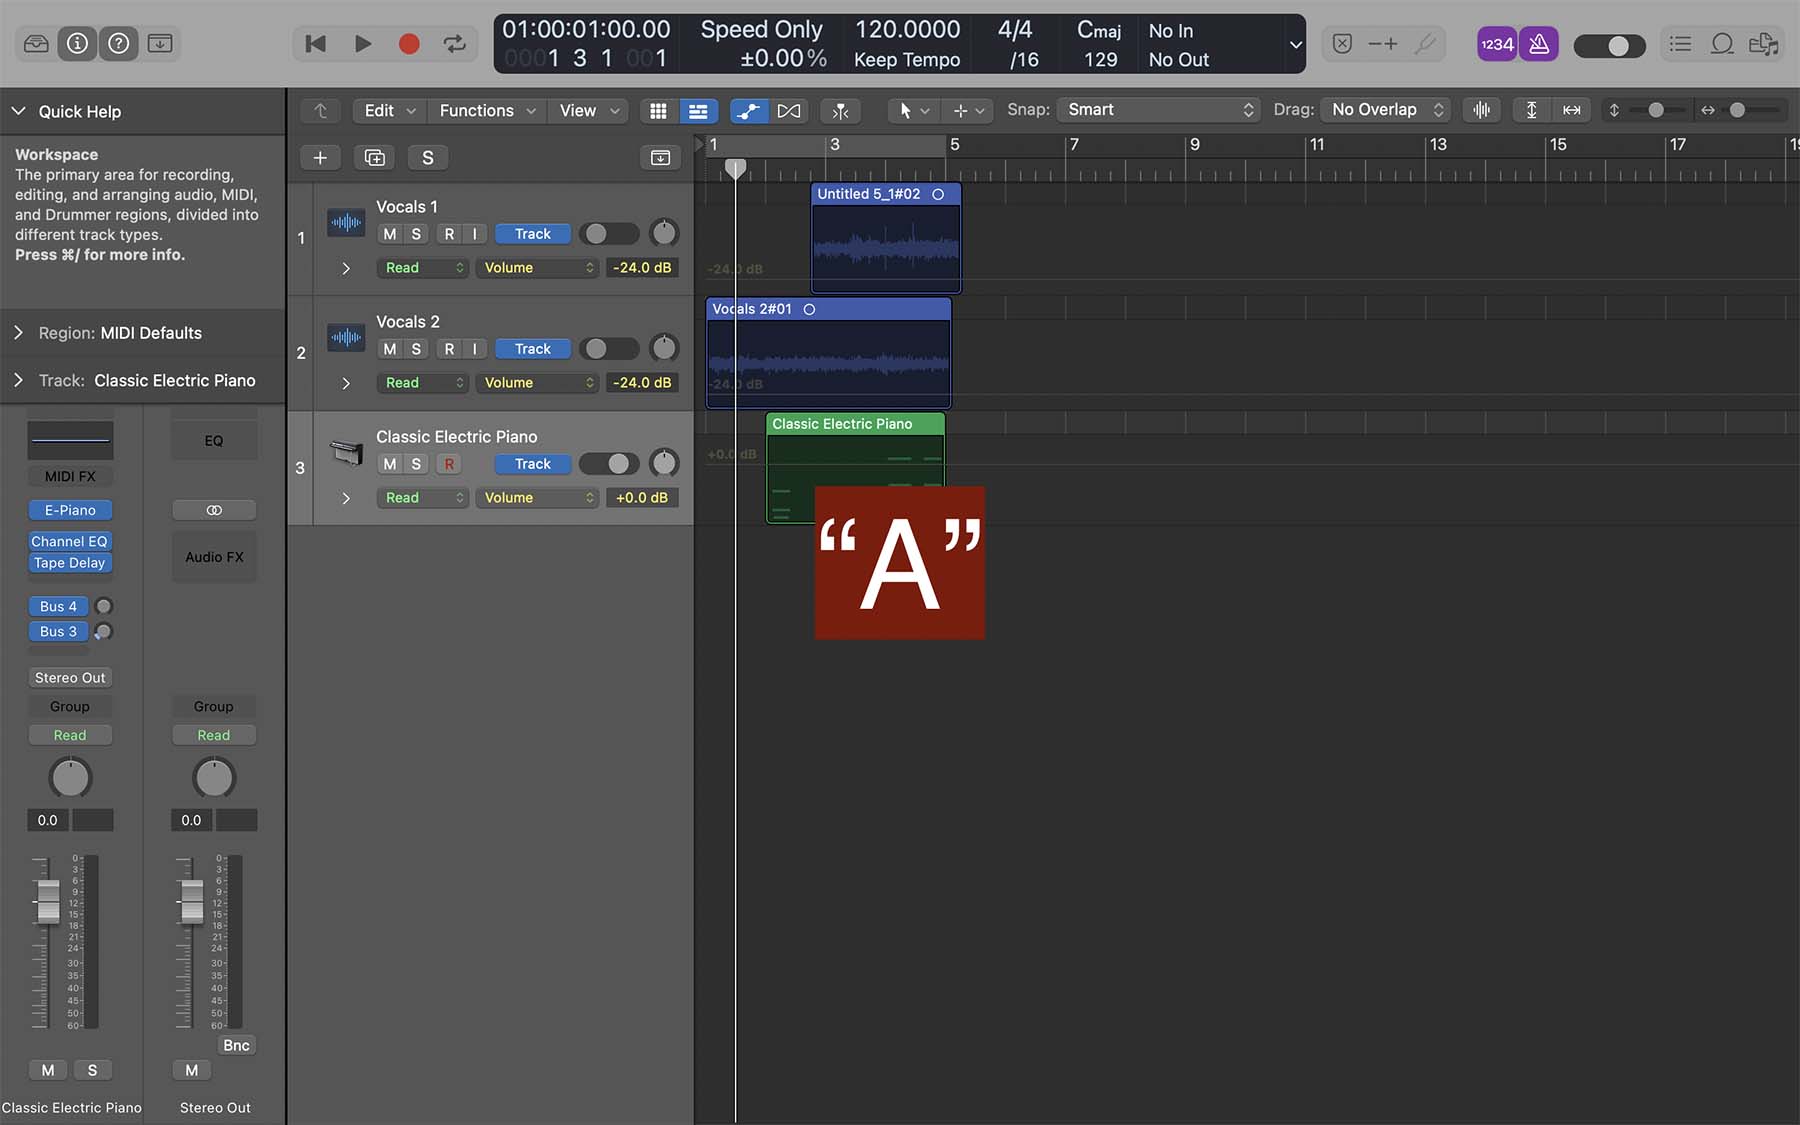
9. Show/Hide Automation Tools - “A”
Automation tools let you make changes to a track’s different parameters, such as volume, gain, EQ, and reverb, plus a lot more. You can automate almost any thing in Logic. Learning to use automation can lift up your songs and add interesting changes to them. It's what separates beginners from PROS!
If you're curious about how I automate my tracks in Logic, watch this video on how to use automation.
You can show/hide automation tools by pressing “A” on your keyboard.
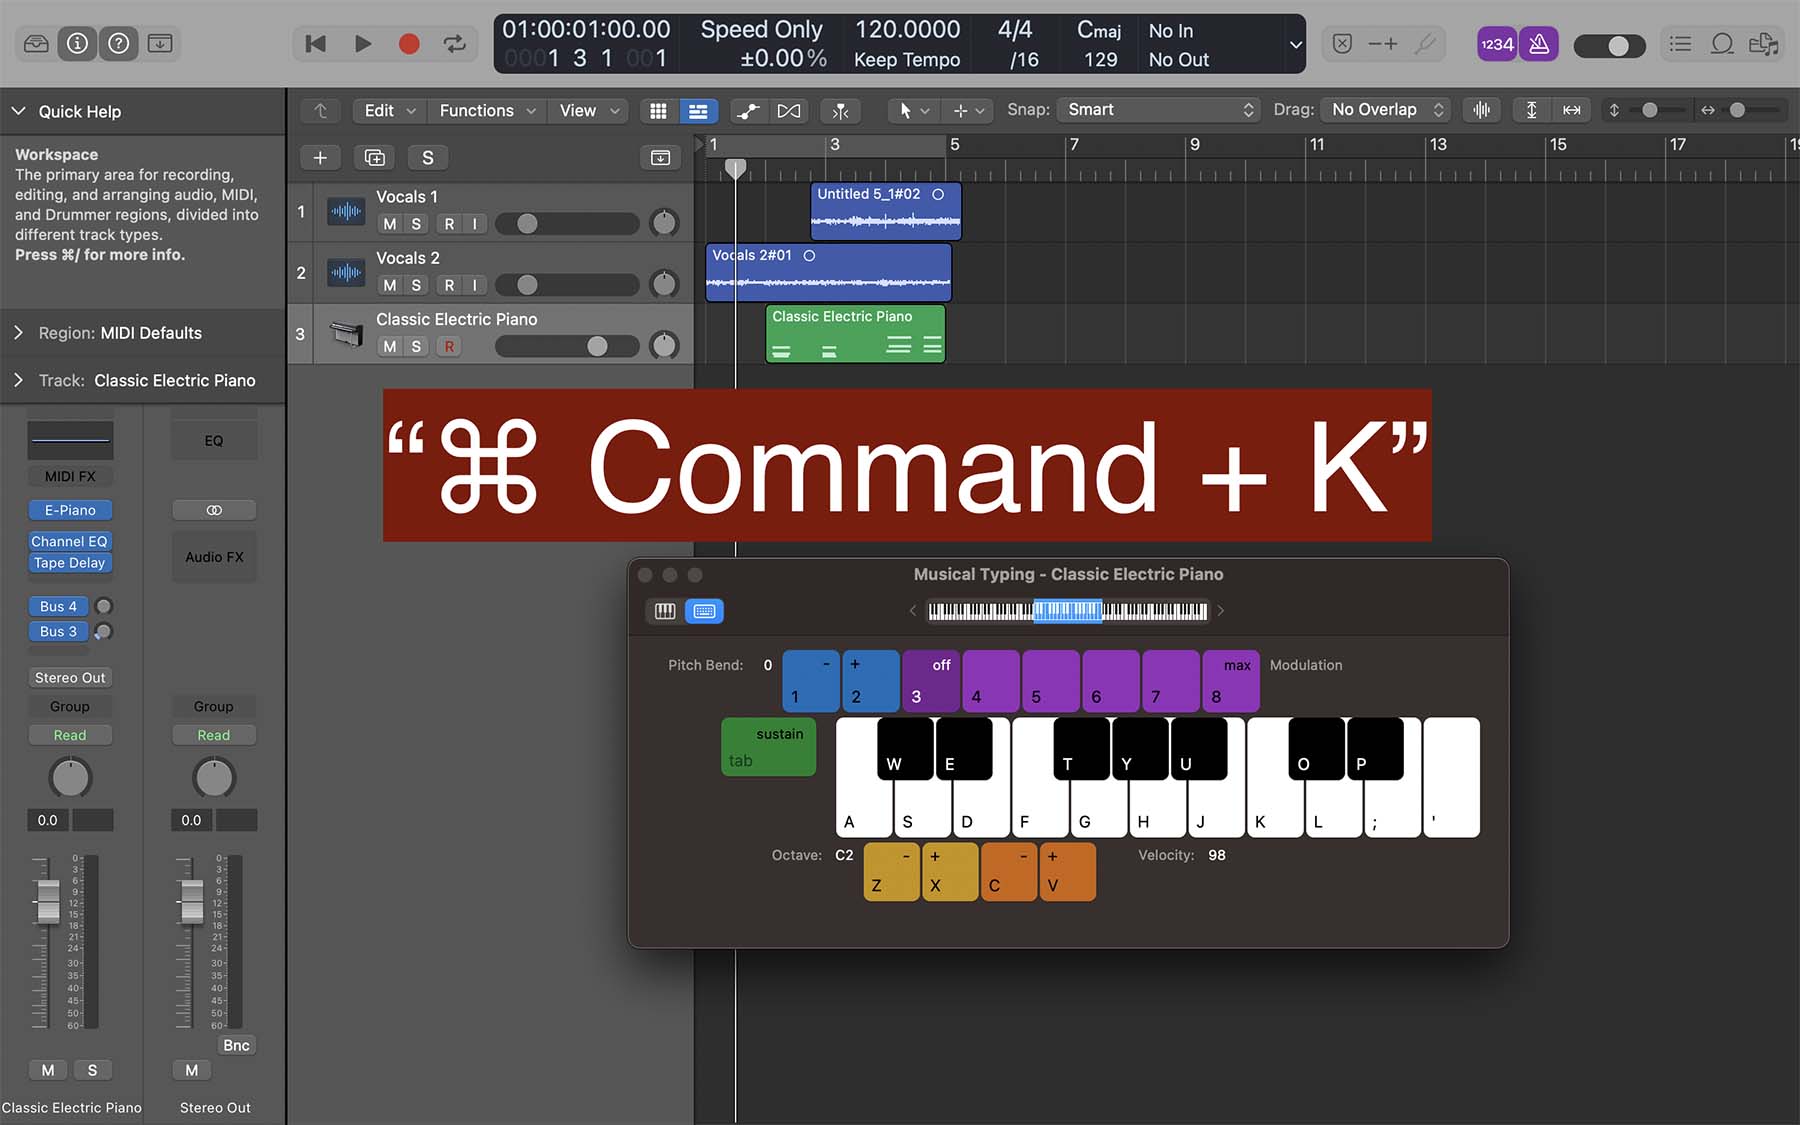
10. Open/Close Musical Typing - “⌘ Command + K”
If you don’t have a MIDI controller to utilize Logic Pro’s virtual software instruments, you can use the musical typing feature.
It allows you to input MIDI notes using your computer keyboard and record melodies, chords, and bass lines without needing an external MIDI controller.
Once you’ve selected a software instrument, press “⌘ Command + K” to open/close the built-in musical keyboard.
I often find myself using the musical typing feature in Logic while I'm in commute. I've been 30,000 feet in the air travelling over the Atlantic and programming a synth line. There is always time to make music! See this in action on my recent songwriting trip to Portugal.
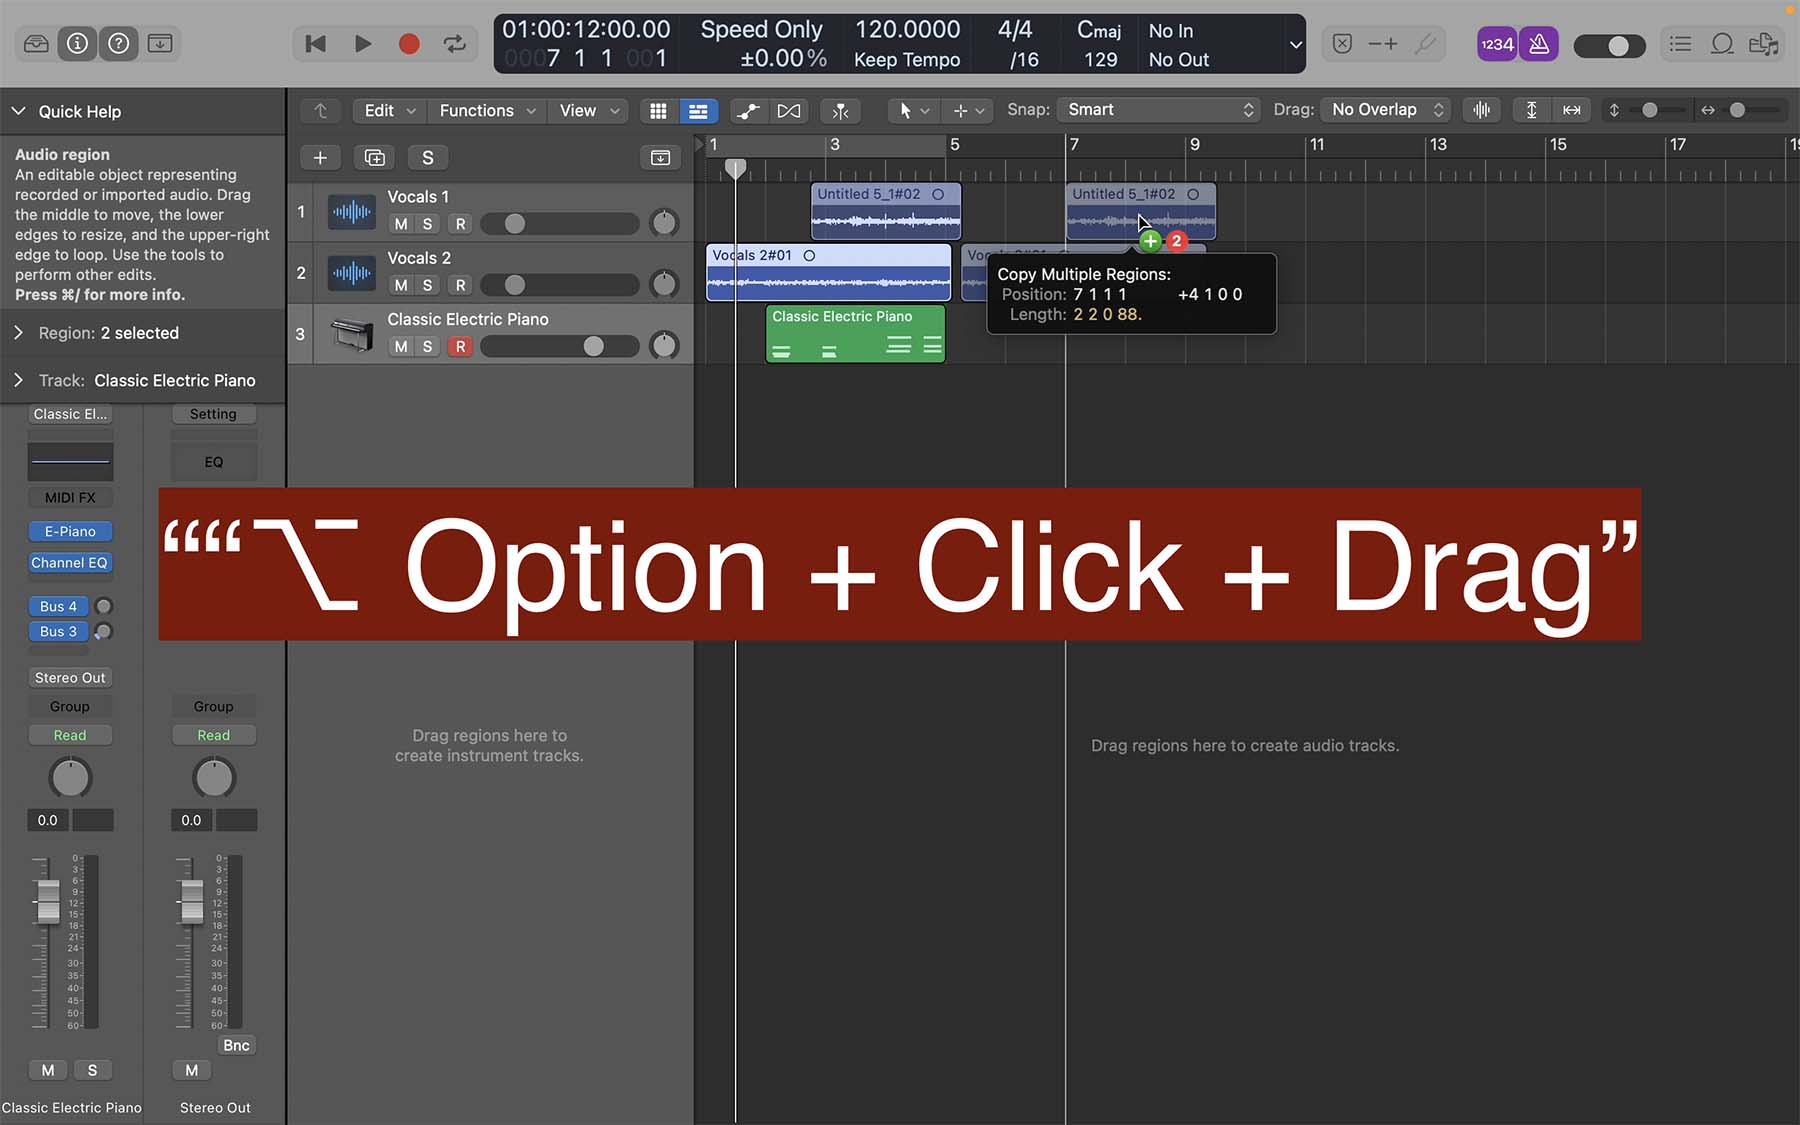
11. Copy and Paste Regions - “⌥ Option + Click + Drag”
There are multiple ways you can copy and paste data in Logic Pro. These methods are all useful depending on your preference and intended function.
One way to copy and paste selected regions is by using the “⌥ Option + Click + Drag” key command. This was a game changer for me when I first found out about this shortcut.
Select the regions you want to copy. Then, hold the “⌥ Option” on your keyboard and drag the data to where you want to paste them.
Ensure you don’t release “⌥ Option” until you’ve finished dragging the regions; otherwise, Logic will only relocate the regions and will not copy and paste them. Boom! Now imagine how fast you can do this once you have the muscle memory now.
Extend it even further by copying and pasting groups of regions. For example, let's say you want to copy and paste an entire chorus section with many regions on different tracks, you can still use this shortcut. I likely use it over 100 times in every single Logic session.

12. Trim Tracks At Playhead - “⌘ Command + T”
Pressing “⌘ Command + T” on your keyboard lets you quickly cut a selection region where the playhead is. You can also cut multiple selected regions. You are likely familiar with this one if you're coming from GarageBand or maybe you've watched my complete GarageBand tutorial. Either way, it's a good shortcut to have in your back pocket.

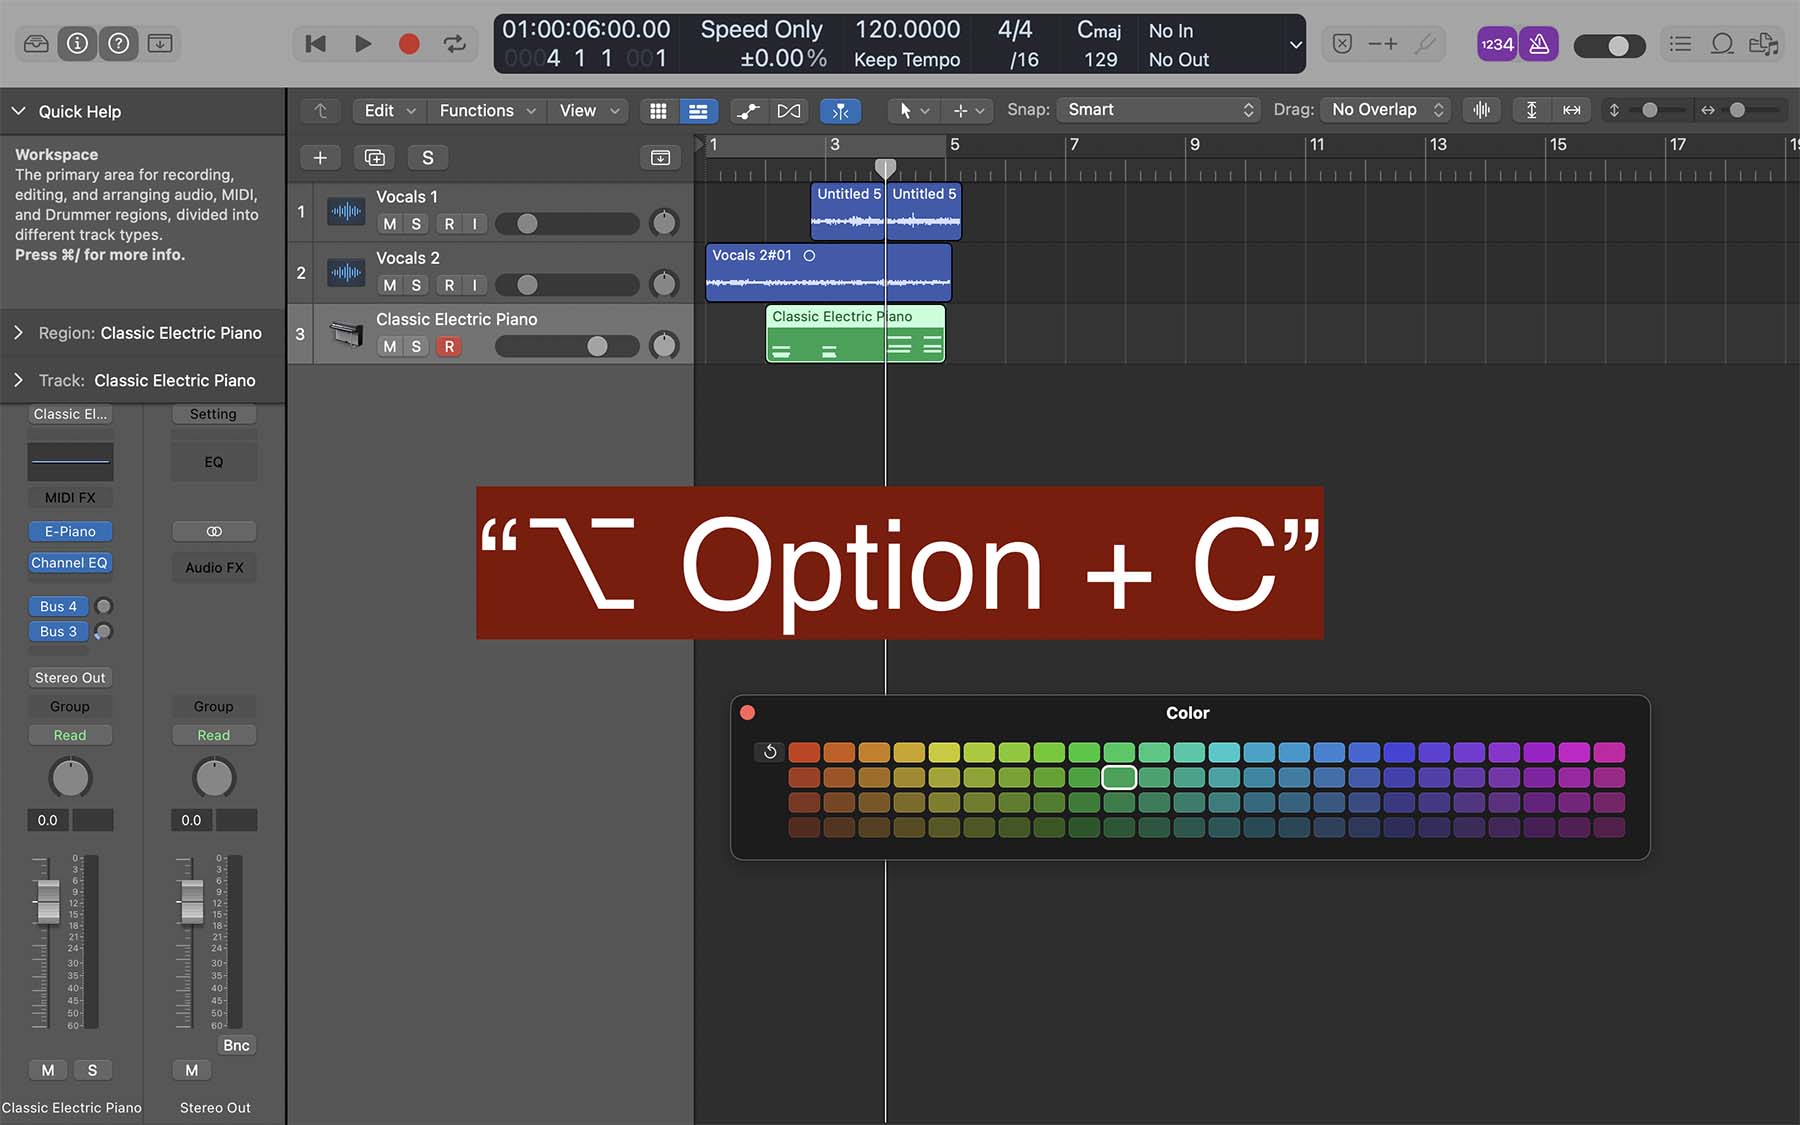
13. Open Color Palette - “⌥ Option + C”
Using comprehensive visual cues is an excellent way to keep your tracks organized in Logic Pro.
Using different colours for different tracks can help you navigate through your project more efficiently.
To open and close the colour palette, press “⌥ Option + C” on your keyboard. This brings up a large selection of colours for you to choose from. I recommend building a colour scheme that you can recycle across all your productions. For example, I like to colour my drums red and my vocals a light blue. This helps me easily see where these specific tracks are in every Logic project I'm working on.
14. Create Track Stacks - “⌘ Command + ⇧ Shift + D”
Creating stacks is another critical method for having organized projects in Logic Pro.
This is particularly useful when you want to target multiple tracks all at once. It also helps declutter your workspace.
Select multiple channels and press “⌘ Command + ⇧ Shift + D” on your keyboard to create a folder/summing stack.
Summing stacks are a great way to process a group of tracks together and I suggest doing this in order to level up your productions. However, if this is the first time you're hearing about creating summing stacks, that's okay, watch this video on how to create summing stacks in Logic Pro.


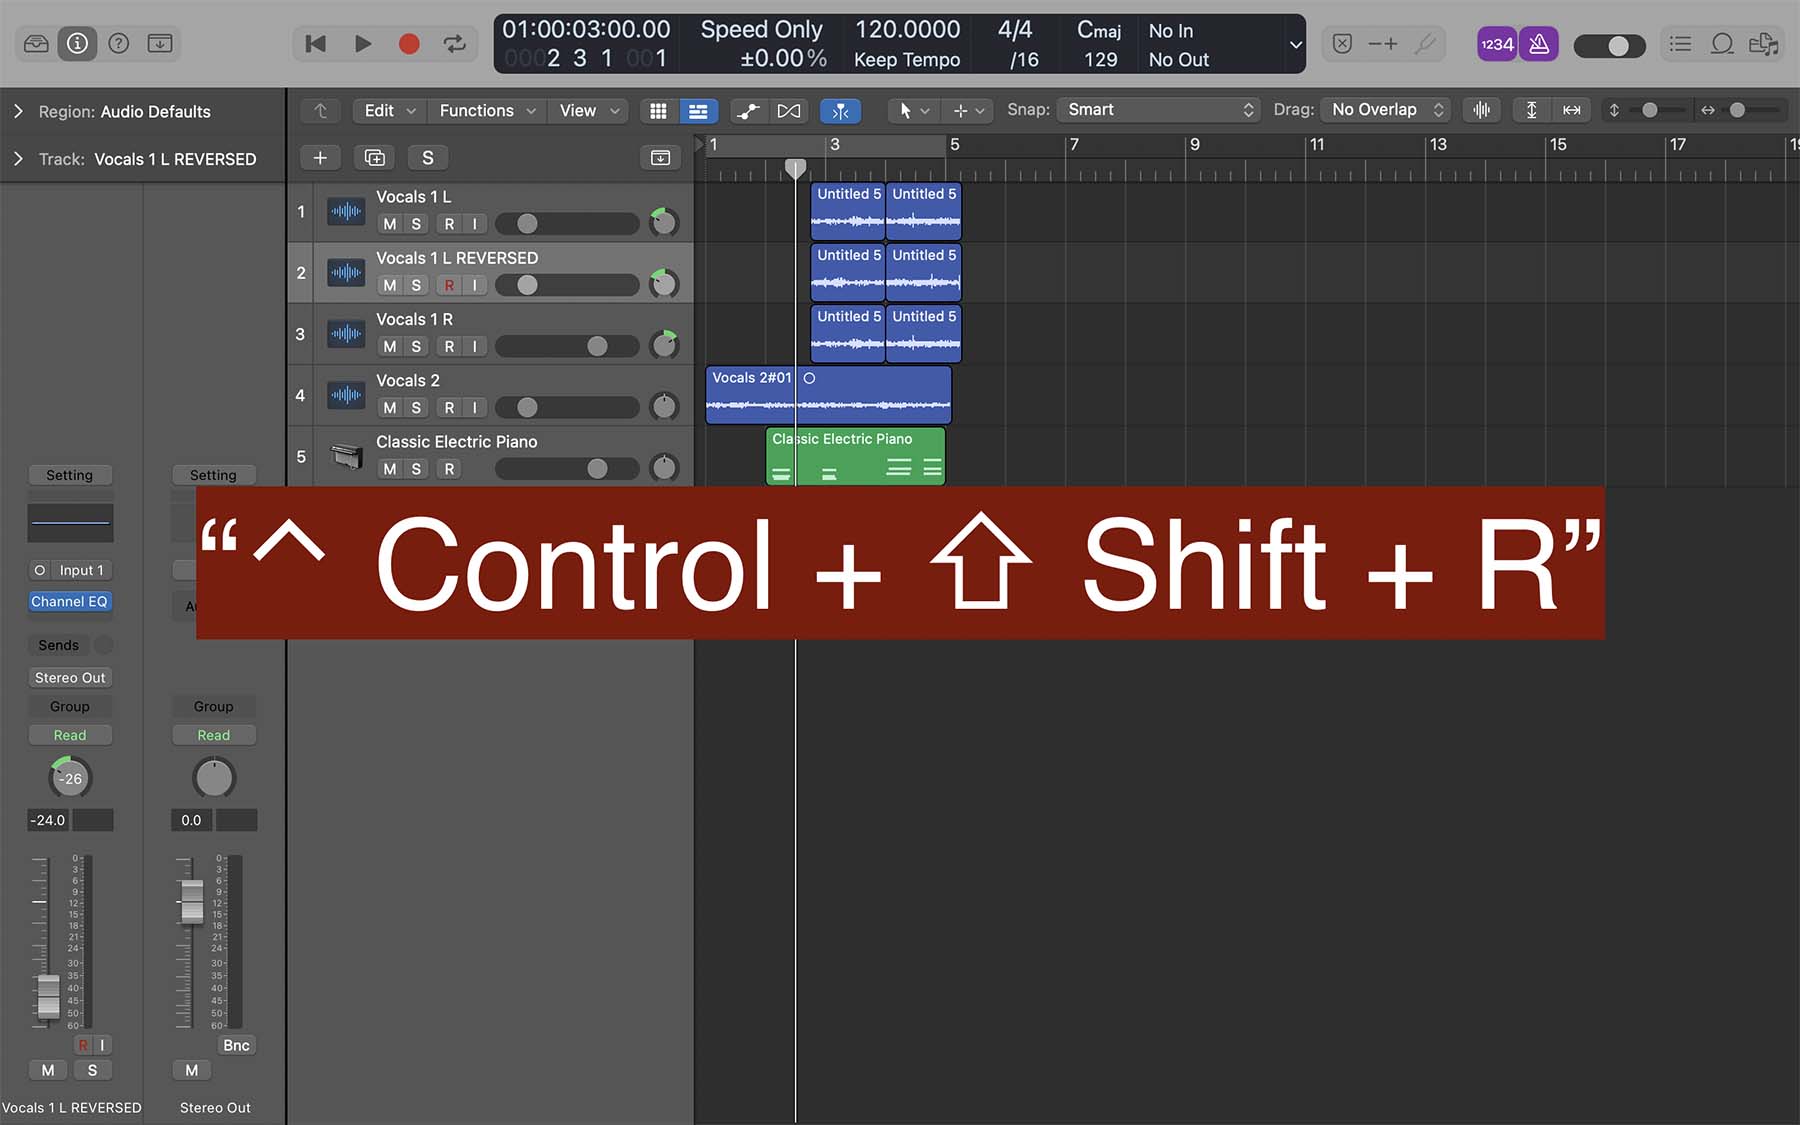
15. Reverse Audio - “⌃ Control + ⇧ Shift + R”
Reversing audio is an excellent tool for creating exciting dynamics in your songs.
As usual, Logic Pro offers various methods for reversing audio. The fastest way is using the assigned key command, which is “⌃ Control + ⇧ Shift + R.”
Reversing audio can be have a really cool sound effect on guitars and pianos. Especially, if you had a lot of reverb. A great way to make authentic sounds for your productions.
16. Expand/Reduce Waveforms - “⌘ Command + [Minus]/[Plus]”
If you want to get a better look at the recorded audio's waveforms, you can press “⌘ Command + [Minus]/[Plus]” on your keyboard to make the waveforms thinner/thicker.
This is really helpful if you receive a set of files from another producer or mixer and the gain is set to low. You can increase the waveform to see the audio signal better. Remember, this doesn't actually increase the gina but rather make it seem like it's bigger. That's important to remember.

17. Transpose Regions - “⌥ Option + Up/Down Arrows”
Pressing “⌥ Option + Up/Down Arrows” on your keyboard lets you transpose selected audio/MIDI tracks by a semitone.
Moreover, you can transpose regions by an octave by pressing “⇧ Shift + ⌥ Option + Up/Down Arrows.”
Whenever I use a sample from the Splice sound library, I usually have to chop it up and transpose the audio.
![]()
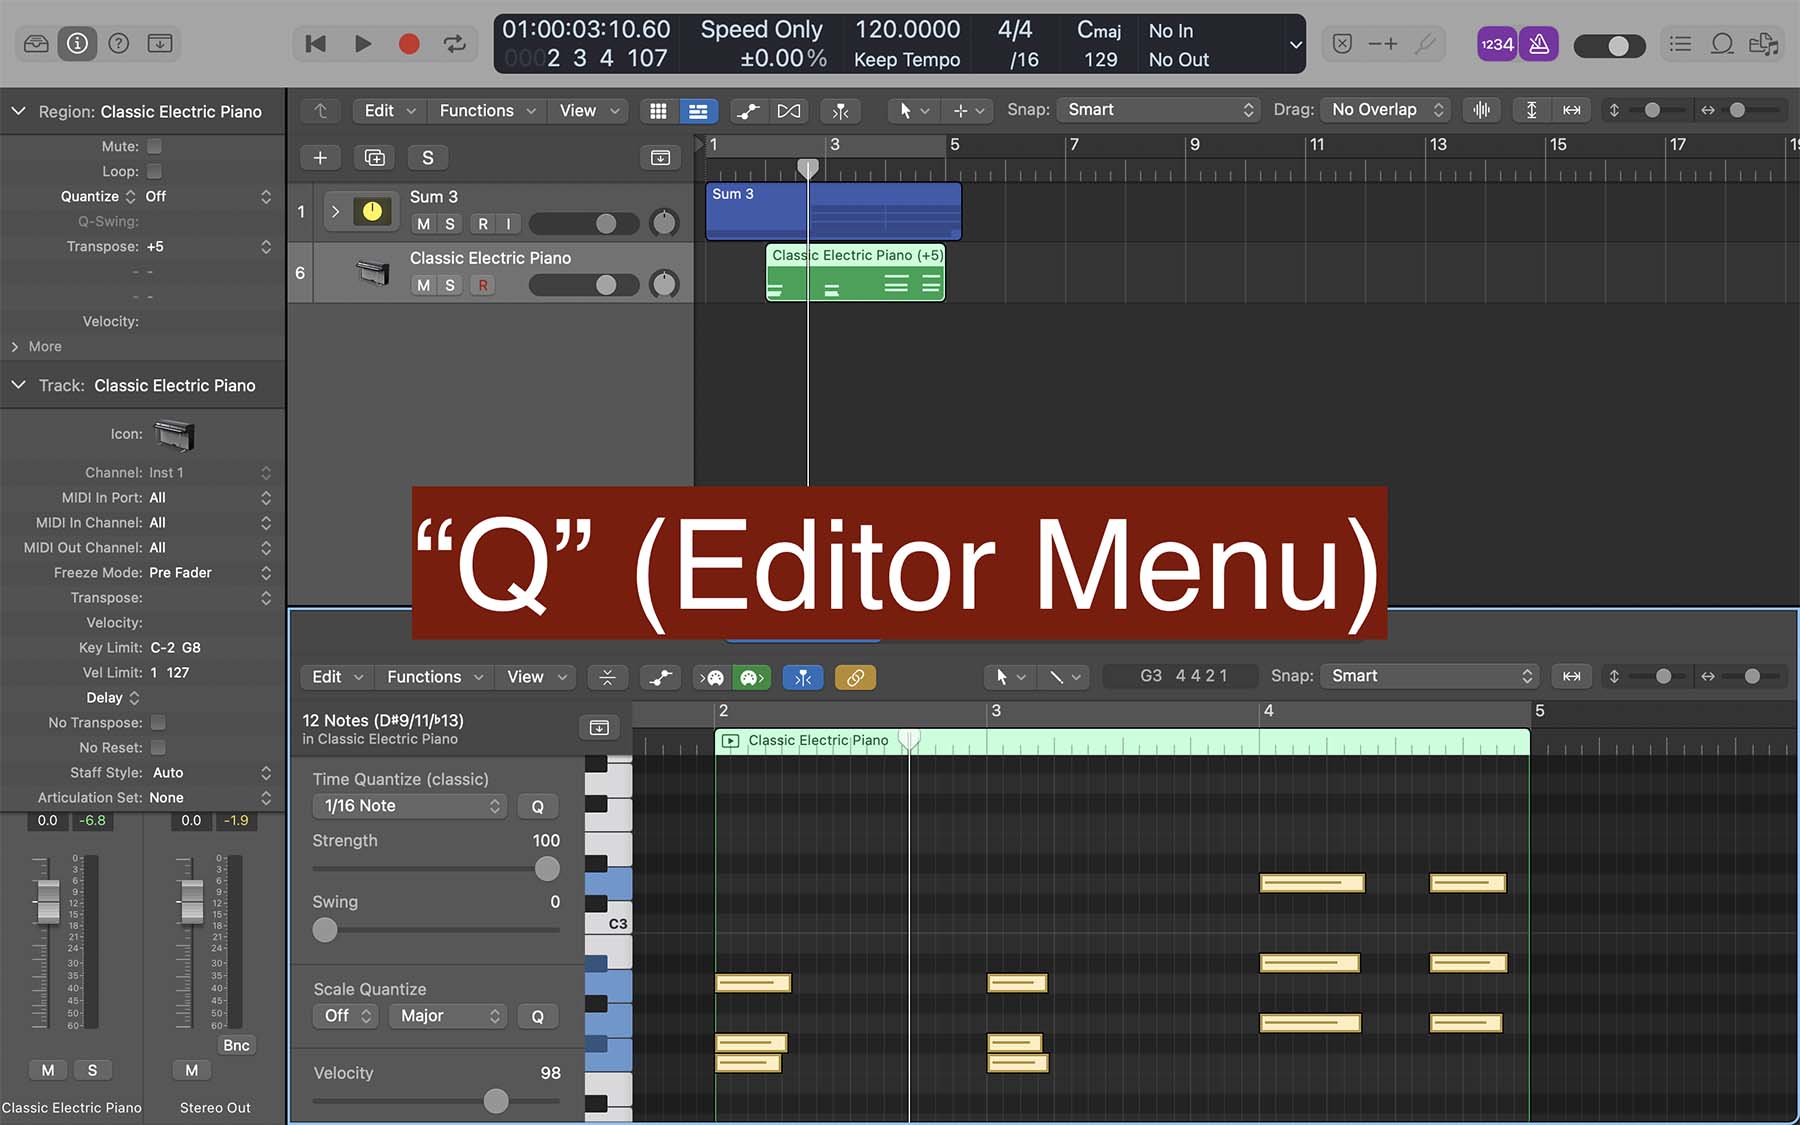
18. Quantize MIDI In Editor Menu - “Q”
Quantizing notes make them in sync with the project’s tempo.
First, press “E” on your keyboard to open the editor menu for one of your MIDI tracks.
Then, select the notes you want to quantize (“⌘ Command + A” to select all notes) and press “Q."

19. Stretch Notes In Editor Menu - “⇧ shift + \”
If you want your MIDI notes to play end to end without any spaces between them, you can press “⇧ shift + \" on your keyboard to stretch selected notes in the editor menu.
Also, you can remove overlapping notes in the editor menu by selecting them and pressing “\” on your keyboard.
This often happens if you are drawing in midi notes or playing them on your midi keyboard. For synth pads, it can some times be nice to have the notes sustain into each other so there is no sound dead space.

20. Bounce Projects - “⌘ Command + B”
Last but not least, when you want to export a song in Logic Pro, you can press “⌘ Command + B” on your keyboard to ‘bounce’ it.
You'll notice there are a lot of options on the bounce pop up that you can choose from. If you're unsure on what bounce format to choose then I suggest watching this video on how to export a song in Logic Pro.

Final Thoughts On Using Key Commands In Logic Pro
Using Logic Pro’s key commands is an essential step toward streamlining your workflow.
Besides the shortcuts I mentioned above, Logic offers many more that may come in handy for you.
You can check out all the key commands available in Logic Pro by pressing “⌥ option + K” on your keyboard. What’s more, you can add new key commands, customize the pre-existing ones, or even add shortcuts to your MIDI controller to make the music-making process even easier.
The idea that you can customize your own workflow in Logic Pro with respect to shortcuts is one of the biggest reasons why I think Logic Pro is the best DAW out there. However, remember that if you customize key commands in your own setup, they will not work if you open up Logic Pro on another persons computer. With that in mind, I do not recommend re-creating or overriding fundamental shortcuts like ⌘C (command C) or ⌘V (command V). Copy and paste.

I'd love to help you on your music journey and I can help you become an expert in Logic so you can make the music you've always wanted to from the comfort of your home. I recommend checking out my free 6 pillars on learning Logic Pro faster.


