How To Arrange And Organize Tracks In Logic Pro
Apr 27, 2023
In this post, I will teach you how to create an organized and clutter-free session in Logic Pro. If you’ve been working with Logic Pro for a while, you know how easy it is to lose sight of your creative vision working with a multitude of tracks and plug-ins.
It can be overwhelming at first if you are unaware how to keep your tracks organized. However, after reading this post, you'll be an organized pro!
Mixing in Logic Pro can be a hassle if your tracks are all over the place. It gets even worse when you want to send a Logic Pro project to another user to mix or master it for you. That’s why keeping your tracks and projects organized is a critical step toward producing music professionally.

There are several techniques to keep a smooth workflow before everything starts to feel overwhelming. Whether you’re recording a demo of your song, making a beat, or mastering a song in Logic Pro, these tips can help you stay focused and achieve your goals easier.
Here’s a list of what you’ll learn in this article:
-
Naming Each Track In Logic Pro
-
Choosing Relevant Icons For Your Tracks
-
Colouring Your Tracks
-
Using The “Marker” Tool
-
Creating Track Stacks
So, without further ado, let’s dive in.
1. Naming Each Track In Logic Pro
First and foremost, make sure you name each track as soon as you create them.
It only takes a few seconds, but it can save you a lot of time when working with multiple instruments and different takes. It's a good habit to start early when you're learning Logic Pro. On the other hand, it's easy to ignore this step. I can tell you from experience, when you have 100+ tracks, you'll be happy you started naming them from the beginning.
Here's how to quickly name each track:
Once you add a new track, simply double-click on its name in the Track Header area and give it a proper name.

It is a good practice to be as specific as you can with your track names. For instance, if a track is panned to the left or the right then add “L” or “R” after its name. This will save you a lot of trouble and make your job easier when editing and mixing. Furthermore, if you bounce these tracks out for another mixer to work on, they'll know these tracks are panned.
2. Choosing Relevant Icons For Your Tracks
Assigning proper icons is another easy step to add visual cues to your tracks.
Logic Pro offers plenty of images you can use for this purpose, including different types of guitars, keyboards, and drum pieces.
From the track header menu, control-click on a track’s icon and choose an image that best suits that track.
Moreover, you can add custom icons to customize your tracks even further.
![]()
Tip: If you find that you have too many tracks to name or too many plugins, you might consider deleting some to increase your computer speed. On the other hand, you can freeze tracks in Logic Pro to help with computer processing.
To add custom icons, click on the custom icons section.
Next, click on the "+" button and this will open up a mac finder window where you can load in your custom icon.
![]()

3. Colouring Your Tracks
There are various approaches when it comes to colouring different tracks in Logic Pro.
One way to do it is to colour each channel individually based on what you think works best for your workflow. For example, I've got into the habit of always colouring my drums red. I just started doing it like and now I've built a habit around it.
Once you’ve selected the regions to which you want to assign new colours, click “View” from the menu bar at the top and click “Show Colours".
You can also open the colours menu by pressing “Option + C” on your keyboard. Using shortcuts are always my preferred method.

I suggest choosing a colour for each section and giving each track different shades of that colour.
For example, assign different shades of purple for vocal tracks and or shares of red, like I do, for the drums. Once you get into this habit, you'll be able to navigate very quickly through your session by visually understanding what your tracks are.
Another way to have different colours for each track is to let Logic Pro automatically do it for you. In this case, you have to be open to open minded to what Logic will chose on your behalf. Although, I don't allow Logic to choose colours for me, I still think it's a fast way to get a colour scheme going to keep you organized.
Here’s how you do it:
-
From the menu bar at the top, click on Logic Pro > Preferences > Display.
-
Once the Preferences menu opens, open the Tracks section.
-
Under the Appearance menu, change the Track Color option to “Auto-assign—96 Colours.”

4. Using The “Marker” Tool
One of the best ways to sort out different segments of your song in Logic Pro is by using the Market tool.
Typically, our songs have various parts, including an intro, verses, choruses, and maybe a bridge or outro. Having visible labels for each section can help you a lot when working on a project.
I'm a huge fan of markers and I have them in every production that I work on. I also have them baked into my Logic Pro template. For example, every time I open up a new Logic Pro session, I have markers that are pre-created in a standard song structure so I can dive right into creating. Here's a video where I show you how I create templates in Logic Pro.
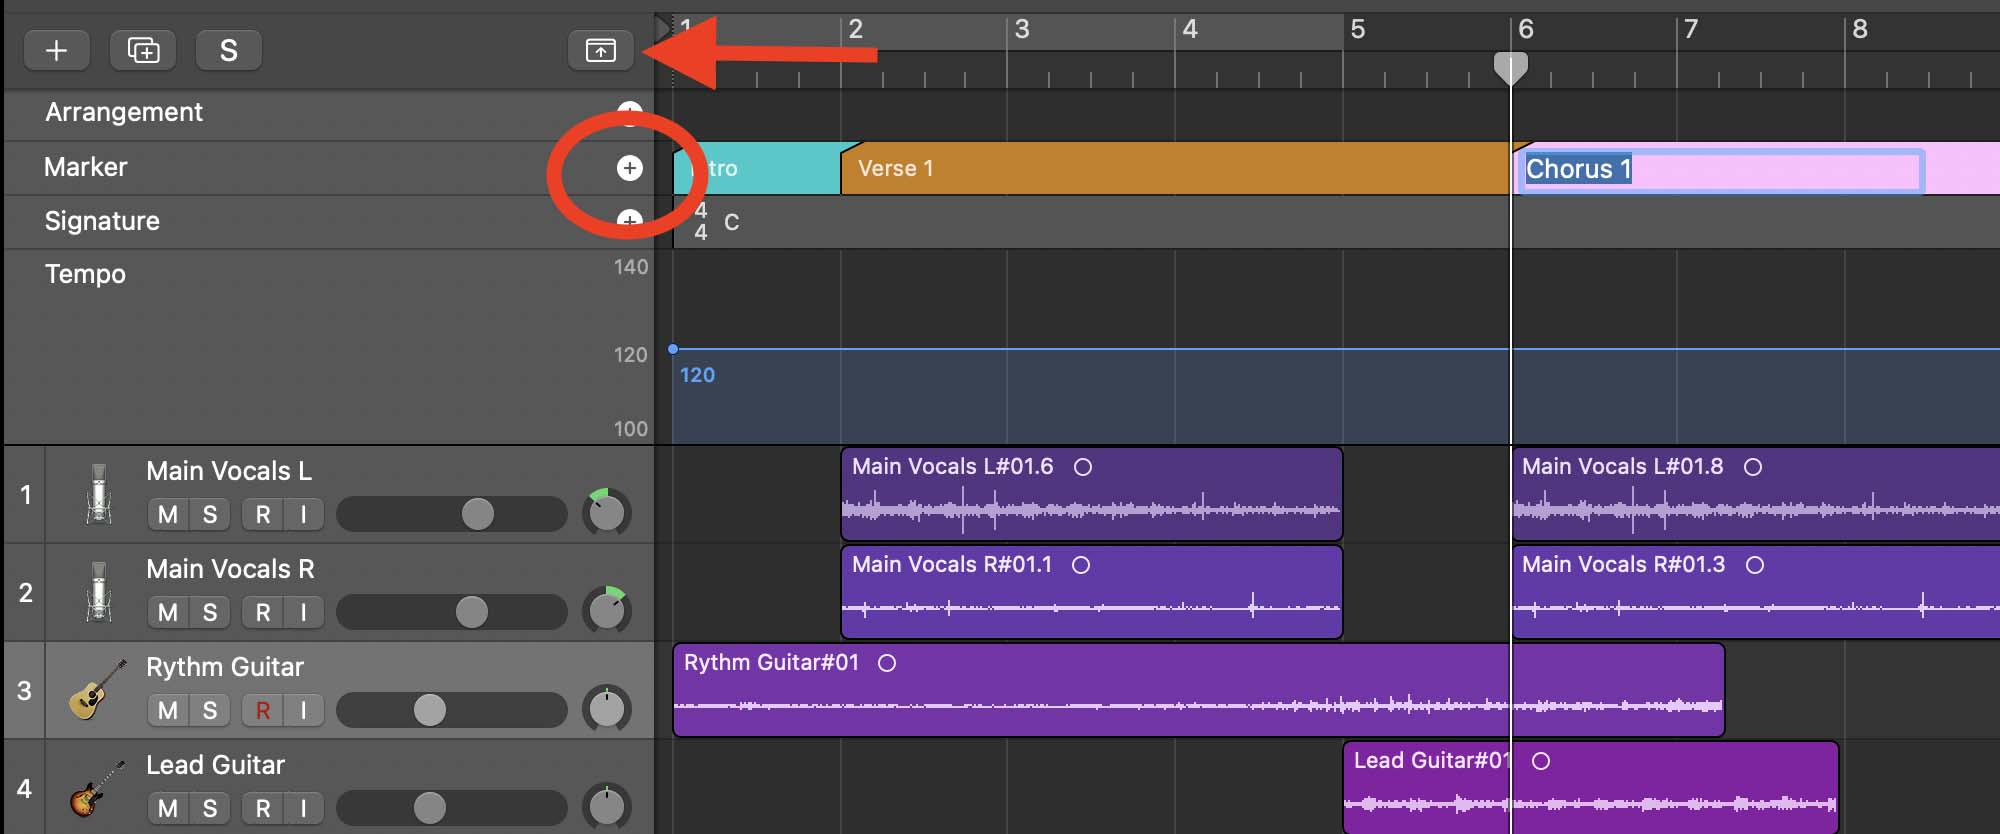
Either way, to use the marker tool:
-
Open the Global Tracks menu by clicking on the small rectangle with an arrow inside of it on top of the Track Header area (you can also open this menu by pressing “G” on your keyboard).
-
Bring the Playhead to where you want to mark a new segment and click on the little “+” sign next to where it says “Marker.”
-
Do the same for other segments to visualize different parts of your song better.
Remember when we were colouring our tracks and regions? Well, you can colour you markers as well so they are easy to see.
Assigning different colours to your markers is one thing you can do to make them more visually comprehensible.
Select one of them and open the colours menu by pressing “Option + C” on your keyboard. Get used to the shortcuts! They save you in the long run.

5. Creating Track Stacks
Last but not least, using track stacks in Logic Pro can simplify your workflow and streamline the editing process.
Moreover, creating track stacks in Logic can help you apply processing to a group of tracks at the same time. In other words, creating track stacks essentially create bus or auxiliary tracks. If this is the first time you're hearing about bus tracks or aux tracks then I recommend watching this video on how to do bussing in Logic Pro.
Logic Pro offers two types of stacks
Folder stacks and;
Summing stacks.
Let me explain the difference between each because it's important that you wrap your head around it.
Folder Stacks
A folder stack is used merely to declutter your workspace and organize your tracks.
It allows you to group multiple tracks to navigate large projects more efficiently. Folder stacks do not have any effects on the audio processing of the tracks they contain. Think of folder stacks as a simple "filing folder" system for your tracks. For example, you have 10 guitar tracks and you don't like looking at them because they take up so much space. In this case, you have the option to put them all in a folder stack to keep them organized.
Summing Stacks
On the other hand, a summing stack does everything a folder stack does but also allows allows you to apply effects to a group of tracks as a whole.
For example, you have different drum tracks in your project. Like a snare, kick, hats, toms, and some claps too. If you want to compress all of these tracks together and perhaps add some distortion to make them a bit for gritty, you can do this by putting them in a summing stack. Think of the he summing stack itself as a separate track that all of your drums are routed to.
I use summing stacks in all of my Logic production because it allows me to keep organized but also I like to process tracks together. Here's a great video tutorial on how I process my drums to get more punch.
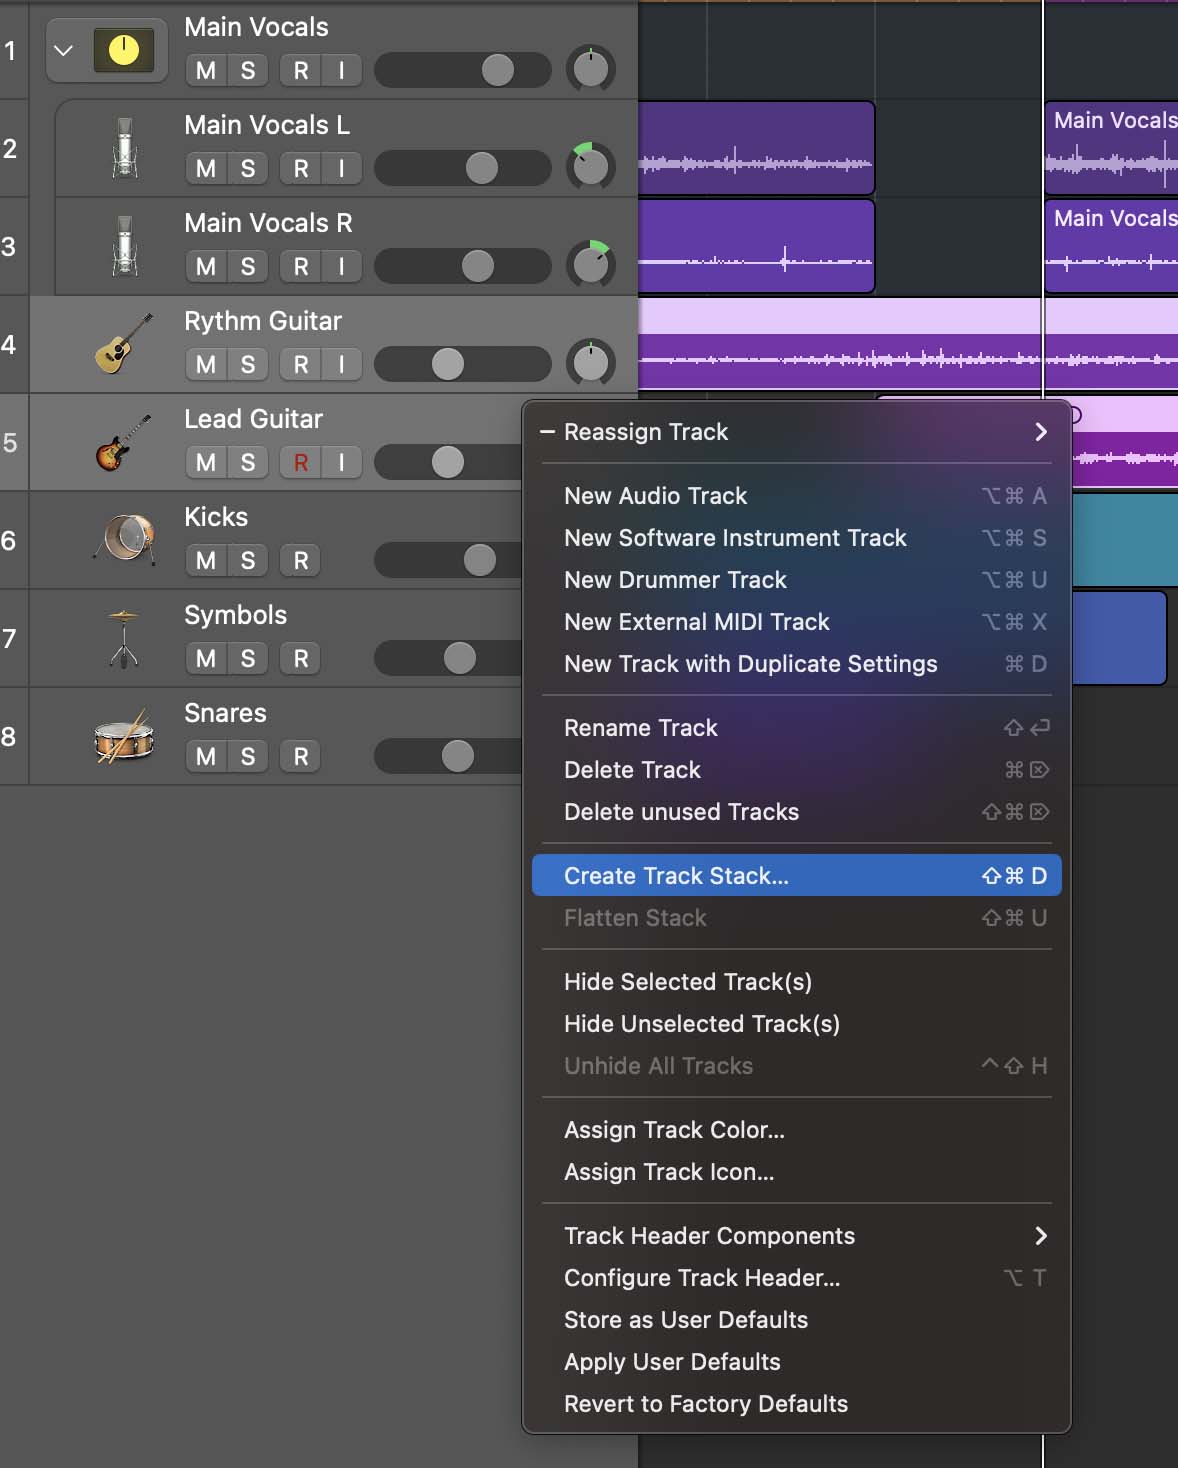
To create a stack in Logic Pro:
-
Select multiple tracks by clicking on them while holding the “Command” key.
-
Control-click on one of the tracks and choose “Create Track Stack” (you can also press “Command + Shift + D” on your keyboard to do this).
-
Logic asks you if you want to create a Folder Stack or a Summing Stack; choose what is suitable for the selected tracks.
Tip: For using EQ on vocal tracks that are panned to left and right, group them in a summing stack and add an EQ plug-in to the stack. This way, you don’t have to do it individually for each channel, and can save a lot of computer processing power.
Final Thoughts On Organizing Projects In Logic Pro
Whether working on a small project or a large-scale score with dozens of instruments, keeping your tracks organized can boost your efficiency and result in higher-quality production.
Utilizing the methods above shouldn’t take much of your time but can save you a lot of hassle when mixing your project, allowing you to focus on the creative aspect of your music-making process.
More often than not, there are multiple ways to tackle an obstacle in Logic Pro to get the results you want. So, remember to experiment with different tools to find out what works best for you. If you like to learn more about production, mixing, and mastering in Logic Pro, I recommend checking out my free 6 pillars on learning Logic Pro Faster.


