How To Remove Silence In Logic Pro
Oct 13, 2022
I’m going to teach you how to remove silence in Logic Pro which is one of the fundamentals in music production and music engineering. It’s natural to have a bit of tape noise or room noise in your recordings, however, you’ll likely want to clean this up on a lead vocal track or other lead instrument so it doesn’t muddy up your mix.
Keeping your productions clean and noise-free can sometimes seem tricky but I’ll remove all the confusion and show you a few different ways to remove silence in Logic Pro.

In this post, I’ll explain in detail, the following three ways on remove silence in Logic. Lastly, I’ll go through some tips on recording to reduce the amount of unnecessary noise that might be captured during your recordings.
-
Cutting Regions And Muting
-
Noise Gate
-
Remove Silence Feature
If you're looking to remove background noise or something that may have been captured in your recordings, you may prefer this video tutorial.
Cutting Regions And Muting
Cutting and muting silence is the most manual approach to removing silence in Logic Pro, but it works the best! I often find when I’m manually removing silence in Logic I notice other clicks or pops in the track that I can remove too. In general, I always try this method after I produce a song before I send it off for mix. When I’m in a session and I need a quick fix to remove some noise then I use the method number 2 or 3.
Here are the steps that I use when I cut regions up and either delete or mute them:
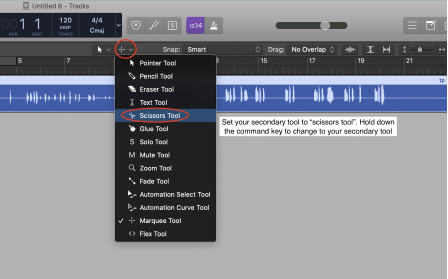
Step 1
Change your secondary tool to the scissors tool by clicking on the secondary tool menu in the centre of the control bar. Take note of the image below.
Step 2
Hold down the command key to use the scissor tool (your secondary tool) and click on an audio region at the point you’d like to slice.

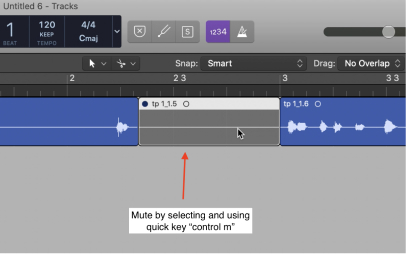
Step 3
After slicing up your region, mute the region you’d like to remove by selecting the region and using the quick key “control m”.
Step 4
To prevent any unwanted clicks or pops, create a tiny fade at the beginning and ends of your regions by using fade tool click zones. Select all regions on a track, drag your mouse over the top left or right corner of one of the regions and simply hold and drag to create fades. Take note of the image below.
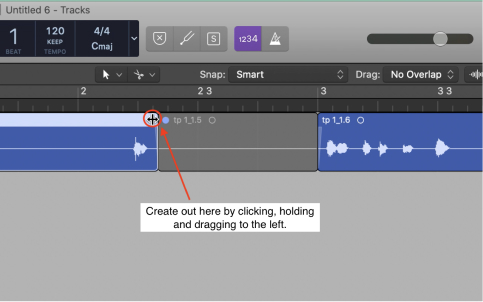
You'll need to enable fade click zones. Go to Logic Pro > Preferences > General > Editing > Fade Tool click zones and make sure that box is checked.

Noise Gate
A quick and effective way to remove silence in Logic, without doing it manually, is a noise gate plugin. Think of a castle. You got one in your head? Okay, now think of the castle gate. It’s big, likely wooden, with 2 doors that can be swung open and closed.
You can think of a noise gate plugin as a castle gate that swings open and closed. When the door is closed, no audio goes through, when the door is open, the audio goes through. You also are in charge of when you would like the gates to be opened or closed. This is also known as the threshold.
A noise gate plugin prevents any noise that is quieter than the threshold from playing. For example, if you have a noise gate on your drums and your threshold is -50 dB, anything below -50 dB will be reduced to silence. Or let’s take another extreme example, if you add a noise gate plugin on a vocal track and you set the threshold to 0db. That means that anything below 0db won’t let through the gate. Which is likely everything.
Here’s how to add and use the noise gate plugin on your tracks in Logic Pro to remove any silence or unnecessary noise.
Step 1
Add the noise gate plugin by clicking on the gray box labeled “Audio FX” on the inspector panel. Take note of the image below.

Step 2
Find the “Noise Gate” plugin in Dynamics > Noise Gate and select it.

Step 3
In the noise gate plugin, set your threshold on the threshold by listening to your track and making sure all the sounds you want are going through the gate and all the sounds you don’t want don’t go through the gate. For example, if the hi-hat is being cut off when the threshold is at -50 dB, try lowering your threshold to -55 dB.

Adjust the attack, hold and release knobs to change how quickly the gate opens, holds and closes. If the decaying sound of a cymbal is being cut off, make your hold or decay time longer. Use your ears and figure out what sounds the best.

Remove Silence
The remove silence feature is the quickest way of removing unwanted silence in tracks. It’s way faster then cutting regions up or even using the noise gate.
You might be asking yourself, “why not use the remove silence feature in Logic on every track?” Good question. You can, however, you can’t be so sure the remove silence feature worked perfectly every time.
It’s good to do a double check on your track and regions after you do the remove silence feature to make sure you’re not cutting out any audio you still want to have in the project. For example, if we do the remove silence feature on a vocal track, it’s possible that it may remove the breaths from the vocal.
However, some producer like to keep the breaths in because they find that it sounds odd without them in the track. Always have a listen over to double check.
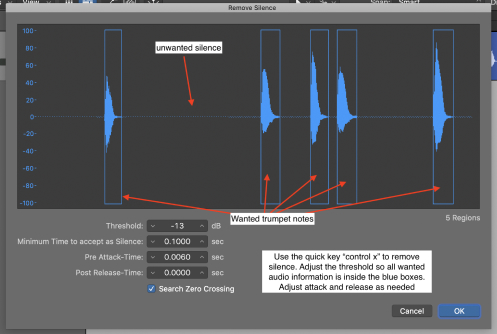
Step 1
First select a region you want to remove silence from.

Step 2
Press “control X” and adjust the threshold so that there are blue boxes around all the audio that you want kept. Everything outside of those boxes will be edited out. Adjust the attack time and release as needed. Remember when I was talking about the castle gates in the noise section above? The threshold here is exactly like the castle gates as well.
Step 3
To prevent any unwanted clicks or pops, create a tiny fade at the beginning and ends of your regions by using fade tool click zones. Select all regions on a track, drag your mouse over the top left or right corner of one of the regions and simply hold and drag to create fades. Take note of the image below.

Recording Tips To Reduce Noise
This section will depend on the style of music and genre that you’re creating. For example, in a lot of pop records, there is no noise. It’s super clean. No hiss, no buzz, hardly even any breaths. Everything is super clean. Is that a good thing? Well, it’s subjective.
If you’re trying to make a pop banger then your tracks need to have all the silence and noise removed. If not, they won’t compete with other singles online. On the other hand, if you’re making an indie record, sometimes a little noise is nice. For example, a soft hiss from a tape machine or from an analog synth. A little bit of noise can actually make the song sound a bit more real, authentic, and warm.
Don’t get too carried away though. I like a little bit of noise in the productions that I want to sound warm and have an analog feeling. Removing silence and noise only became really popular in the last decade or so when pop records have become so clean. If you listen to the track stems of hits in the 60s and 70s you’ll sometimes even hear the band chatting in the background!
If you’re looking for that pop and modern sound to reduce noise and remove silence in your tracks, then I would follow these steps when you’re producing a song in Logic Pro.
Step 1
Make sure your gain is set at an appropriate level. Recording levels should fall between 24 dB and -10 dB, with the very highest peaks at -6 dB.
Step 2
Record in a quiet environment. For example, if you are recording vocals in Logic, be sure to turn off any fans and close any windows. This will help make your room more silent.
You should also consider hanging up some acoustic treatment in your room to minimize the amount of reflections that could muddy up your mix. Adding treatment to your room will make it much easier to mix your song. If you want to setup your own acoustic room treatment, watch this video tutorial.
Step 3
Record using a condenser microphone. Any microphone with a self-noise rating above 20 dBA will have a noticeable hiss.

Final Thoughts On Removing Silence In Logic Pro
Remember that removing silence isn’t always the right answer. Sometimes a little bit of noise and silence is a good thing in a track.
I think a bit of noise or silence can make it sound more analog and warm. However, and of course, sometimes noise and silence can be downright unbearable to listen to, harsh, or annoying. This type of silence definitely needs to be removed.
Keep in mind too that not al your tracks will be a the same volume. For instance, when you are mixing harmonies in Logic Pro, the track that has a bit of silence or noise on it might be buried anyways based on the priority it has in your mix.
I’d love to help you be a more confident mixer and producer in Logic Pro. I recommend getting my 6 free pillars on learning Logic Pro faster.


