5 Settings You Must Change In Logic Pro
Aug 24, 2023
Many praise Apple’s Logic Pro for its user-friendliness. Regardless of your skill set, learning the fundamentals of producing music in Logic Pro is pretty straightforward.
On the other hand, Logic Pro offers many powerful tools for professionals to capture and manipulate audio to create music. Because of that, it is among the most popular Digital Audio Workstations (DAWs) in the world.

Whether you’re new to music production or switched to Logic Pro from another DAW, getting used to the program’s interface might take a while. With enough practice, you can get to know all the tools within Logic deep into your music muscle memory that you'll be creating in no time.
When it comes to workflow, each producer has their own preferences. What works for me might not work for many others. However, there are some basic settings that I believe most users should adjust to streamline their workflow. In this post, I will show you the five most critical settings you must change in Logic Pro.
1. Enabling Logic’s Complete Features
Logic Pro provides Mac users the power and flexibility of a complete professional audio workstation while also allowing you to work with a simplified version to understand the basics of the tools and menus across the app.
When you first install Logic Pro, it loads the simplified mode by default. It is excellent for newbies or GarageBand users to play around with a core set of features for music production. However, if you’re an experienced user and you want to pursue production more seriously, I highly recommend changing this setting right off the bat to unleash Logic Pro’s true potential.
From the top-left side of your screen:
-
Click “Logic Pro” and hover your pointer on “Settings.”
-
From the settings menu, Select “Advanced…”
-
Click the checkbox next to “Enable Complete Features.”
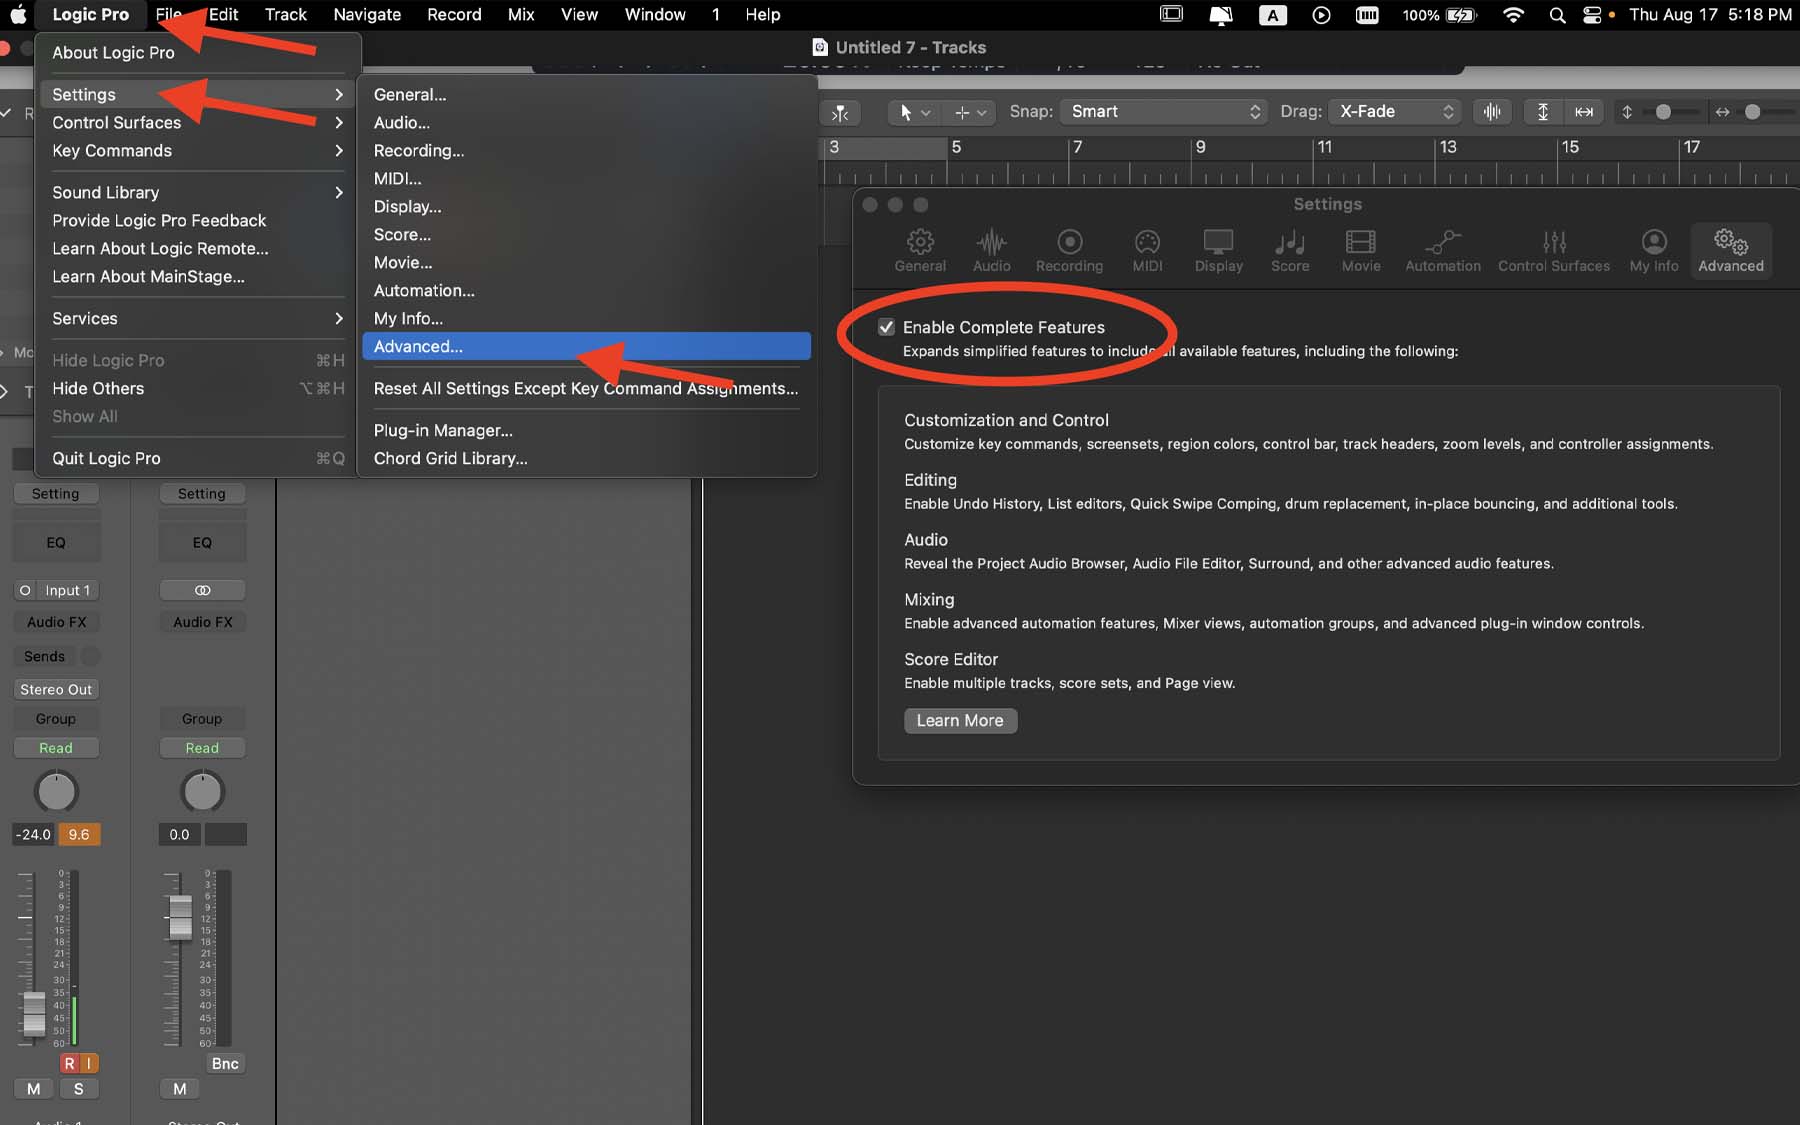
Once enabled, you can take advantage of all of Logic’s features. First and foremost, you can customize region colors and access events and markers, which are all excellent ways to arrange and organize your projects in Logic Pro.
Moreover, many new tools will unlock in the Editor menu, both for audio and MIDI. Flex Pitch, for example, is an excellent tool to fine-tune vocal tracks. You can also use the Step Editor to create and edit MIDI notes, a great way to make MIDI sound more natural in your projects.
Making use of shortcuts and key commands in Logic is an essential strategy for streamlining your workflow. By enabling Logic’s complete features, you can customize key commands to further make your workflow even more efficient.
If you’ve tried to learn Logic from online tutorials and couldn’t follow the instructions, chances are it was because you needed to enable Logic’s complete features.
2. Customizing Control Bar and Display
I can’t stress enough how important it is to customize the upper section of Logic’s workstation. I use the tools and buttons on the top all the time when producing, mixing, and mastering, and I guarantee that you will use them, too.
The more screen real estate you have, the more tools you can squeeze in Logic’s control bar. For instance, I connect my MacBook Pro to a 27-inch external monitor display for music production. Some of the control bar buttons automatically disappear if I open Logic on my laptop’s built-in display.
Even if you don’t use an external display, you can still take advantage of customizing Logic’s control bar.
Generally, the upper control bar is divided into four sections; Views, Transport, LCD, and Modes and Functions.
Customizing these sections heavily depends on your preference and workflow. I’ve seen producers adjusting the control bar very differently. So, by no means what I suggest should be used as a fixed solution for more efficiency. Try different layouts for yourself to see what works best for you.
-
Control-click on the upper section of Logic’s workstation.
-
Select “Customize Control Bar and Display…”
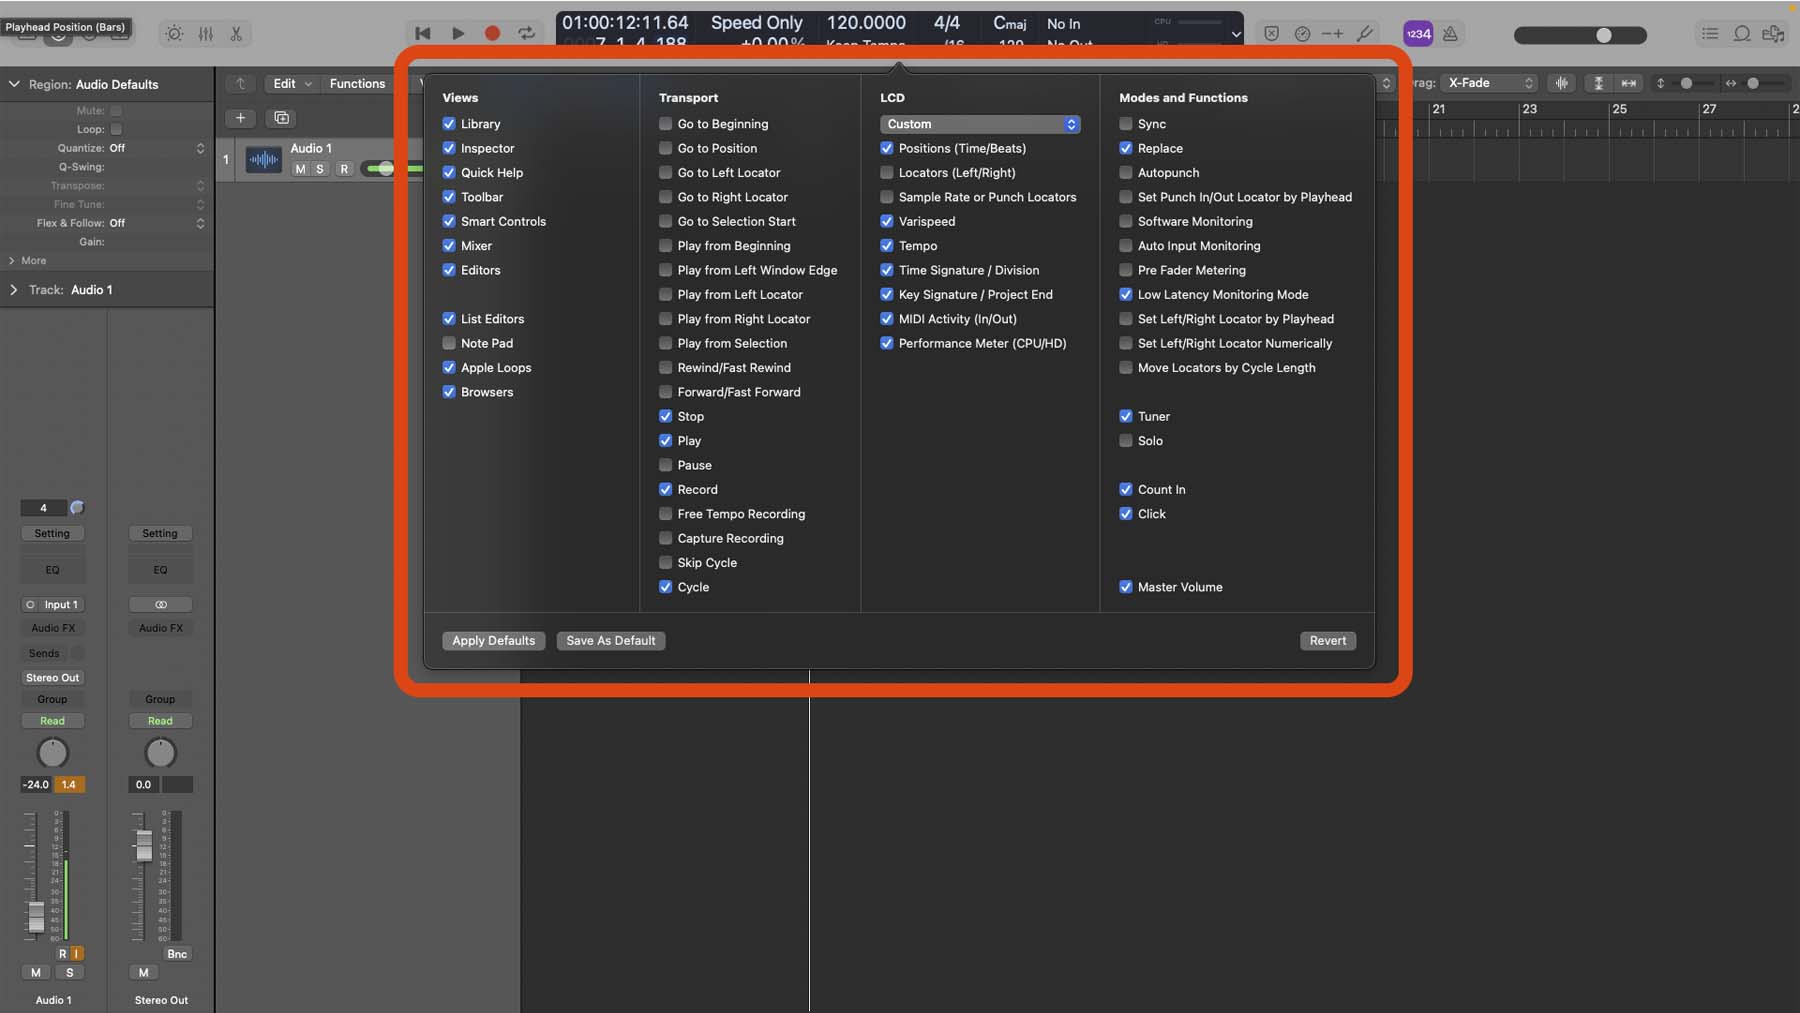
Here are some of the tools I recommend adding to your control bar:
“MIDI Activity (In/Out)” allows you to supervise what you play on your MIDI controller. This is particularly useful to see what chords you’re playing.
With “Time Signature/ Division," you can quickly switch from different time signatures (4/4, 3/4, 6/8, etc.).
I’ve also added Logic’s built-in tuner in my control bar to check my tuning when recording guitars directly in Logic Pro.

“Varispeed” lets you bring up or down the speed of the entire project. You can use it to temporarily slow down your project and record a complex bass line, and then turn everything back to normal speed.
Lastly, “Performance Meter (CPU/HD)” allows you to monitor how much stress you’re putting on your computer. Opening too many CPU-hungry VSTs and plugins in one session can max out your computer’s processing power and result in Logic freezing. In such a case, you might have no other option than to force quit Logic and risk losing some of your progress.
In another post, I have explained how to force quit Logic safely and avoid dealing with such situations.
3. I/O Buffer Size
This is something you’d want to change depending on what you’re doing in Logic. Buffer size refers to how much time your computer has to process a sound in real-time. The less time you give it, the more processing power it requires.
To change the buffer size:
-
Click “Logic Pro” from the top-left corner of your screen.
-
Hover your pointer on “settings” and select “Audio…”
-
From the pop-up menu, change the “I/O Buffer Size” variable.

A lower I/O buffer size allows you to monitor your input with less latency. Typically, you’d want 256 samples or lower when recording vocals or other instruments for proper monitoring.
If you have too many tracks and plugins running simultaneously, a low I/O buffer size can result in glitchy audio playback, random pops, and even the session crashing. It can be super frustrating.
On the other hand, since a higher buffer size gives your computer more time to process audio, you can hear tracks with better quality. During mixing and mastering in Logic Pro, you’d want to set the I/O buffer size as high as possible (1024 samples) to reduce strain on your computer.
If general, if you find Logic is lagging, crashing, or freezing up, you might consider taking a look at other programs you have open on you Mac. If you're producing in Logic Pro, it's ideal that there are no other apps running. For example, sometimes I might have Final Cut open in the background because I might be editing a video for my YouTube channel. However, that's not a great idea. As another option, you could try freezing some of your software instrument tracks.
4. Metronome Sound
Logic’s built-in metronome helps keep track of tempo when recording. If the volume is too low to hear it among different tracks, or you want to change the tone to hear it more clearly, you can do so:
- From the top-left corner of your screen, click “File.”
- Hover your pointer on “Project Settings” and select “Metronome…”

Sometimes when recording vocals or an instrument through a microphone, the metronome sound might bleed into the recorded track from your monitoring headphones. You can temporarily turn the metronome volume down to avoid such issues.

5. My Info
Last but not least, Logic allows you to include details, such as composer, artist, and album name for your tracks. I suggest filling up these details to keep track of your projects better.
-
From the top-left corner of your screen, click “Logic Pro.”
-
Hover your pointer on “Settings” and select “My Info…”
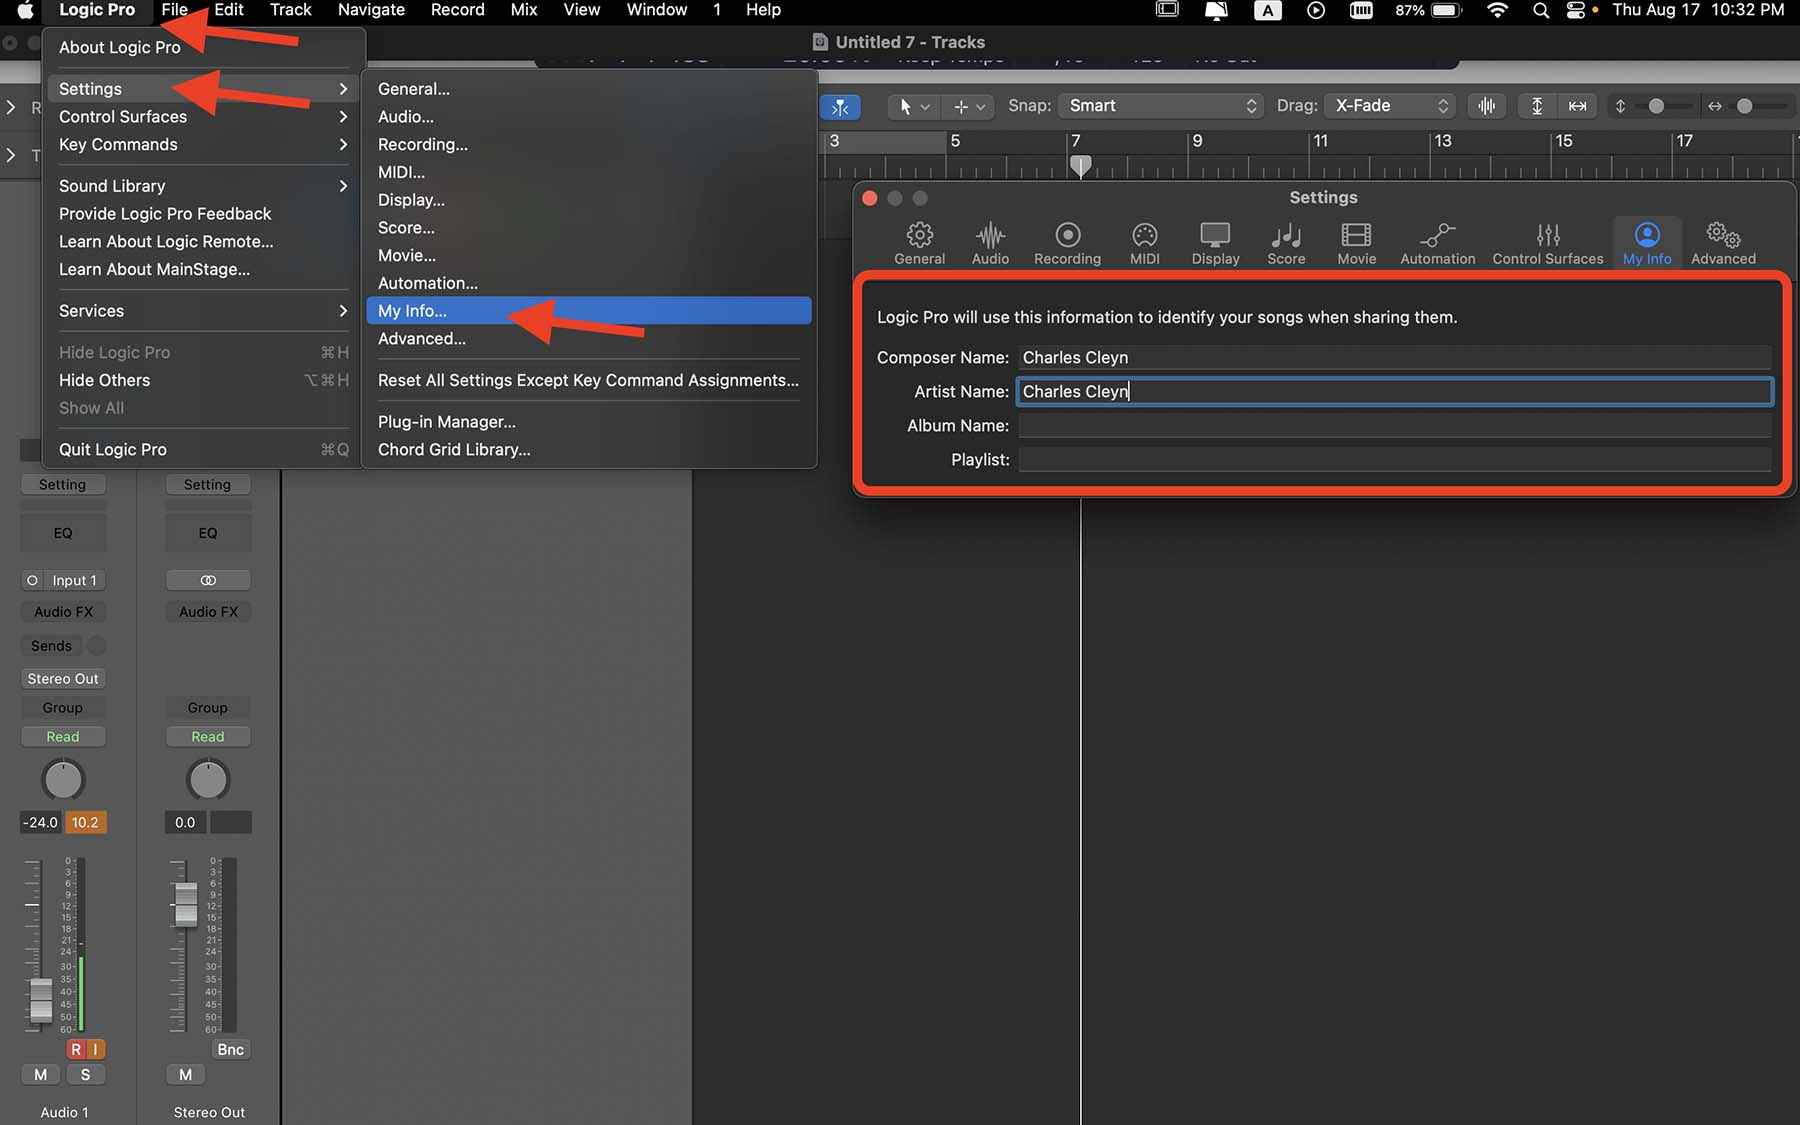
Logic will use this information to identify your tracks when sharing them.

Final Thoughts: Change Settings Based On Your Workflow
At the end of the day, you should customize Logic’s tools and settings based on what works for you. Use the methods above as cornerstones for adjusting Logic according to your preference. What works for me might not be ideal for you.
The more you familiarize yourself with Logic’s workstation and music production in general, the better you can adjust everything for maximum efficiency. So, remember to practice, and don’t be afraid of trial and error!
If you need more help regarding production, mixing, mastering, or songwriting, I recommend downloading my Free 6 Pillars To Learn Logic Pro Faster.


