How To Use Logic Pro | Ultimate Guide For Starters
Sep 13, 2023
So you’ve kickstarted your adventure into the world of music production and you’re looking for a powerful Digital Audio Workstation (DAW) to express your creativity. For years, Apple’s, Logic Pro has been one of the most favorite DAWs among producers, regardless of experience level and genre.
Logic’s powerful features and versatility, fused with its user-friendly interface, make it an amazing tool both for beginners and pros.

Other than that, learning music production with Logic gives you various advantages that other DAWs might not provide. For instance, Logic’s built-in extensive list of high-quality stock plugins and sounds makes it easier for producers to find the exact sound they’re looking for to implement in their projects.
Music production with Logic Pro, like any other skill, takes time and effort to develop.
It’s normal to feel overwhelmed when you try to use Logic for the first time. Navigating through all the sections and buttons, setting up external gear properly, and adding effects are only some of the steps to turn raw sound waves into music.
In this post, I will go through everything you need to know in order to use Logic Pro. I recommend reading through this guide thoroughly if you’re a complete beginner. If you have some experience using Logic, this post can still come to your aid to hone your foundational skills in music production with Logic Pro.
Let’s take a quick look at what we’ll go through in this guide:
-
Getting Started With Logic Pro
-
Apple Loop Library and Logic Sounds
-
Syncing Studio Gear With Logic
-
Recording Audio - Vocals and Guitars
-
Recording And Editing MIDI
-
Using Audio Effects And Plugins
-
Arranging A Song
-
Exporting Your Song As MP3
1. Getting Started with Logic Pro
First and foremost, download Logic Pro from the App Store. If you already have Logic installed on your Mac, make sure it is updated to the latest version your computer supports. Once you’ve downloaded Logic, you can locate it on your Mac’s Launchpad. Alternatively, you can find it in the Finder’s Applications folder and open it from there.
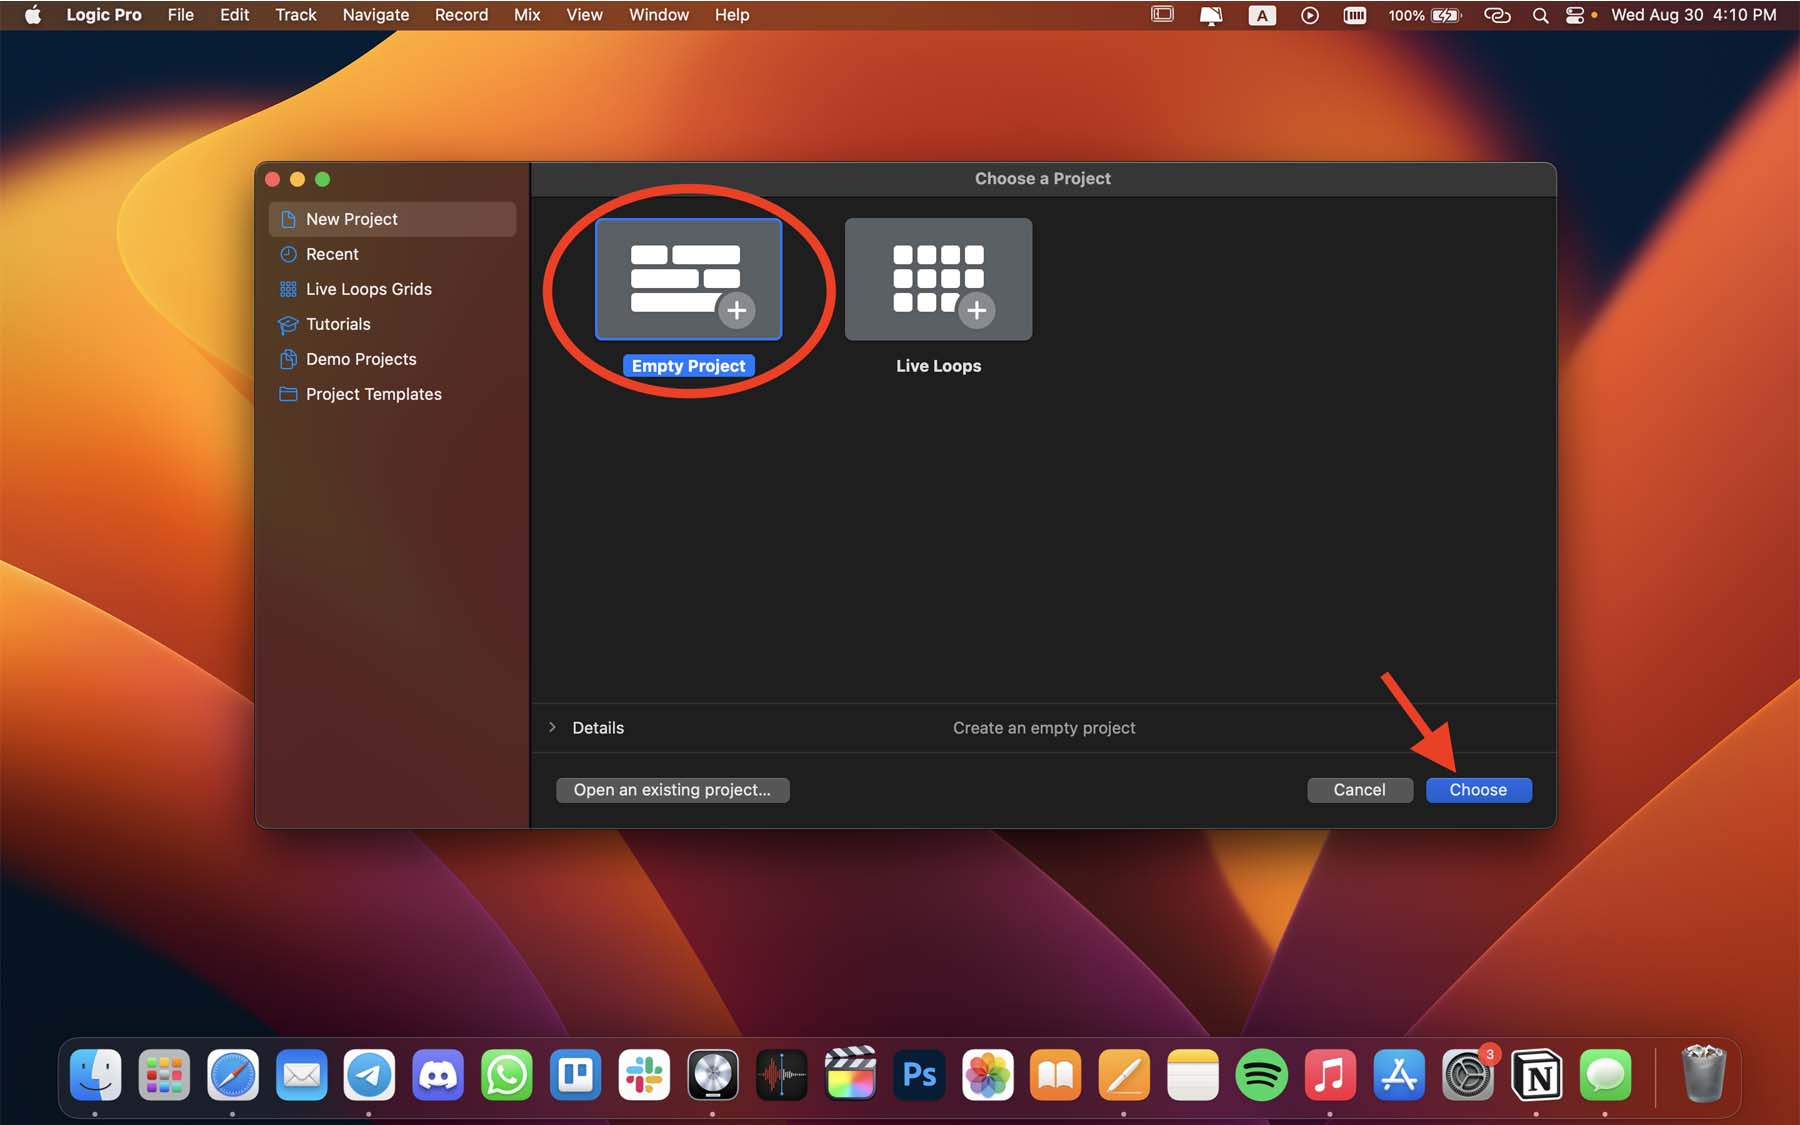
Once you launch Logic, the first thing it asks you is to choose a project. For now, choose “Empty Project.”
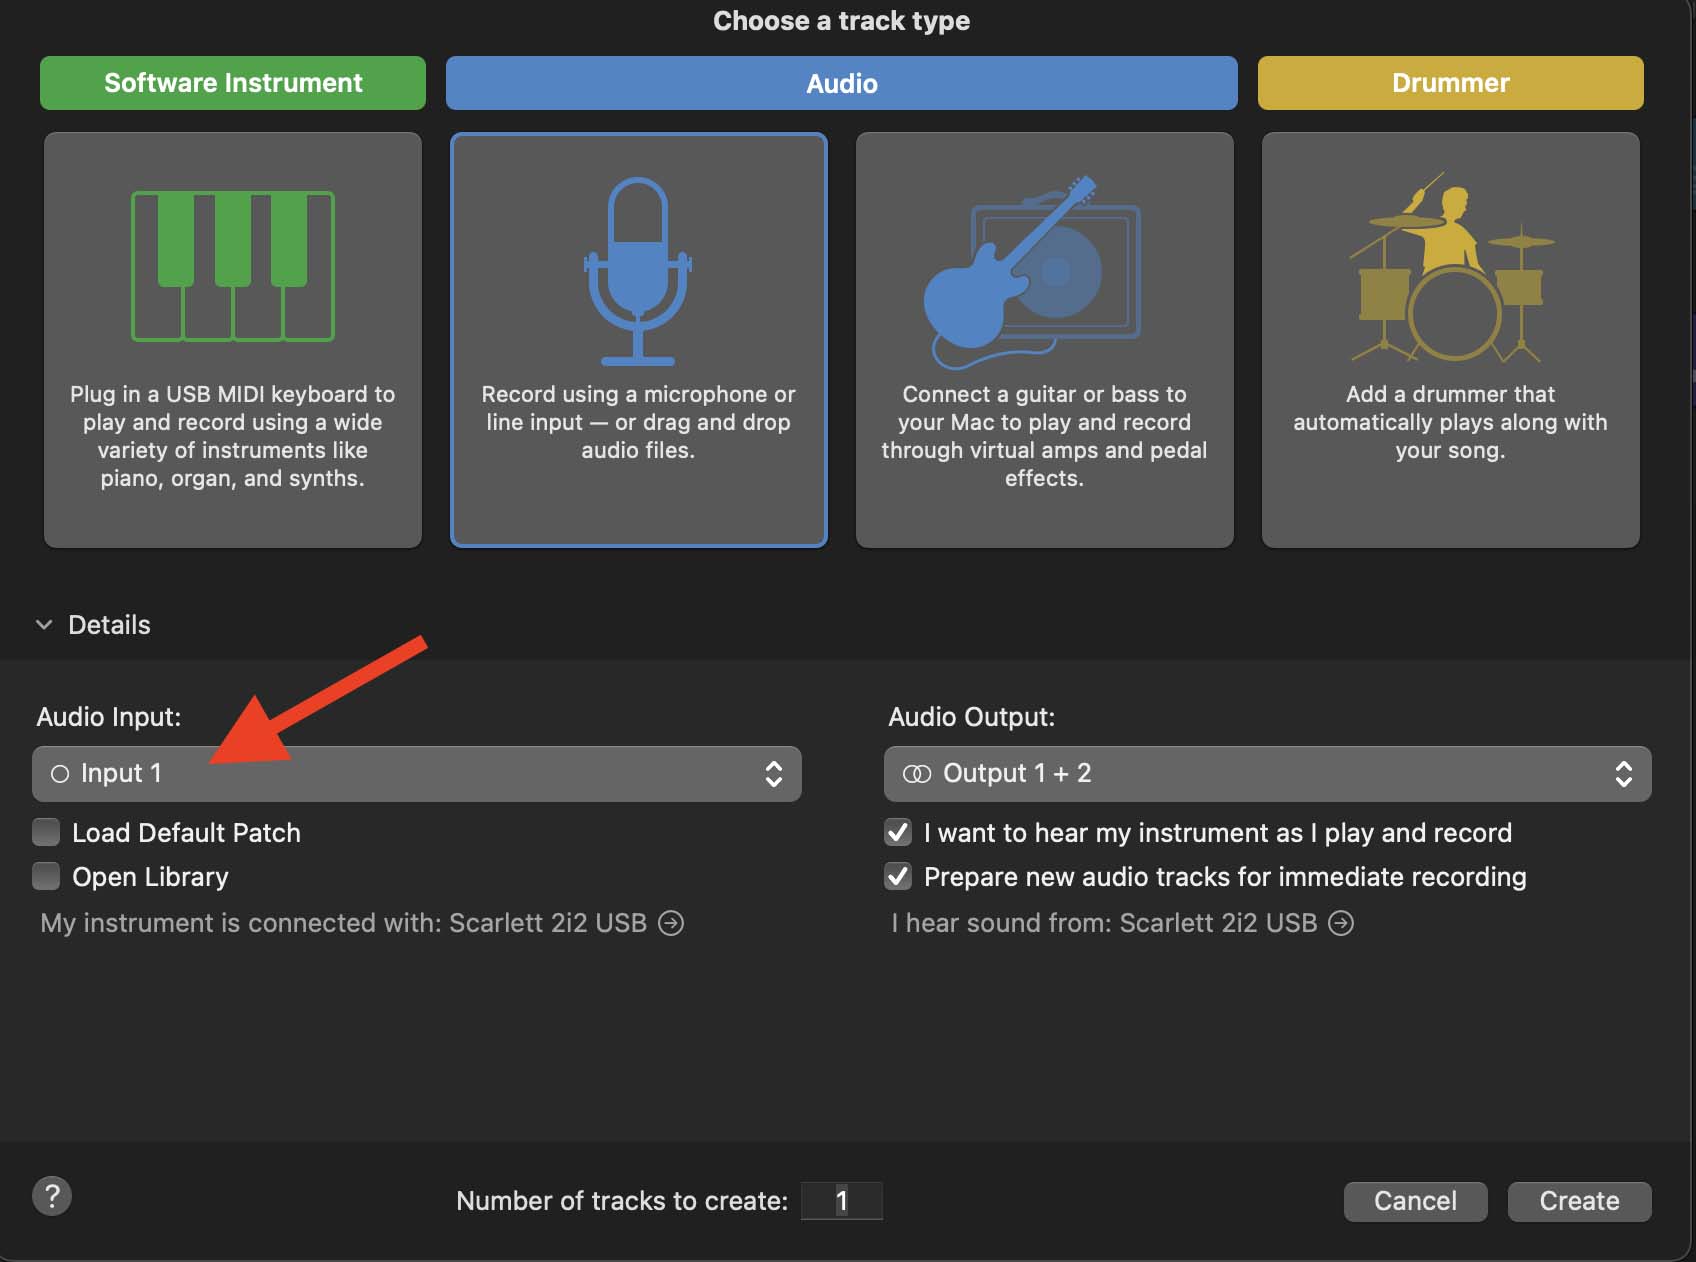
Since there’s nothing to work with an empty project, Logic will immediately ask you to select a track type to move forward. As you can see in the screenshot below, there are four tracks you can choose from; a Software Instrument, two Audio, and a Drummer track. Let’s select the software instrument as our first track and click “Create.” For now, ignore the options you see under the “Details” drop-down menu.
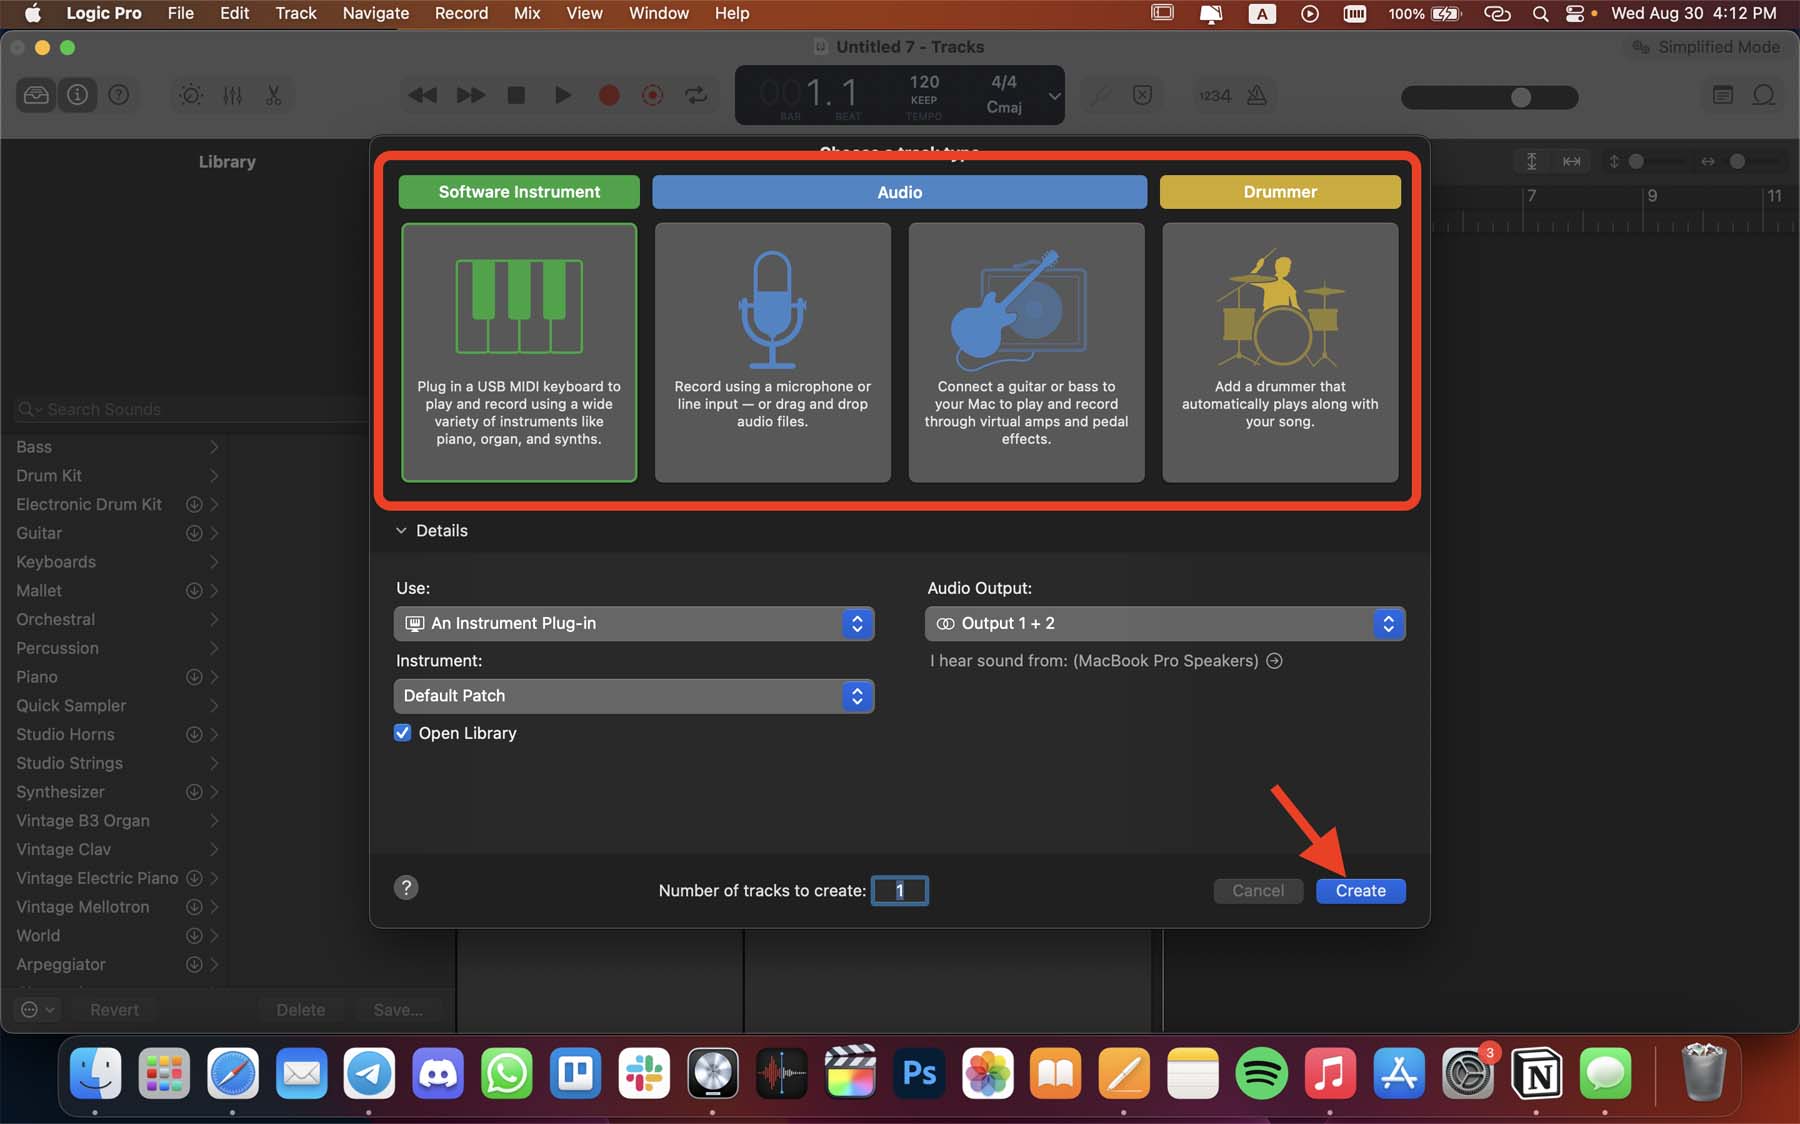
There’s a lot to unpack once you create a track and open a session in Logic. I know it might look intimidating at first, but don’t worry, I’ll go through everything step by step. fundamentally, Logic’s workspace is divided into five sections. You can expand and close different areas, which I will get into later on. But for now, let’s see what’s in front of us in a default Logic session after opening a software instrument track.
(A): At the upper section of Logic’s interface, you’ll see the control bar. Which contains displays and buttons for the main functions you need in your projects. On the far right, you have the loop library (which I’ll explain in the next part) and the notepad. Next to them is the master volume slider that sets the overall volume of your project.
Next to them, you see a little metronome icon; if turned on, Logic will play a repeating ticking sound based on your project’s tempo. It is only to give you a cue for staying on beat when recording and it won’t be present when exporting your projects. Right next to it is a button that says “1234,” which makes logic play four ticks before starting to capture when you press record.
The main display in the center of the control bar shows the beat count, project tempo (set at 120 in the photo above), and your project’s time and key signatures. You can click and drag the tempo vertically to increase or decrease the general speed of your song.
Moving further to the left, you have the main playback and record buttons. You can play, stop, rewind, and start recording audio and instruments from here.
Next, there’s the editor, mixer, and smart controls which we’ll have a better look at further in this guide.
Finally, the question mark in a circle shows short introductions for anything you hover your pointer on. The inspector menu (little “I” in a circle) opens and closes the (D) section, and the library button (furthest to the left) opens/closes (E).

(B): This is your main workspace. This is the primary area that shows everything you’ve recorded on the grid. You can record, edit, and arrange software instrument, audio, and drummer tracks here.
(C): The track header area shows what type of tracks you have here. So far, we’ve added one software instrument, Classic Electric Piano. You can change the track name by double-clicking on it, and change the track icon by control-clicking. Adjusting the name and icon for each track is an essential practice for keeping your Logic projects arranged and organized.
Under the name of each track, there are three buttons, one slide, and a circular knob. The buttons are for muting, soloing, and enabling record for a track. Muting a track disables it during playback, and the solo button isolates a track’s signal so that you can hear it without other tracks. Pressing the little red circle arms the track for recording. The button changes to indicate if a track is inactive, record-enabled, or currently recording when you press play.
The slider next to them controls the track’s volume (not the gain), and the knob next to that is for panning the track signal to the left or right.
You can add more tracks by pressing the little + button on the top-left corner of the track header area.
(D): This is the inspector channel strip where you see the audio effects and plugins on your tracks. You can open/close this menu by clicking the little “i” in the circle at the top-left. Any track you select from the track header area (C) will be expanded here to see the chain of effects. Logic offers myriad high-quality plugins. You can add them to your tracks by clicking “Audio FX.”
If you have a software instrument track, you’ll see a slot for your virtual instrument as well. As shown in the screenshot above, I have “E-Piano” as my software instrument here. Hovering your pointer on the virtual instrument slot will turn it into three buttons. Clicking the middle of the slot will allow you to adjust the instrument’s parameters. You can click on the right side of the slot to change the instrument entirely.
(E): Finally, the Library, which also can be toggled from a dedicated button from the top-left, shows instrument patches and presets that you can choose for your track. If you have an audio track open, instead of software instruments, you’ll see presets for different recording purposes (vocals, acoustic guitars, studio instruments, etc.).
These are the main areas that you should get familiarized with before moving forward to more advanced tools and details in Logic. Through the rest of this guide, I will go back to these areas a lot. So, it’s critical to have a general understanding of these areas to make progress in learning how to use Logic Pro.
2. Apple Loop Library and Logic Sounds
Using Apple Loops, you can add a variety of pre-recorded sounds—anything from drums and other percussive instruments to guitars and keyboards—to your project.
You can open the loop browser by clicking the button at the top-right of Logic’s interface. Alternatively, you can press “O” on your keyboard to open the loop browser.

You’ll see a long list of different sounds pop up on the right side of your screen. The highlighted ones are available on your computer. You can click on the little arrow pointing downwards next to the loops that are not available to download them.
On the top of the list, you can choose the instrument, genre, and descriptors to narrow down the list and find what you’re looking for. Moreover, you can select the scale to find recordings that match the tone of the song you’re working on. The Major scale is often bright and happy, whereas the minor scale usually sounds darker.
As shown on the right side of the list, some of these sounds are recorded in certain keys. However, Logic will automatically change the pitch according to your project’s key signature. You can change your project’s key signature from the main display.

Click on them to quickly play them and hear what they sound like. Then, click and drag the ones you like to the grid (main workspace).
Each of these loops will appear as regions on tracks. You can click and drag each of these regions to arrange them according to your preference. If you click and drag the top-right corner of a region, you can repeat it across the grid.
There is a lot you can do with audio loops. For more tips on how to integrate them into your songs, check out my YouTube tutorial on how to use Apple Loops in Logic Pro.
3. Syncing Studio Gear With Logic
Although it’s possible to make music only using your computer, having proper studio equipment can take your music production to the next level. Typically, you’d want a studio microphone, an audio interface, and a MIDI keyboard controller.
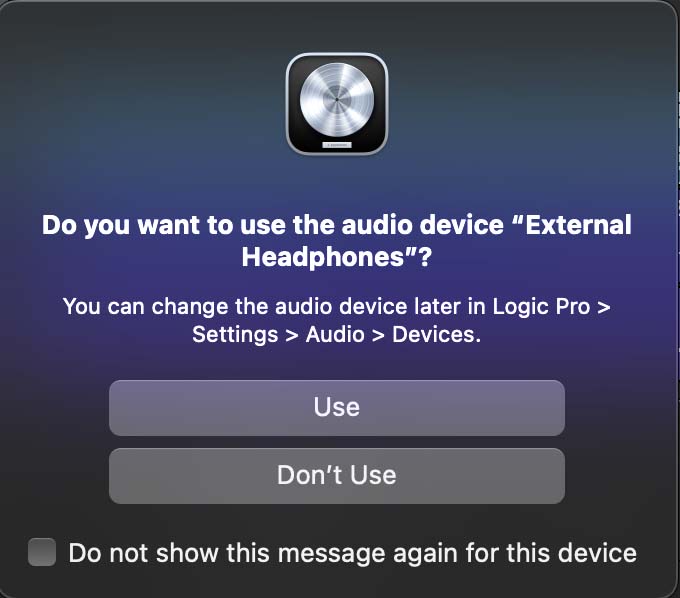
Whenever you connect a new audio device to your Mac, Logic automatically detects it and asks you if you want to use it.
Connecting Microphone To Logic: Typically there are two types of microphones you can use to capture audio; USB microphones and XLR microphones. A USB microphone connects to your computer directly via a USB cable, whereas XLR microphones require an audio interface to amplify and process the audio first and then send it to your computer.
Either way, once you’ve plugged everything into your computer:
-
From the top-left corner of your screen, click “Logic Pro.”
-
Hover your pointer on “Settings” and select “Audio…”
-
Find your mic/audio interface from the “Input Device” drop-down menu.
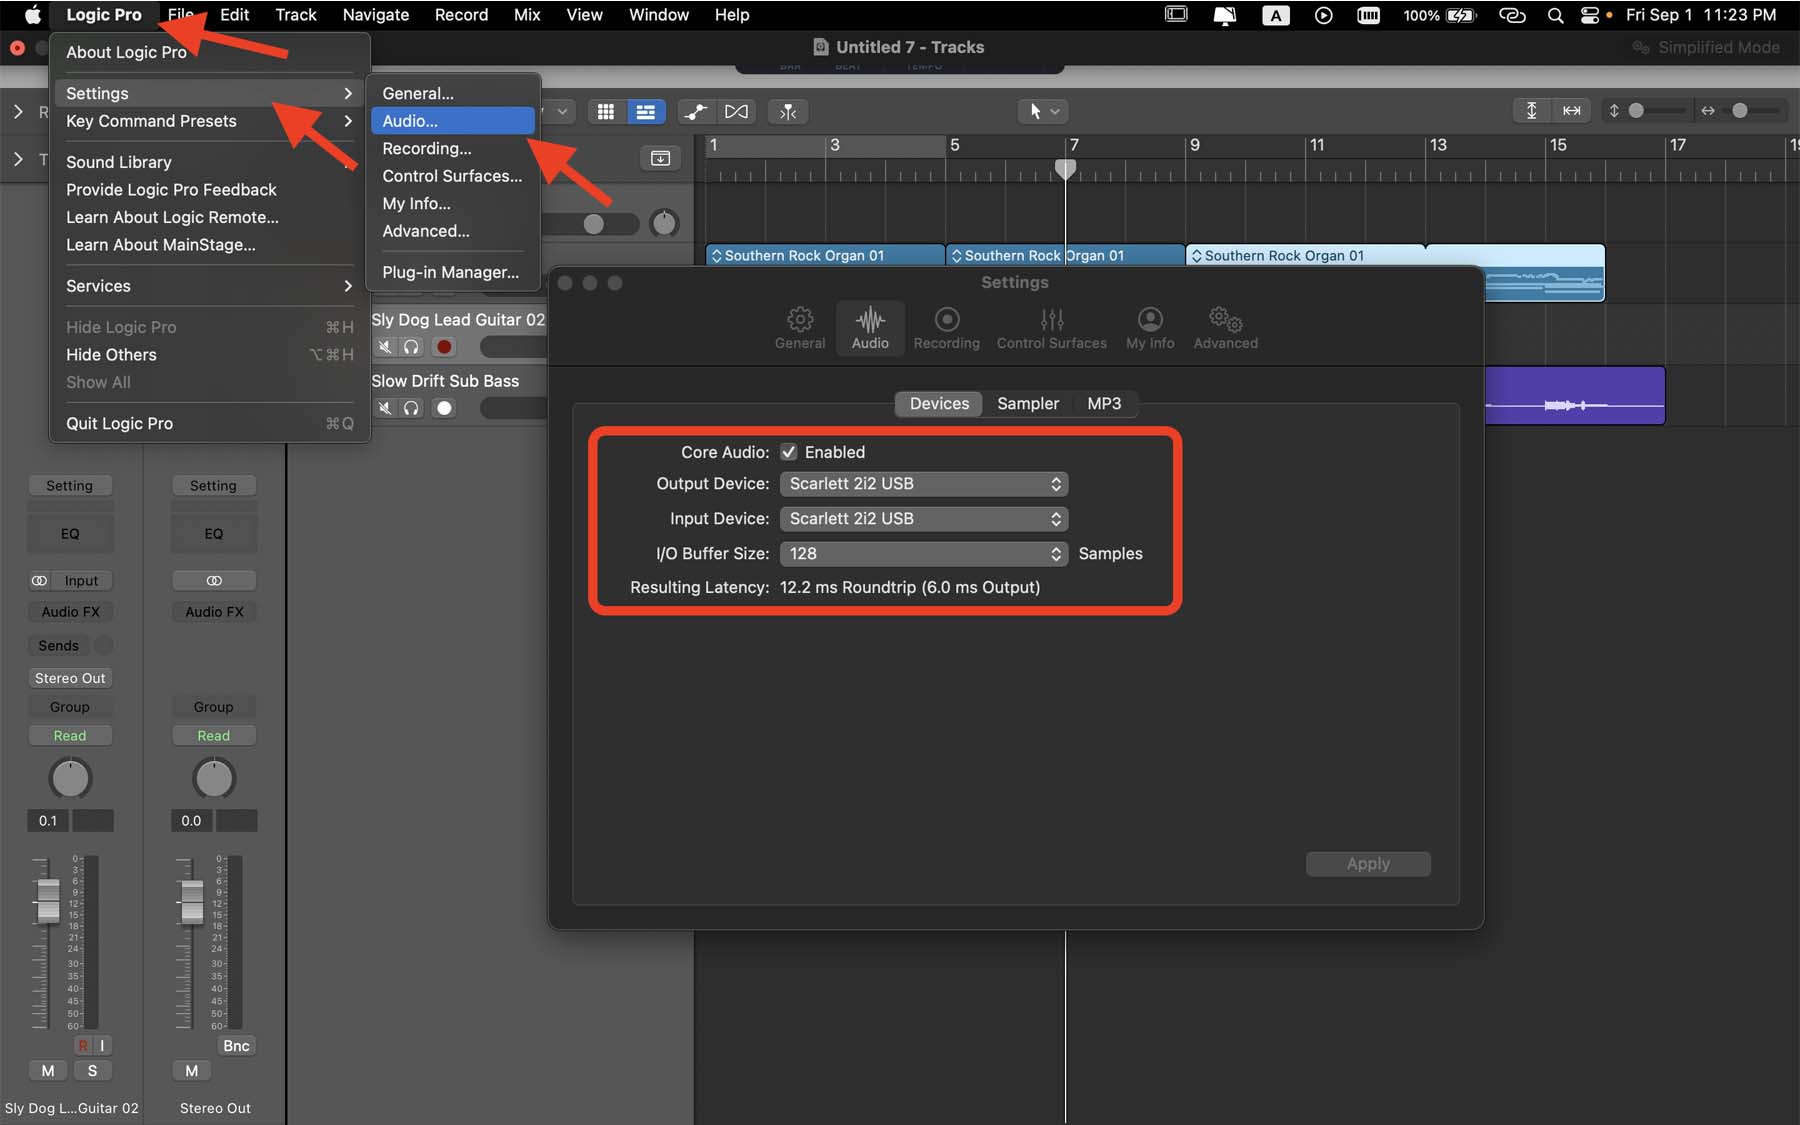
If you have monitoring headphones or speakers connected to your audio interface, select your audio interface as the output device. If you’ve connected a pair of headphones to your Mac directly via the headphone jack, select “External Headphones” as Logic’s output device.

For connecting MIDI controllers and keyboards, Logic will automatically detect them. So, in almost all cases, you can plug your MIDI in and play software instruments in Logic right away.
In another post, I explain everything you need to know about connecting and using MIDI in Logic Pro and how to troubleshoot it if Logic doesn’t recognize your device automatically.
4. Recording Audio - Vocal and Guitar
Now that all your studio gear is connected and in sync with Logic, go ahead and add a new audio track by clicking on the “+” button from the top-left corner of the track header area.
Recording vocals: If you’re using an audio interface with more than one input, make sure to select the correct one before proceeding to create your new track.
There are several measures you should take to make your vocals sound professional, one of the first steps is to ensure you’re positioning your microphone correctly. Typically, you’d want to be about 6 to 12 inches away from the microphone to avoid too much proximity effect in the low ends of your vocals. However, this depends on how soft or loud your vocal is and on the dynamics of the song you're singing.
If you want to hear your input in real time, you can turn the monitoring button on. There are two ways to do this: from the track header area and from the inspector channel strip.

Another critical step before starting to record is to set the gain on your microphone. Too much gain can cause clipping and a reduction in the quality of what you’re recording. If the gain is too low, you can always use production tricks to increase it digitally, but there’s nothing you can do to fix clipping noises from too much gain.
Test your gain level by singing to your microphone. As a rule of thumb, you’d want your peak signal to be around -10.0 dBs. The number on the top-right corner of the volume fader in the inspector channel strip shows your peak signal. Click to reset it and start adjusting your gain level until it’s optimal.

You’ll notice that your vocal track still sounds unprocessed; that’s because you still haven’t added any audio effects. Thankfully, Logic offers many excellent stock plugins, such as the Channel EQ, Compressor, and Space Designer Reverb to make your tracks sound livelier.
If you’re not familiar with these plugins, you can use Logic’s ready-to-use presets. Click on the library button from the top-left corner of your screen to open audio patch categories and select Voice. You can check out my post about the best presets to use in Logic Pro.

As you see in the screenshot above, each of these presets adds a list of effects and plugins to your track.
I encourage you to take a look at the plugins in the Audio FX slot and try to get a general understanding of what goes on in each preset. This can help you build a foundation of what audio processing plugins do.
Finally, enable the record button on your track and press record from the control bar to start recording vocals. If you need more help regarding tools, gears, and methods for recording vocals, take a look at my post about recording vocals in Logic Pro.

Recording the guitar: Generally, there are two ways to record your electric guitar or bass. You can either connect your guitar to an amplifier and put a microphone next to your amp cabinet or connect your instrument directly to your audio interface.
For the acoustic guitar, you can set your microphone up in front of the 12th fret, about 10 to 20 inches away from the instrument. Some acoustic guitars have a built-in pickup that captures audio. In that case, you can use an instrument cable to connect it directly to your audio interface.

Once you’ve connected everything, add a new audio track. If you select the guitar audio track, Logic will automatically open its patch library for the electric guitar, On the other hand, choosing a regular audio track allows you to listen to your raw instrument signal without audio processing.
Nonetheless, you can still access guitar and bass presets from Logic’s library.

The rest of the steps are pretty similar to recording vocals: turn on monitoring to hear what you’re playing, adjust the gain to have it peak around -10.0 dBs, and enable the record button to start recording your guitar track.
I have another post where I explain everything about recording the guitar in Logic Pro. Check that out if you have more questions or want more pro tips for capturing a professional take.
5. Recording And Editing MIDI
Short for Musical Instrument Digital Interface, a MIDI keyboard allows you to use Logic’s virtual instruments. Typically, MIDI controllers look like a piano keyboard. Some of them even come with weighted keys to emulate the feeling you get from playing a real piano. However, launch pads and control surfaces are also considered MIDI controllers.
Fundamentally, they all work the same; they give you pads, keys, knobs, and faders that you can use to send MIDI signals to Logic Pro. These signals often carry note length, velocity, and other parameters.
To add MIDI sections to your songs:
-
Connect your MIDI controller to your computer.
-
Create a new software instrument track in your Logic session.
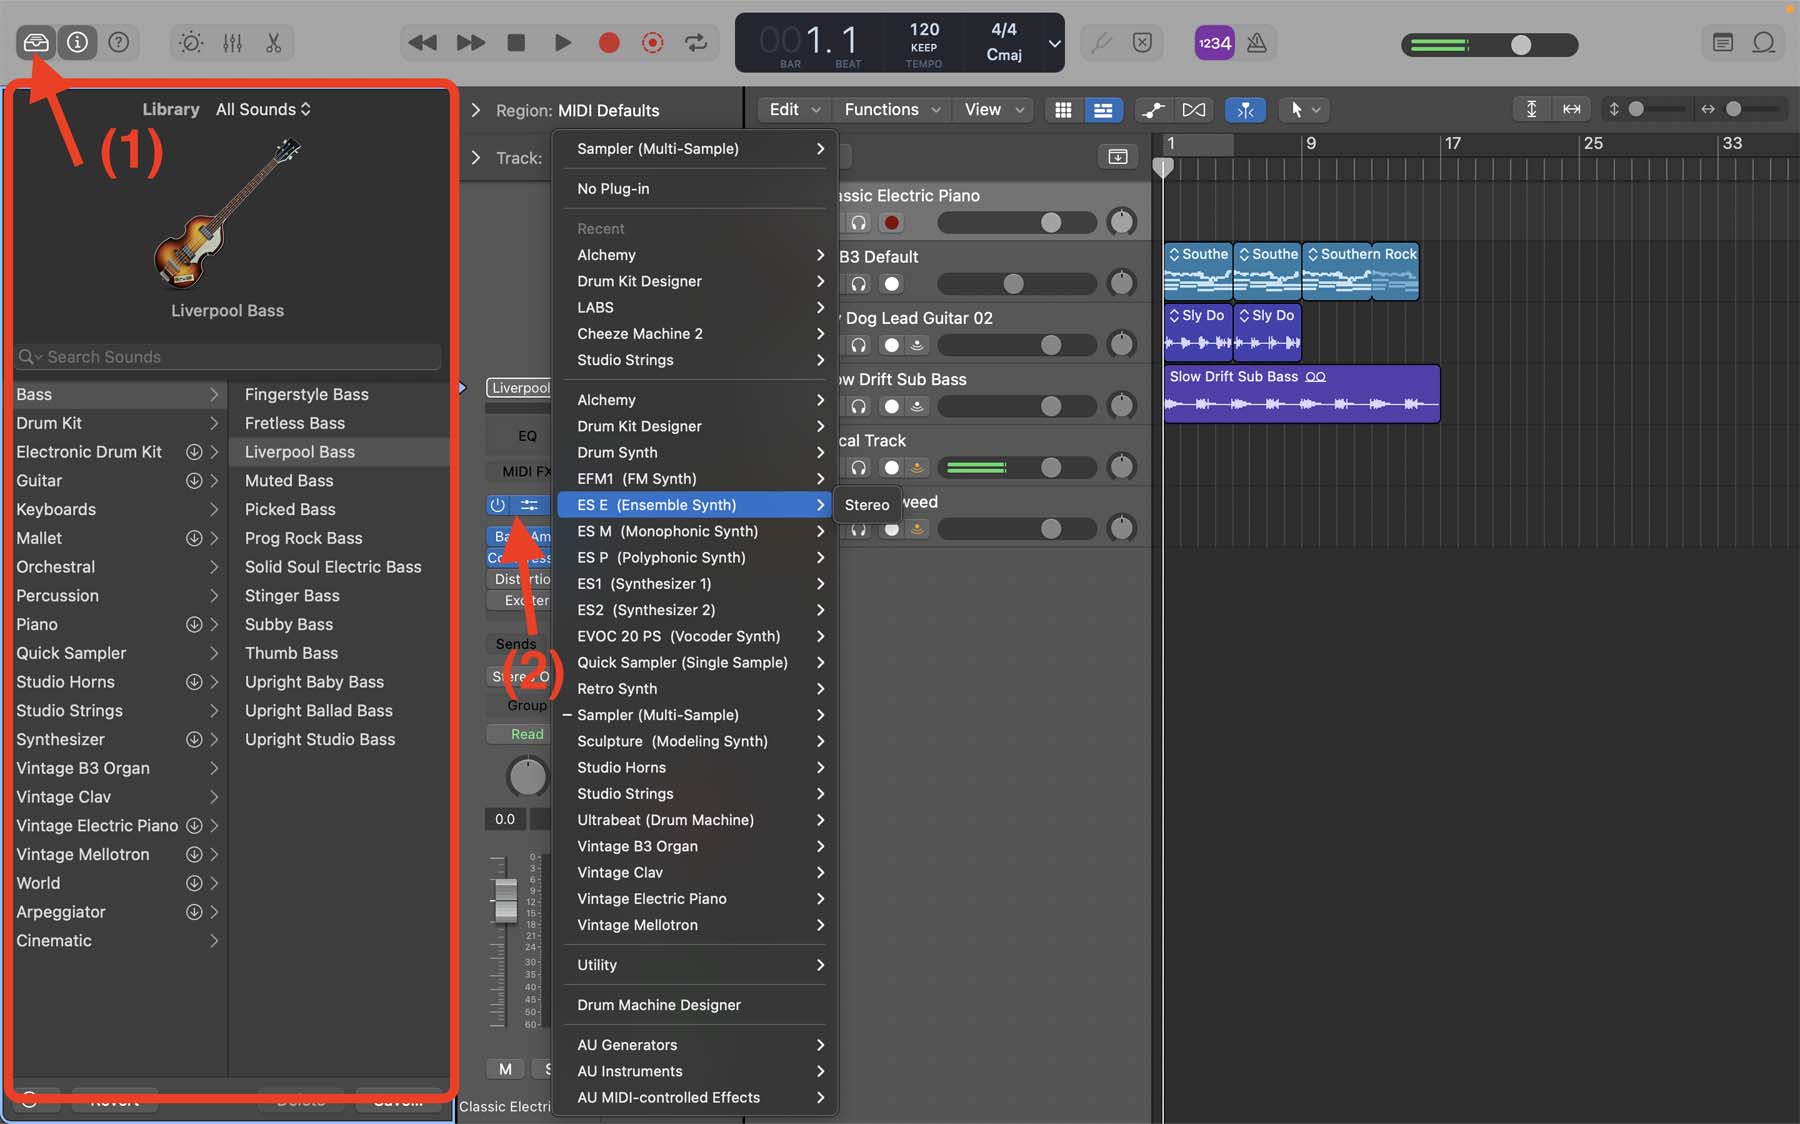
As mentioned in the first section of this post, Logic will load “E-Piano” by default. However, you can change it to any other instrument you want. You can either choose from Logic’s Library (1) or change the virtual instrument from the inspector channel strip (2) to start creating your own sounds. For instance, Logic’s Alchemy is a powerful virtual synthesizer with a virtually endless library of sounds that you can use in your projects.
If you don’t have a MIDI keyboard, you can use other methods to trigger notes for virtual instruments in Logic. The easy way is to use Logic’s Musical Typing feature:
-
Click “Window” from the top of your screen.
-
Select “Show Musical Typing.”
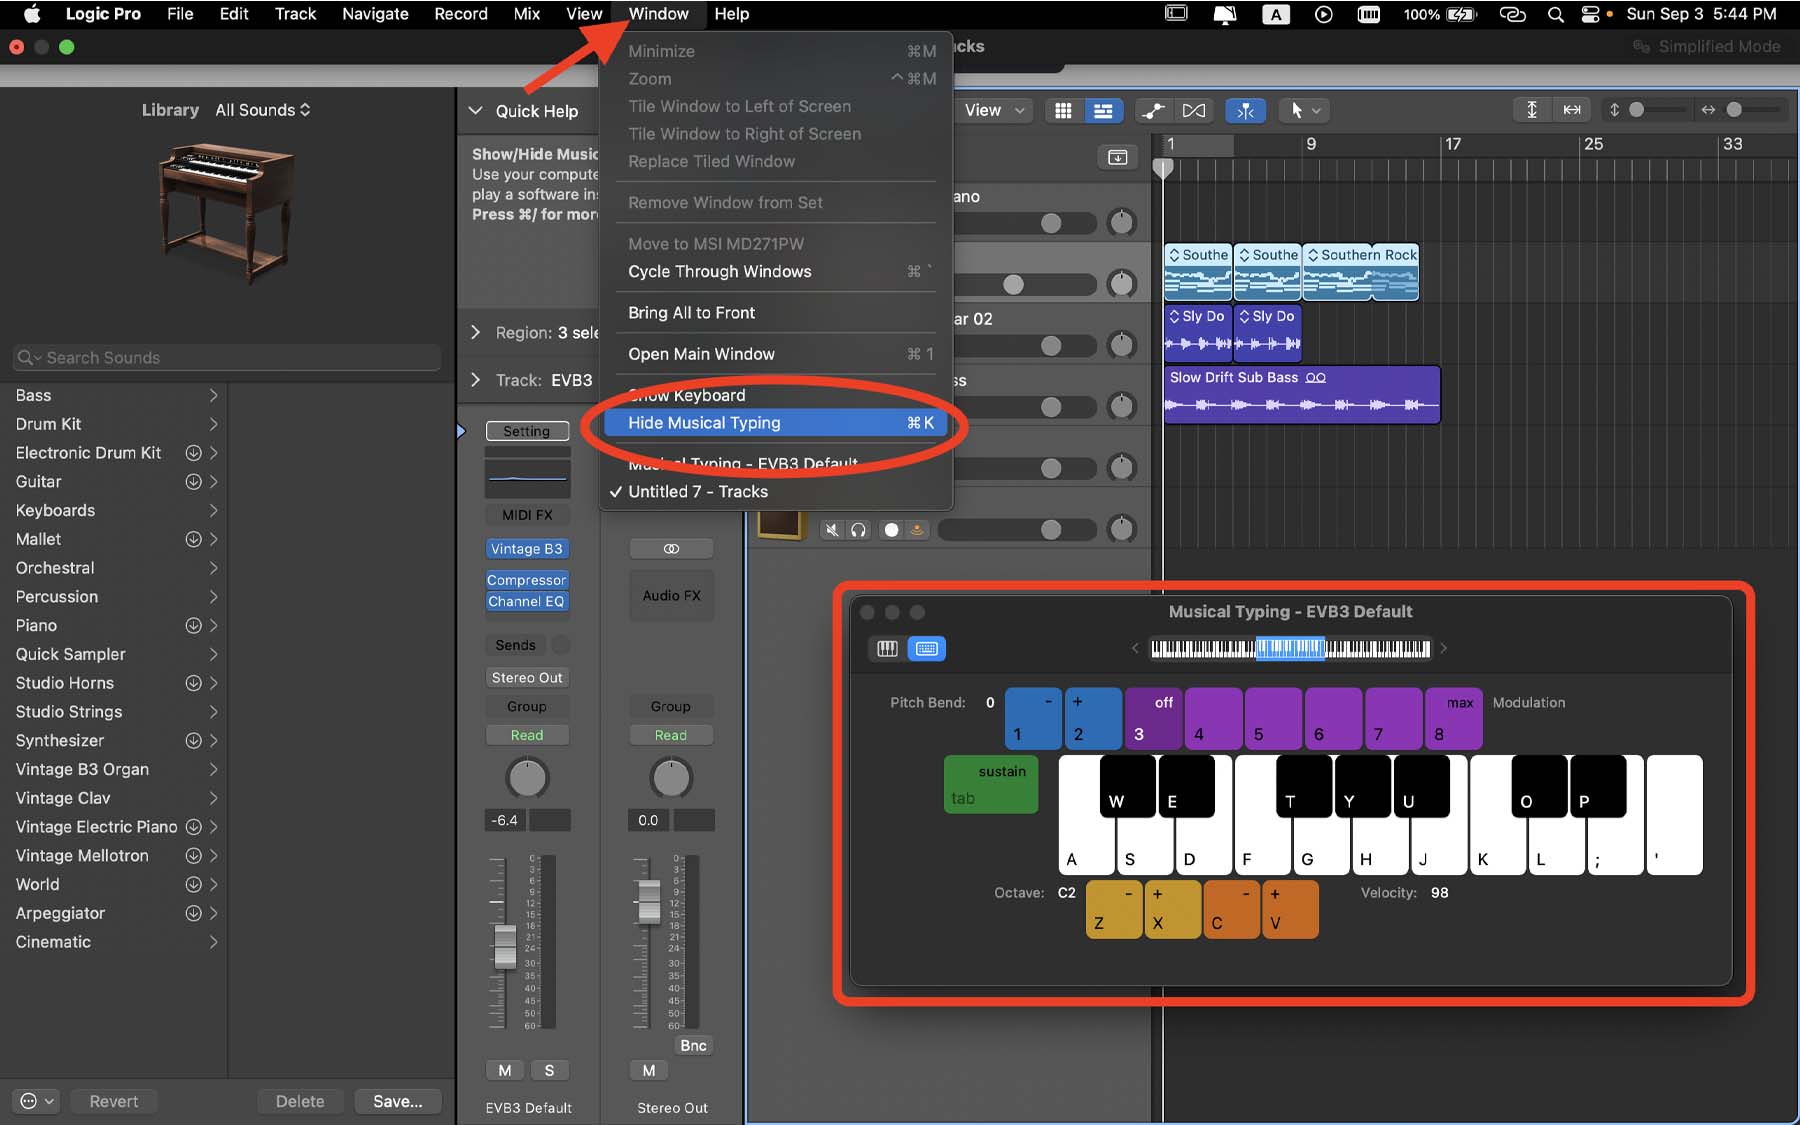
Now, Logic allows you to use your Mac’s keyboard to trigger MIDI notes.
Another, more professional way to add MIDI notes in Logic is to use the Editor menu. Click the scissors button from the right side of the control bar to open the editor menu. Alternatively, you can press “E” on your keyboard.
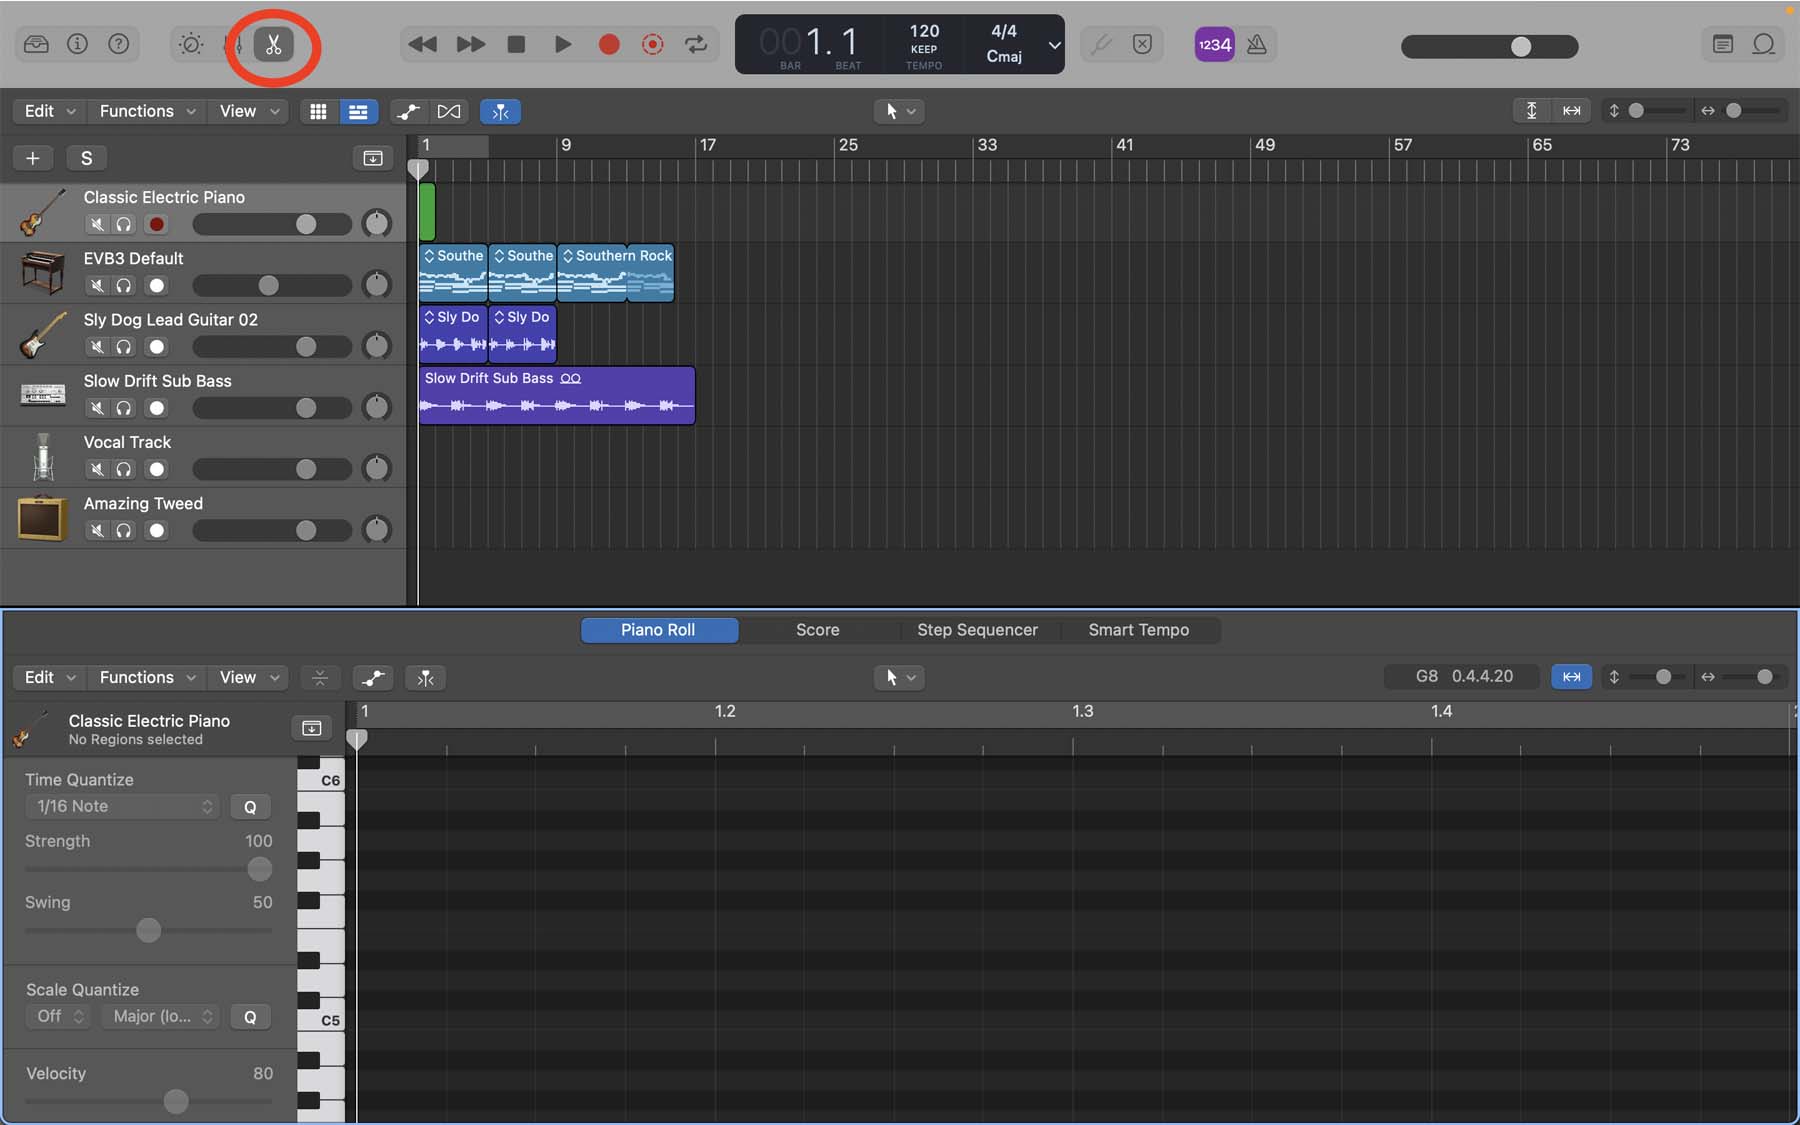
The editor menu gives access to several powerful tools to use both for audio and MIDI. Once you open it on a software instrument track, you’ll see a mini piano roll grid that showcases your notes. You add, remove, and adjust the parameters of your MIDI notes here.
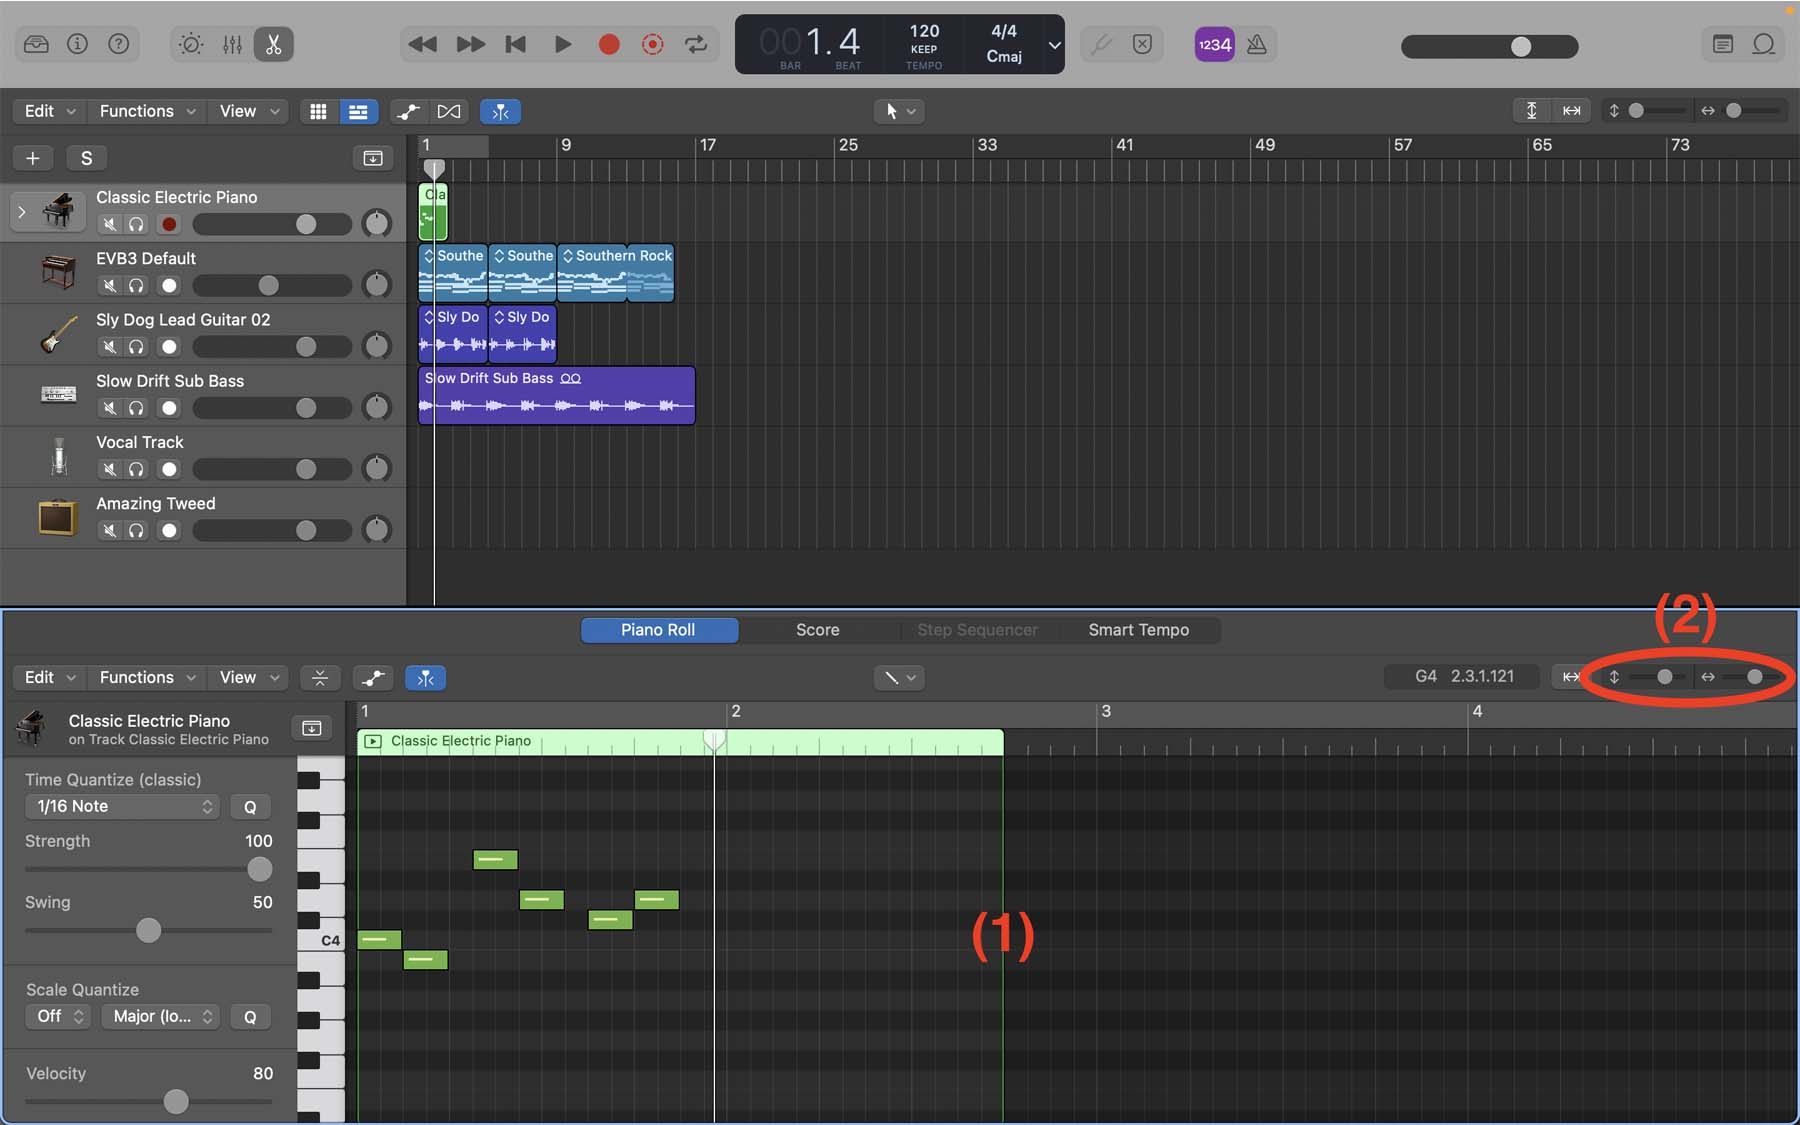
Let’s start by adding MIDI notes. From the top-center of the editor menu, click the pointer tool menu and change to “Pencil Tool.”

This allows you to create MIDI notes on the grid. You can also click and drag existing notes to move them around the grid horizontally to change their time. Moving them vertically would change the pitch.
Moreover, you can extend your MIDI region by clicking and dragging the right side of your region block across the grid (1). Use the two faders at the top-right corner of the editor menu to adjust your view of the workspace (2).
Let's dive into editing midi.
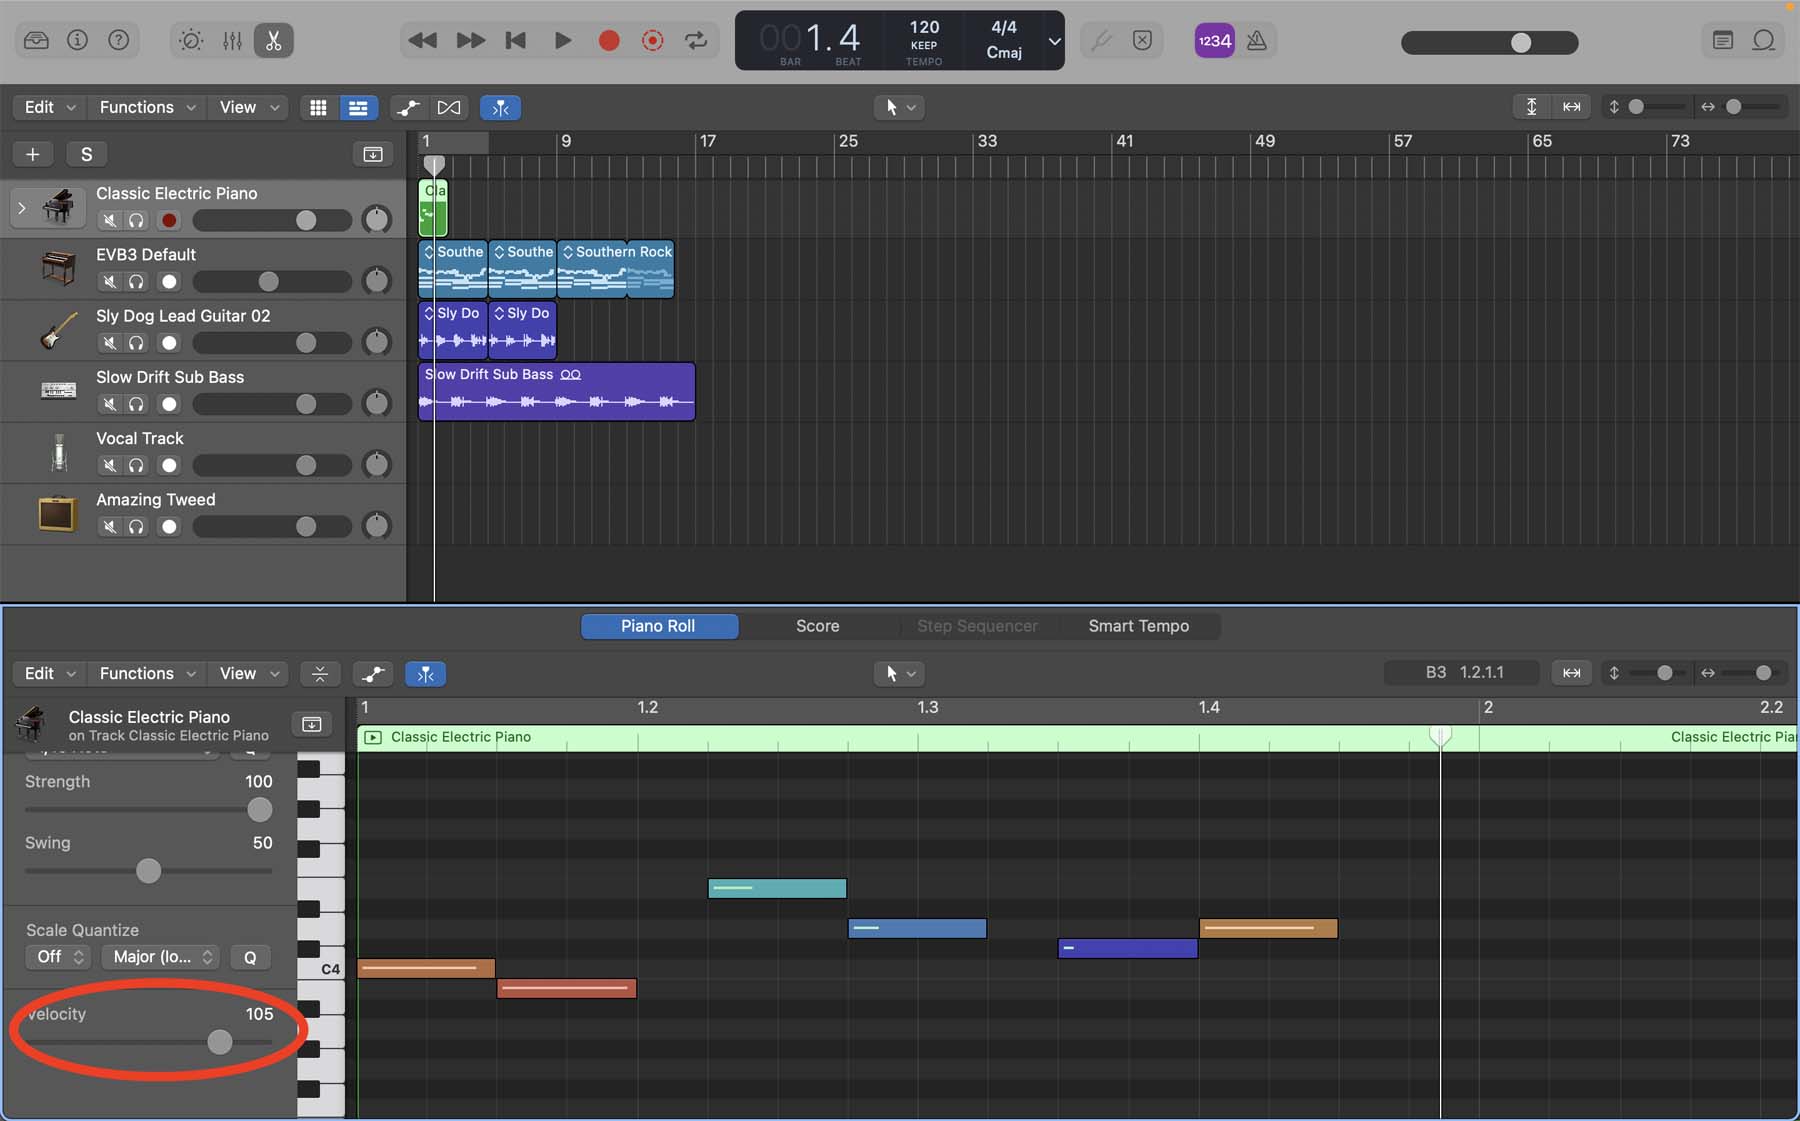
If you align all your notes to the grid perfectly and have the same level of velocity across the region, your track starts to sound computerized and boring. It is those slight imperfections and dynamics that create the ‘feel’ when someone plays a real instrument.
On the bottom-left side of the inspector menu, you’ll find a velocity slider. The velocity value of a note shows how hard the note was played. While notes with lower velocity values are often quieter, velocity is more than just volume control.
Select your MIDI notes and adjust their velocity. You’ll notice that their colors start to change. Higher velocity levels are indicated by orange and red colors, whereas MIDI notes with lower velocities are colored blue and purple.
When it comes to MIDI sections, velocity is only one of the parameters to edit. In another post, I explain everything you need to know about making MIDI sound more human in Logic Pro.
6. Using Audio Effects And Plugins In Logic
Audio effects are an inseparable part of music production. As you make progress in learning Logic Pro, you’ll find yourself spending more and more time using different effect plugins and fine-tuning different parameters during production, mixing, and mastering sessions.
The world of audio effects and plugins is truly limitless. Logic’s stock library of plugins offers an abundance of industry-standard effects. Learning to use all of these effects to their fullest potential is no easy task, and that’s only the beginning! Once you hone your skills in using stock plugins, you can turn everything up a notch by installing third-party plugins.
It’s impossible to explain everything about audio effects in one section. I’m merely going to brush up on some of the most critical plugins that are used frequently in music production. I have linked each of these sections to their dedicated posts in my blog. You can click on them to learn more about using them in your Logic Pro projects.
Equalizer (EQ): The equalizer is used on almost all types of tracks in music production projects. The equalizer allows us to raise desirable frequencies and attenuate unwanted ones. This is particularly important to make all the tracks sound crisp and clear and glue everything together.
Logic’s built-in “Channel EQ” is a powerful parametric equalizer that allows you to target different frequency bands with surgical precision. To add it to your track:
-
From the inspector channel strip, click “Audio FX.”
-
Hover your pointer on “EQ” and select “Channel EQ.”
-
Alternatively, you can click on the little rectangle above the input slot in the middle of the inspector menu.

The equalizer gives you different filters to target different frequencies. For instance, you’d typically want to roll off all frequencies below 80 Hz on your vocal tracks to omit unwanted room sounds. To do that, you can add a high-pass filter and position it around 80 on the frequency axis.
Additionally, you can use other filters to reduce the muddiness or make your vocals sound more airy.
Compressor: A compressor plugin allows you to level out the volume of your track to make it sound fuller. Sometimes the louder parts of our tracks are ideal while the quieter parts are barely audible, or sometimes the sound of a drum kick is not punchy enough. In those instances, a compressor can come in very handy. Here’s how you add a compressor to your track in Logic Pro:
-
Click “Audio FX” from the inspector menu.
-
Hover your pointer on “Dynamics” and select “Compressor.”
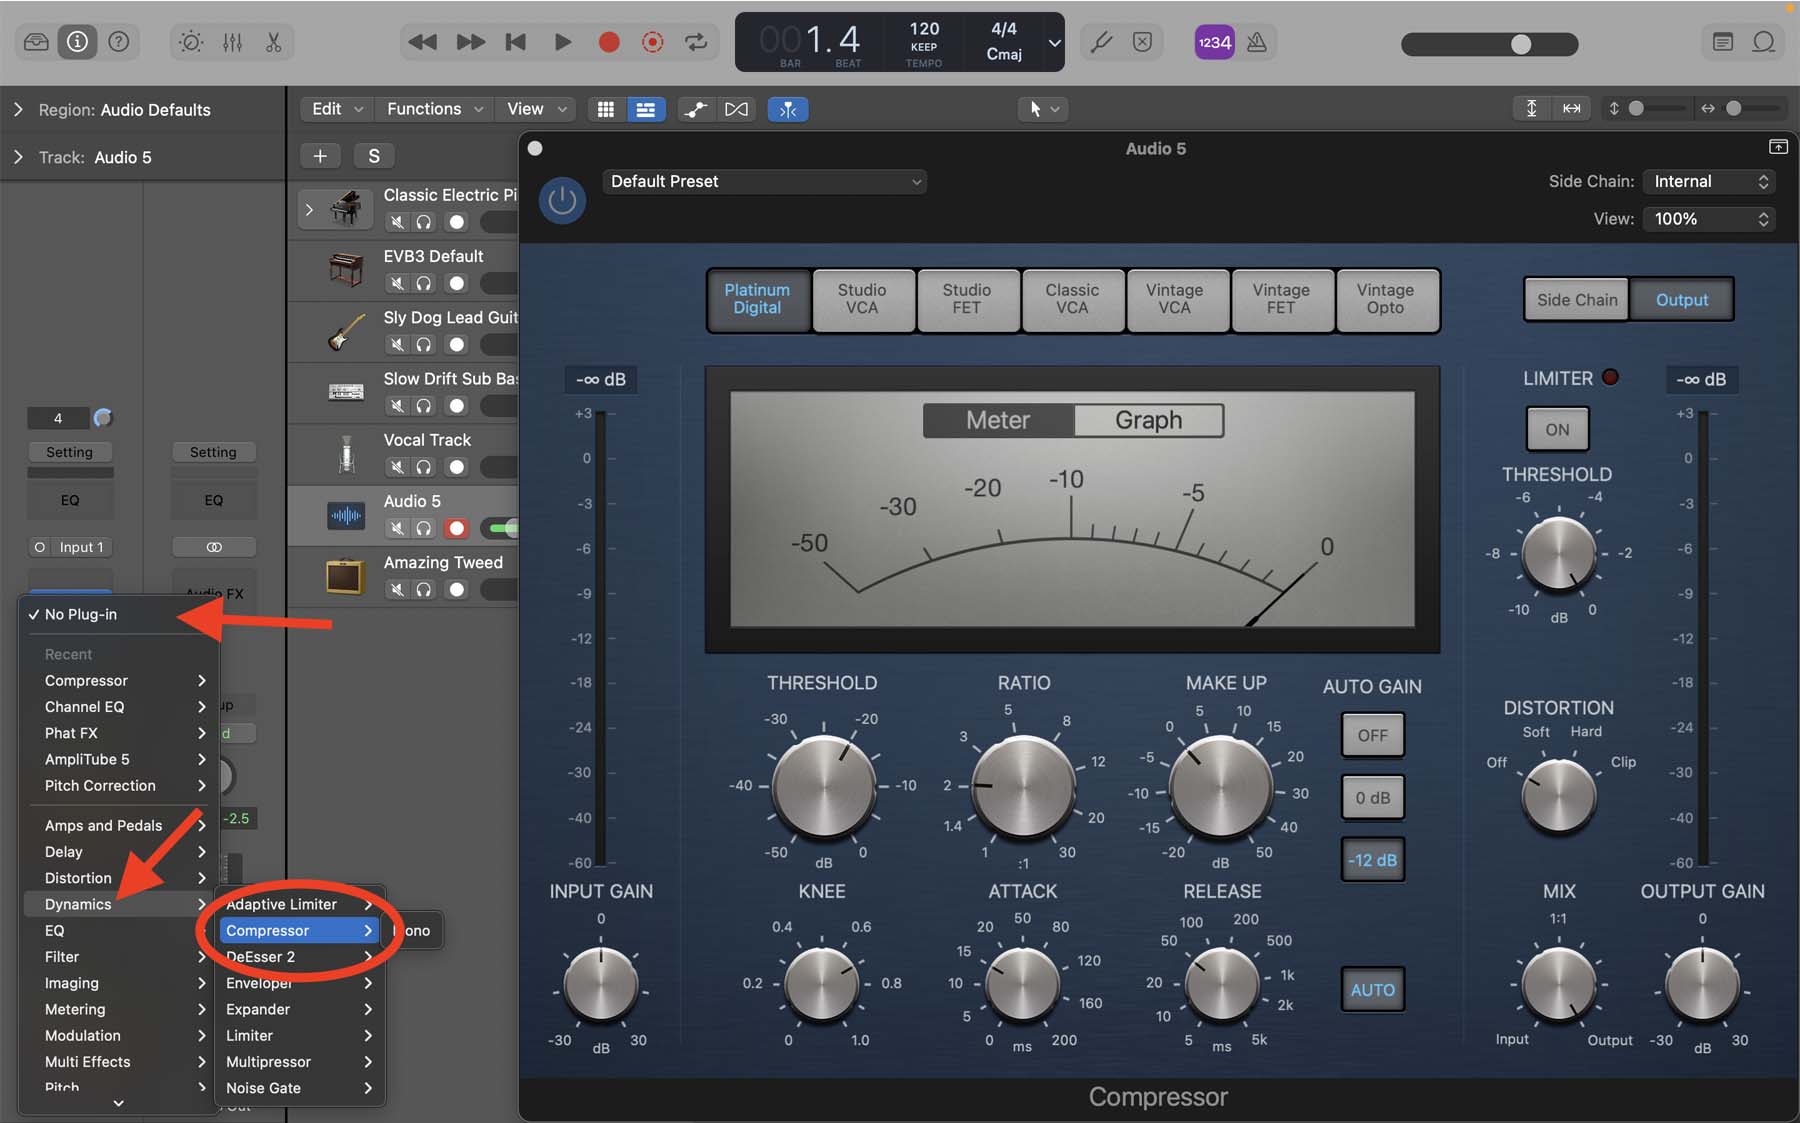
You can adjust the THRESHOLD knob to select signals that you want to compress. Any signal louder than the threshold will be reduced in gain. Then, you’d want to use the RATIO knob to adjust how much reduction takes place. Now that the louder parts are reduced, we can increase the gain on the entire track by adjusting the MAKE UP knob.
Reverb: A reverb plugin helps emulate an atmosphere or space for your track to be played in. Typically, if you record audio in an acoustically-treated room, you’ll get a dry recording. By adding reverb, you can make it sound more spacious and atmospheric; as if it’s coming from a concert hall.
Logic’s “Space Designer” is a killer plugin that lets you add reverb to your tracks. With so many variables within this plugin, you can create anything from a nice and intimate reverb sound to something epic that resembles a large cathedral.
-
Open the “Audio FX” slot from the inspector channel strip.
-
Hover your pointer on “Reverb” and select “Space Designer.”

The three plugins mentioned above are only a small portion of what Logic Pro offers. Make sure to explore more before jumping into installing third-party plugins. There are so many underrated stock plugins in Logic that can uplift your songs.
7. Arranging A Song In Logic Pro
Now that we have a basic understanding of Logic Pro’s workspace and tools, let’s put that all into practice by arranging a song.
Of course, it is up to you what instruments and sections you want to use in your track. Countless world-famous songs feature only a piano and a singular vocal track. However, there are certain trends that most popular songs follow that you can integrate into your projects to make them sound more professional.
Typically, songs consist of percussive instruments for rhythm and other instruments for melodic purposes. You can use Logic’s Drum machine designer or virtual drum sets to give your track a groove. Moreover, you can take advantage of Logic’s smart drummer by adding a “Drummer” track.

For lower frequencies, you can add a synth bass (MIDI track) or record a bass guitar (audio track). The mid and high frequencies can be filled up with keys, guitars, strings, and brass instruments.
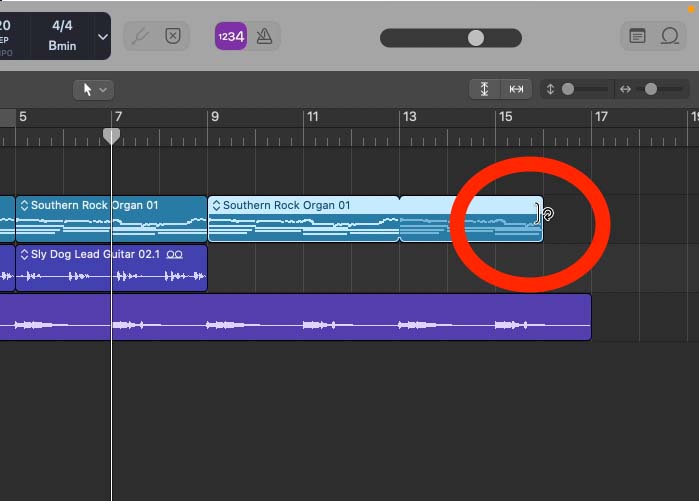
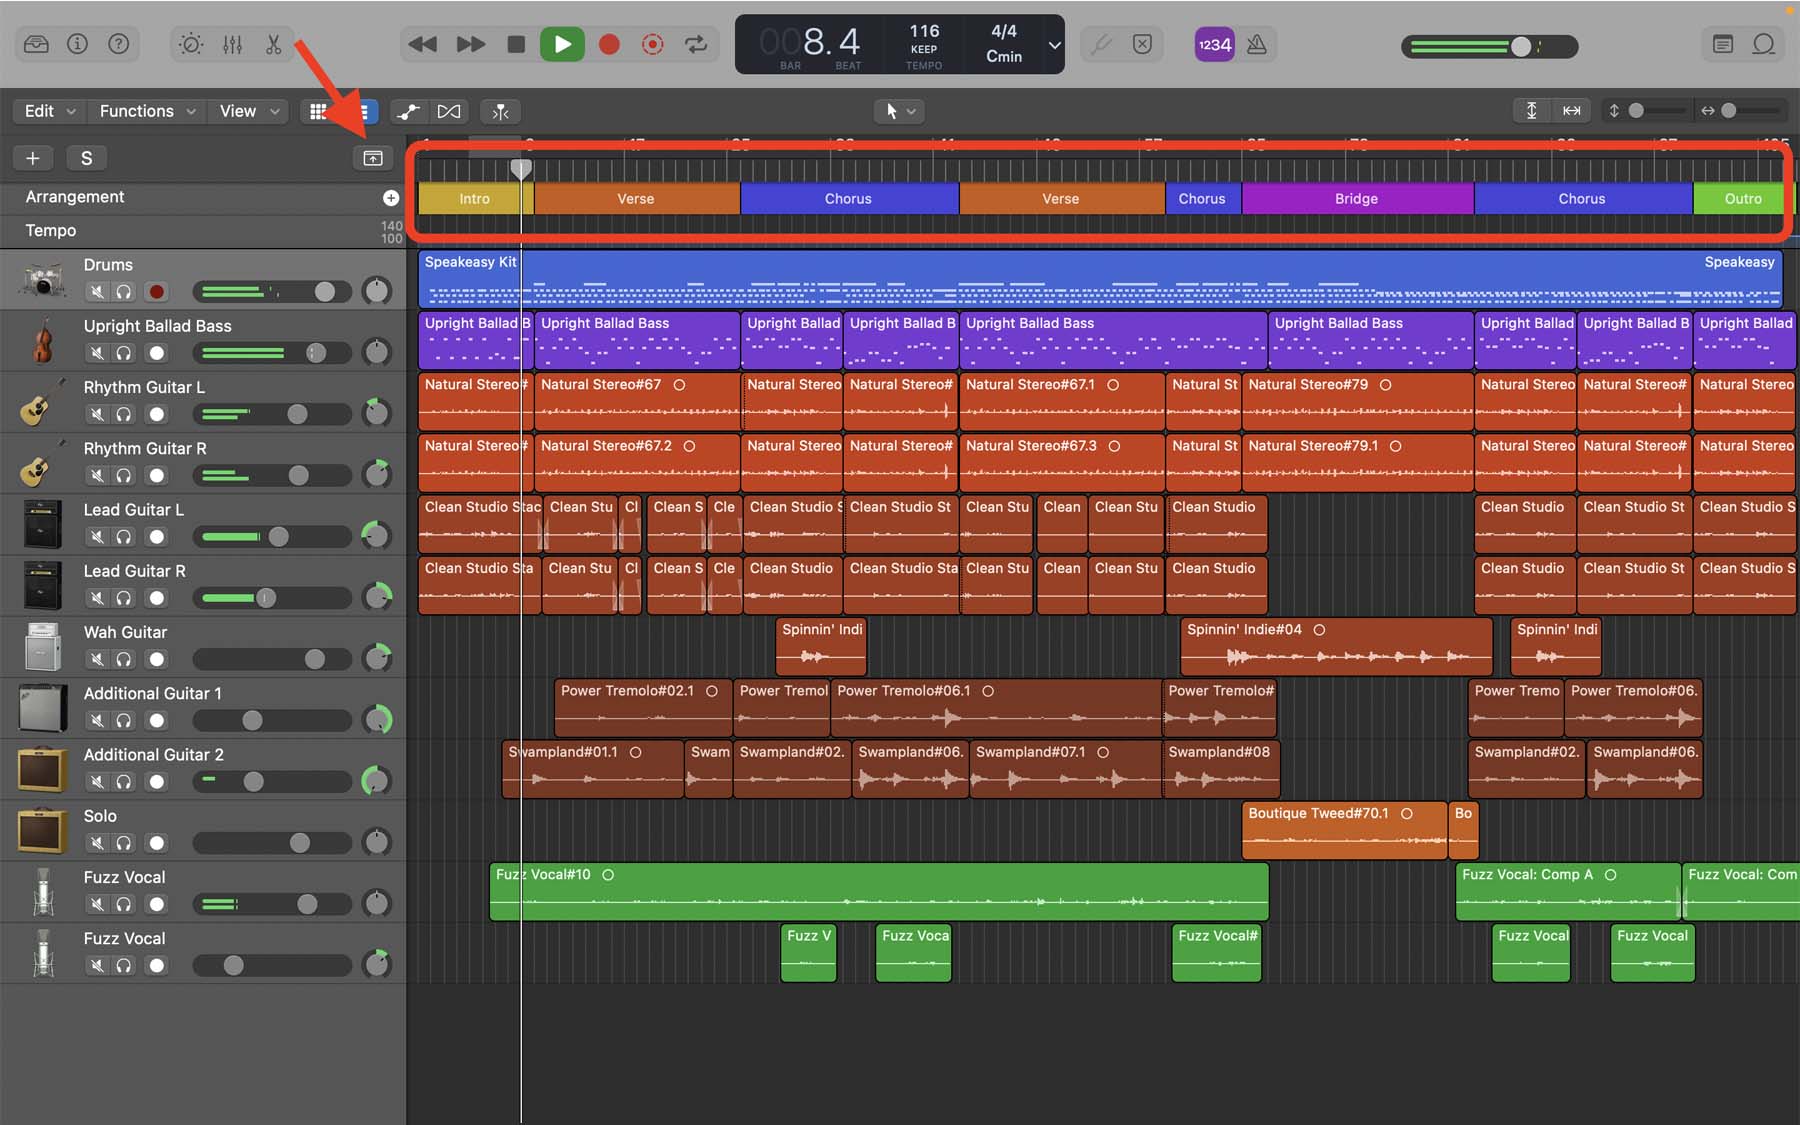
More often than not, songs consist of an intro, two or three verses, two or three choruses, a bridge/solo section, and an outro. Take a look at the screenshot below from one of my projects.
To streamline your workflow, it is critical to arrange and organize your sessions so you can navigate through them with no headache.
One of the first things you notice in the screenshot above is the arrangement sections. You can access this tool by clicking on the Global Tracks button from the top-right corner of the track header area (or pressing “G” on your keyboard). Clicking the “+” will add a new arrangement segment wherever your playhead is. You can click on their names to change them. You can also add colors to them for a better visual cue. Press “Option + C” on your keyboard to open Logic’s color pallet.
Another thing you’ll notice is that the instruments in this Logic session are organized by color. This is another visual cue that makes it significantly easier for me to locate different tracks. For example, I’ve colored all of my guitar tracks shades of red and orange, whereas my drums are blue in this project. There’s no fixed rule when it comes to coloring your tracks, it’s just a matter of preference.
Turning a blank Logic session into a full song might look difficult at first. If you need more help in songwriting, check out my YouTube video on how to write a song for beginners.
8. Exporting Your Song As MP3
Now that we’ve covered the basics of using logic to create a song, it’s time to export our project. In music production with Logic, the term “bouncing” refers to exporting a project out of the workstation as a consumable file.
-
From the top-left corner of your screen, click “File.”
-
Click “Bounce Project or Section…”
-
Alternatively, you can press “Command + B” on your keyboard.

-
From the pop-up menu, change the format to MP3.
-
For the highest quality, change the bit rate to 320 kbps.

Where To Go From Here
We’ve covered a lot in this tutorial, but there’s still a lot more to learn. There are many useful video and blog tutorials on the internet for free, although they might be a bit confusing for starters, try consuming as much as you can. Additionally, using a paid course for a more linear approach is one of the best ways to learn Logic Pro. In another post, I have covered the best online schools for music production.
I have a dense library of Logic Pro tutorials on my YouTube channel that you can watch for free. I cover everything from the basics to the more advanced tips and tricks for music production.
Finally, if you need more help regarding songwriting, producing, mixing, and mastering, I suggest getting my Free 6 Pillars To Learn Logic Pro fast guidebook.


